For Church operators and administrators using the iPhone screens in Davar App to send announcements, manage media, and open orders. Browser-based procedures now have a separate Member Web Guide.
Availability: See Version History for public releases and distribution status. Features limited to internal TestFlight are explicitly marked.
Account roles: Sign in and sign out from Settings → Account. User access includes Bible AI, Verse Card uploads, and photo/video uploads. Operator access also enables announcement sending. Administrator access also enables Verse Card and photo/video management. Password values are provided privately by the Church and are not published here.
Server-driven content: Normal menu, page, and announcement text can be updated without releasing a new app. Check your account and permissions in Settings before managing content.
1. How to send a notification
An announcement remains as a complete item in the app Inbox. A push notification is the short alert shown on devices whose users chose to receive it. Users choose administrator announcements separately from the once-daily site-update digest in Settings.
Tap an Inbox announcement to open its complete details and delivery information. Tap an email address within the text to compose mail with the recipient and message filled in. Link actions appear only when that announcement has a URL. These actions differ from Announcements on the Home screen.
From iPhone or iPad
Open Settings → Account and sign in with an Operator or Administrator account.
Open Settings → Notifications → Send an Announcement.
Enter the original title and message in the app's current language. Add an HTTPS link only when needed.
Tap Review and Send. Check dates, times, links, audience, and spelling.
Confirm once. The Inbox item is published, and users who enabled administrator announcements and match the selected audience receive the Push notification.
Open the Inbox as a normal user and confirm the complete text and action. Sign out from Settings when finished.
Announcement branch selection and list highlighting are features of internal TestFlight iOS 1.20 (build 241).They are not yet included in the public App Store version.
Choose an announcement audience
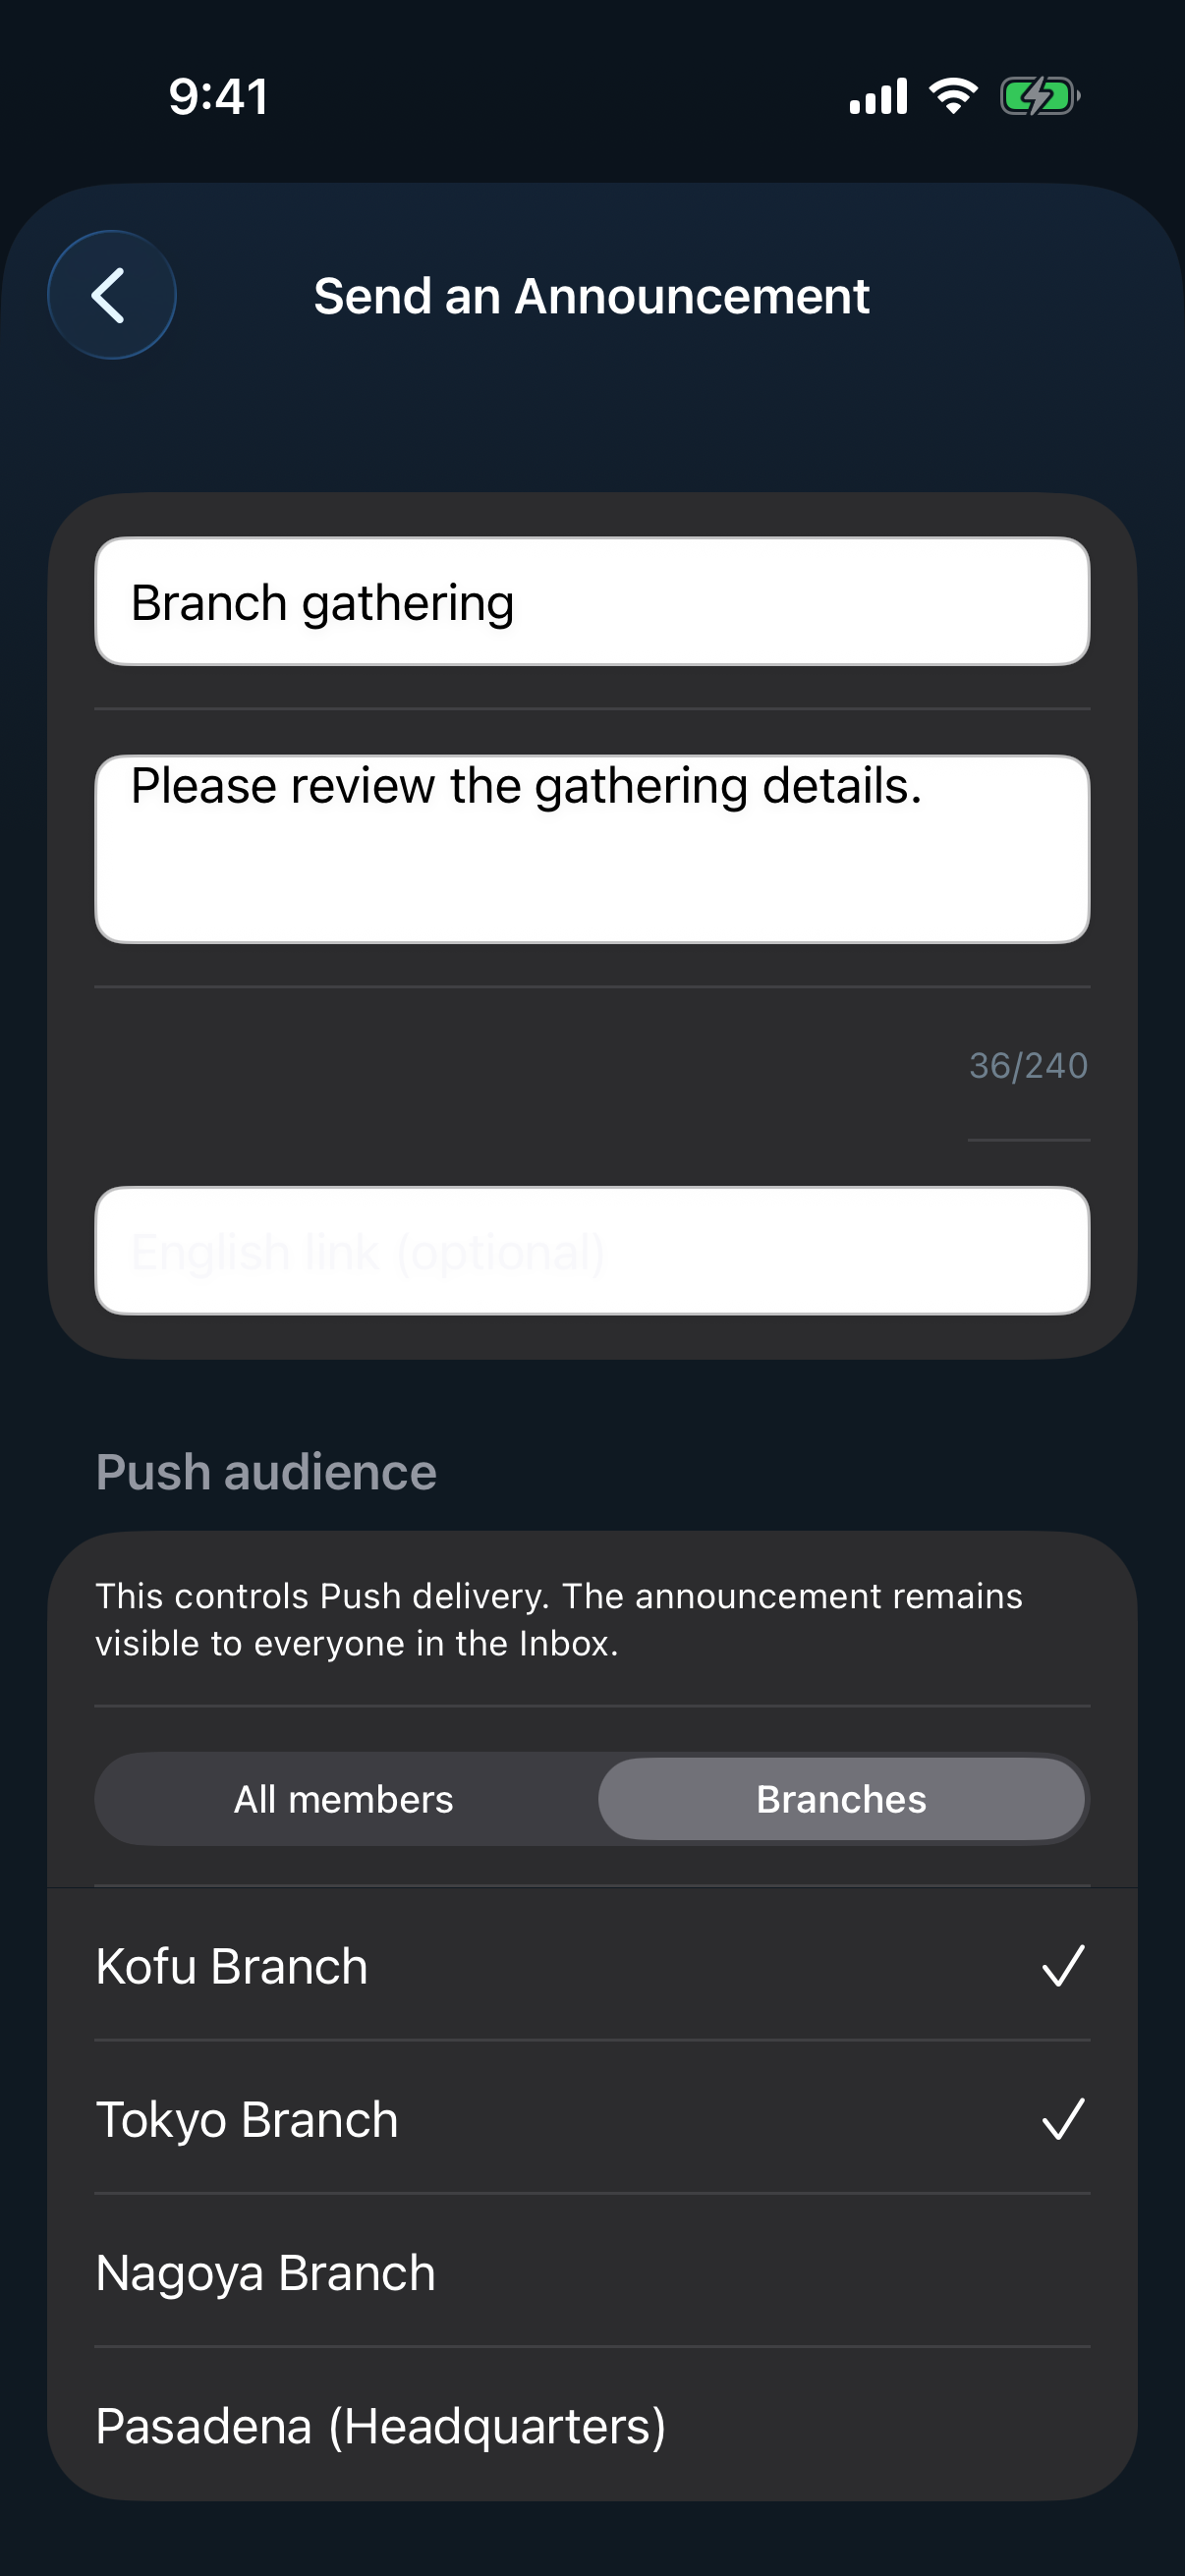
For each announcement, choose All members or Branches. In branch mode, select at least one branch, including Pasadena (Headquarters) when appropriate. Orders, My branches, and announcements share the catalog synchronized with the Verse Card Gallery. Headquarters is a fixed branch absent from the Blogger gallery and is never removed by synchronization.
Enter the title and message, then select the audience. Each new announcement starts with All members.
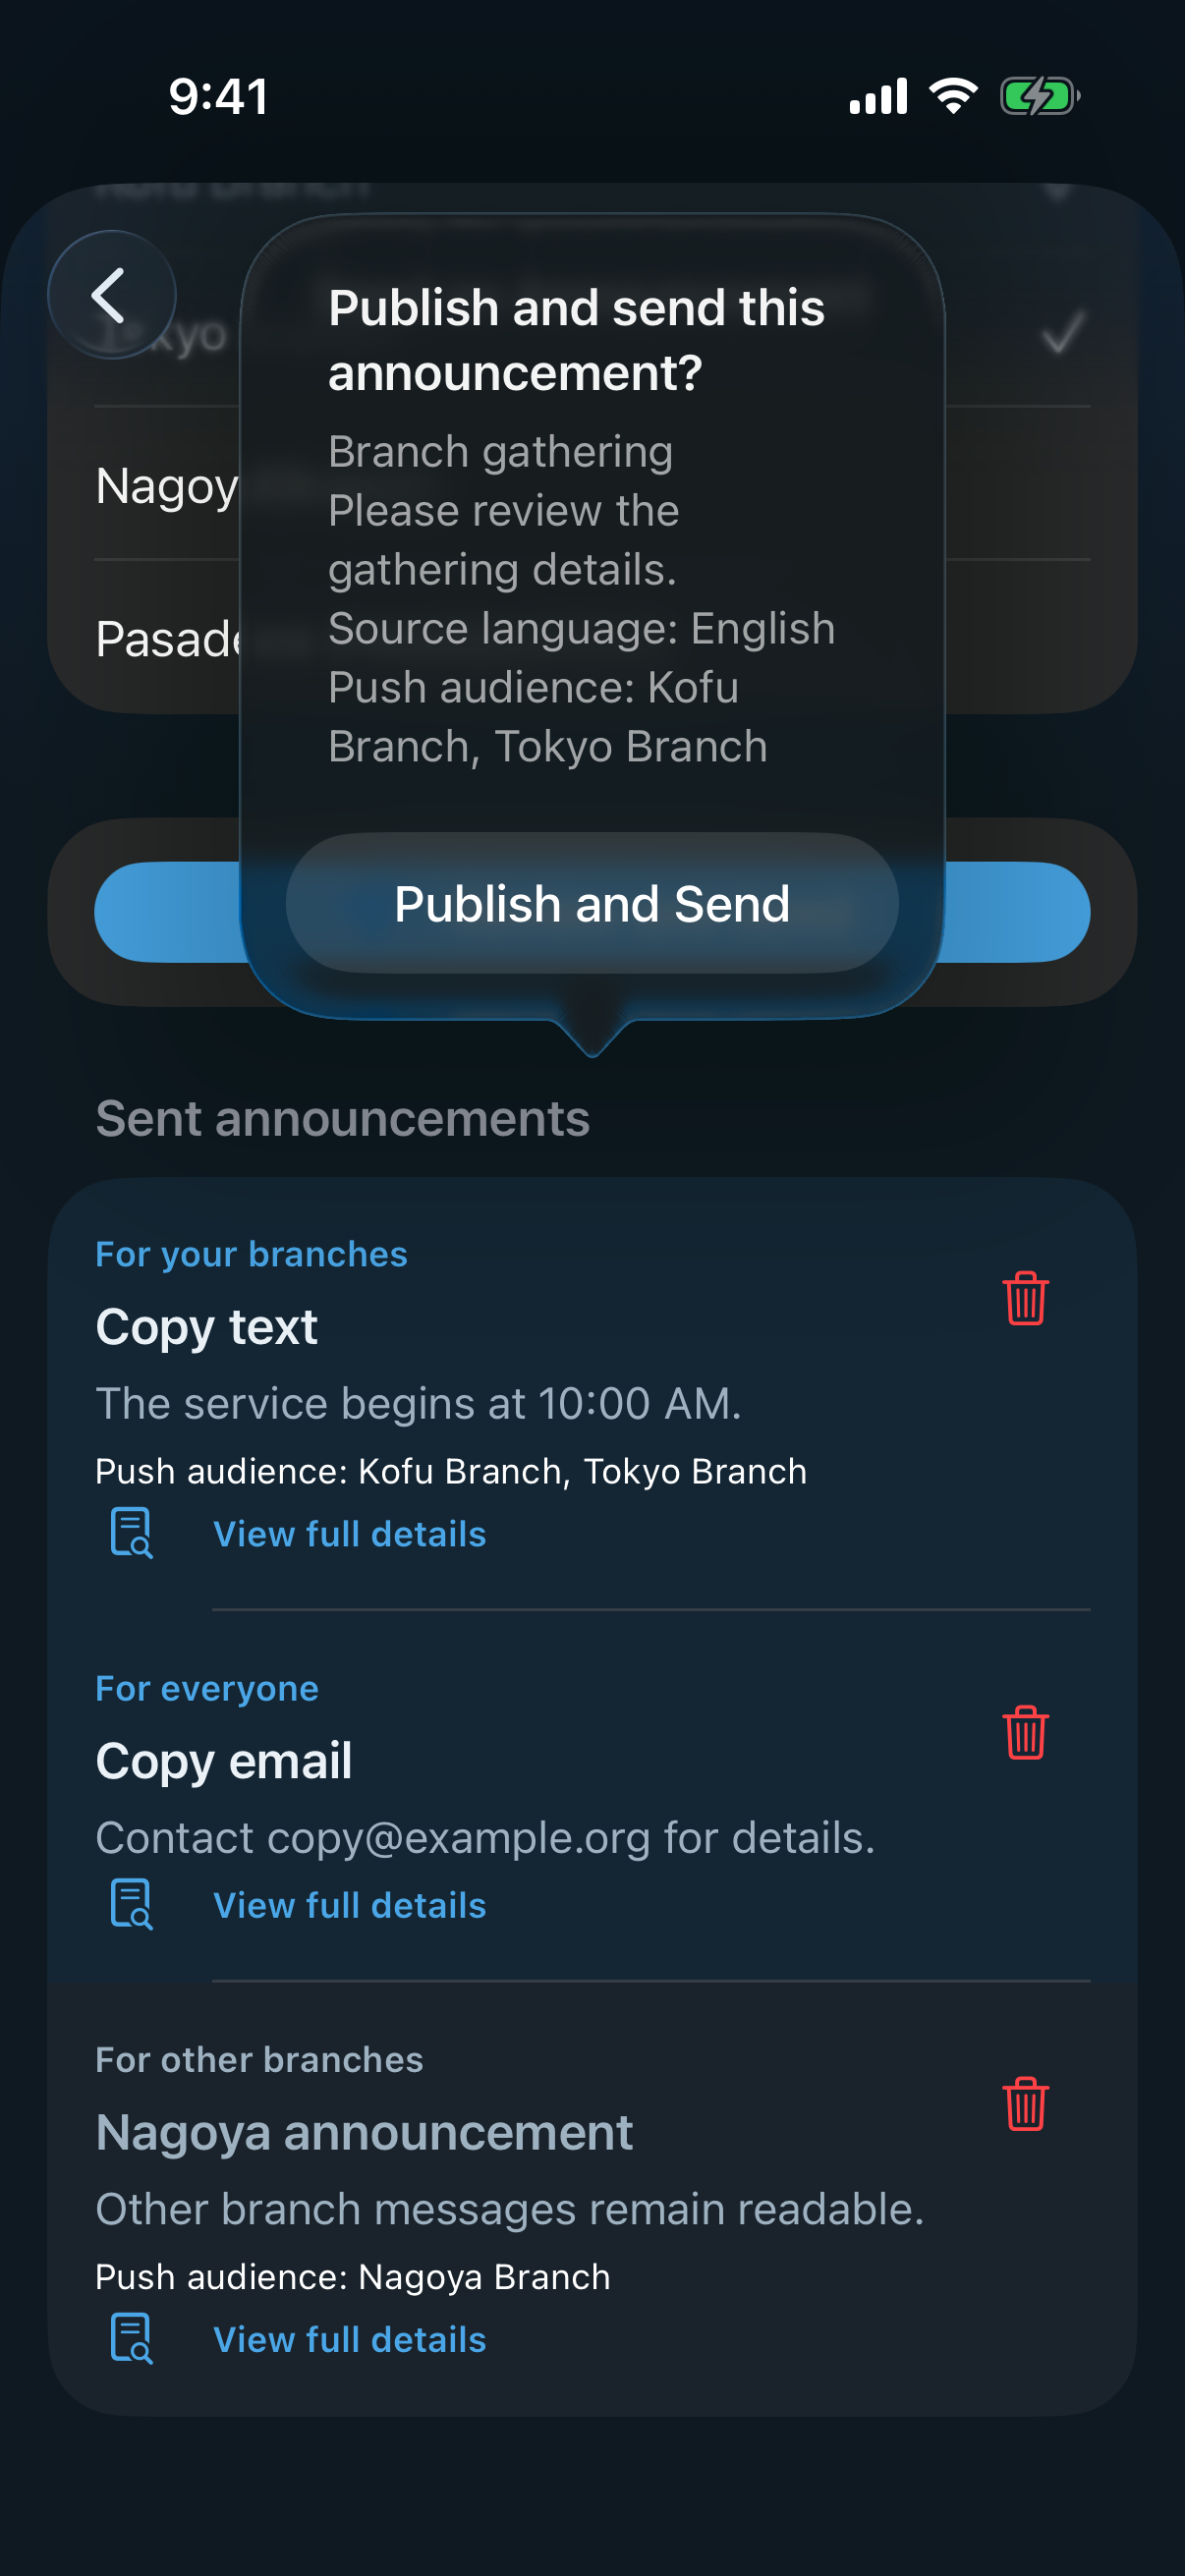
Tap Review and Send, read the message and branch names, and confirm. Branch sending is unavailable when the selection is empty or unavailable, or server support cannot be verified.
If the connection is interrupted, retry the same confirmed content. Check Sent announcements first as well.
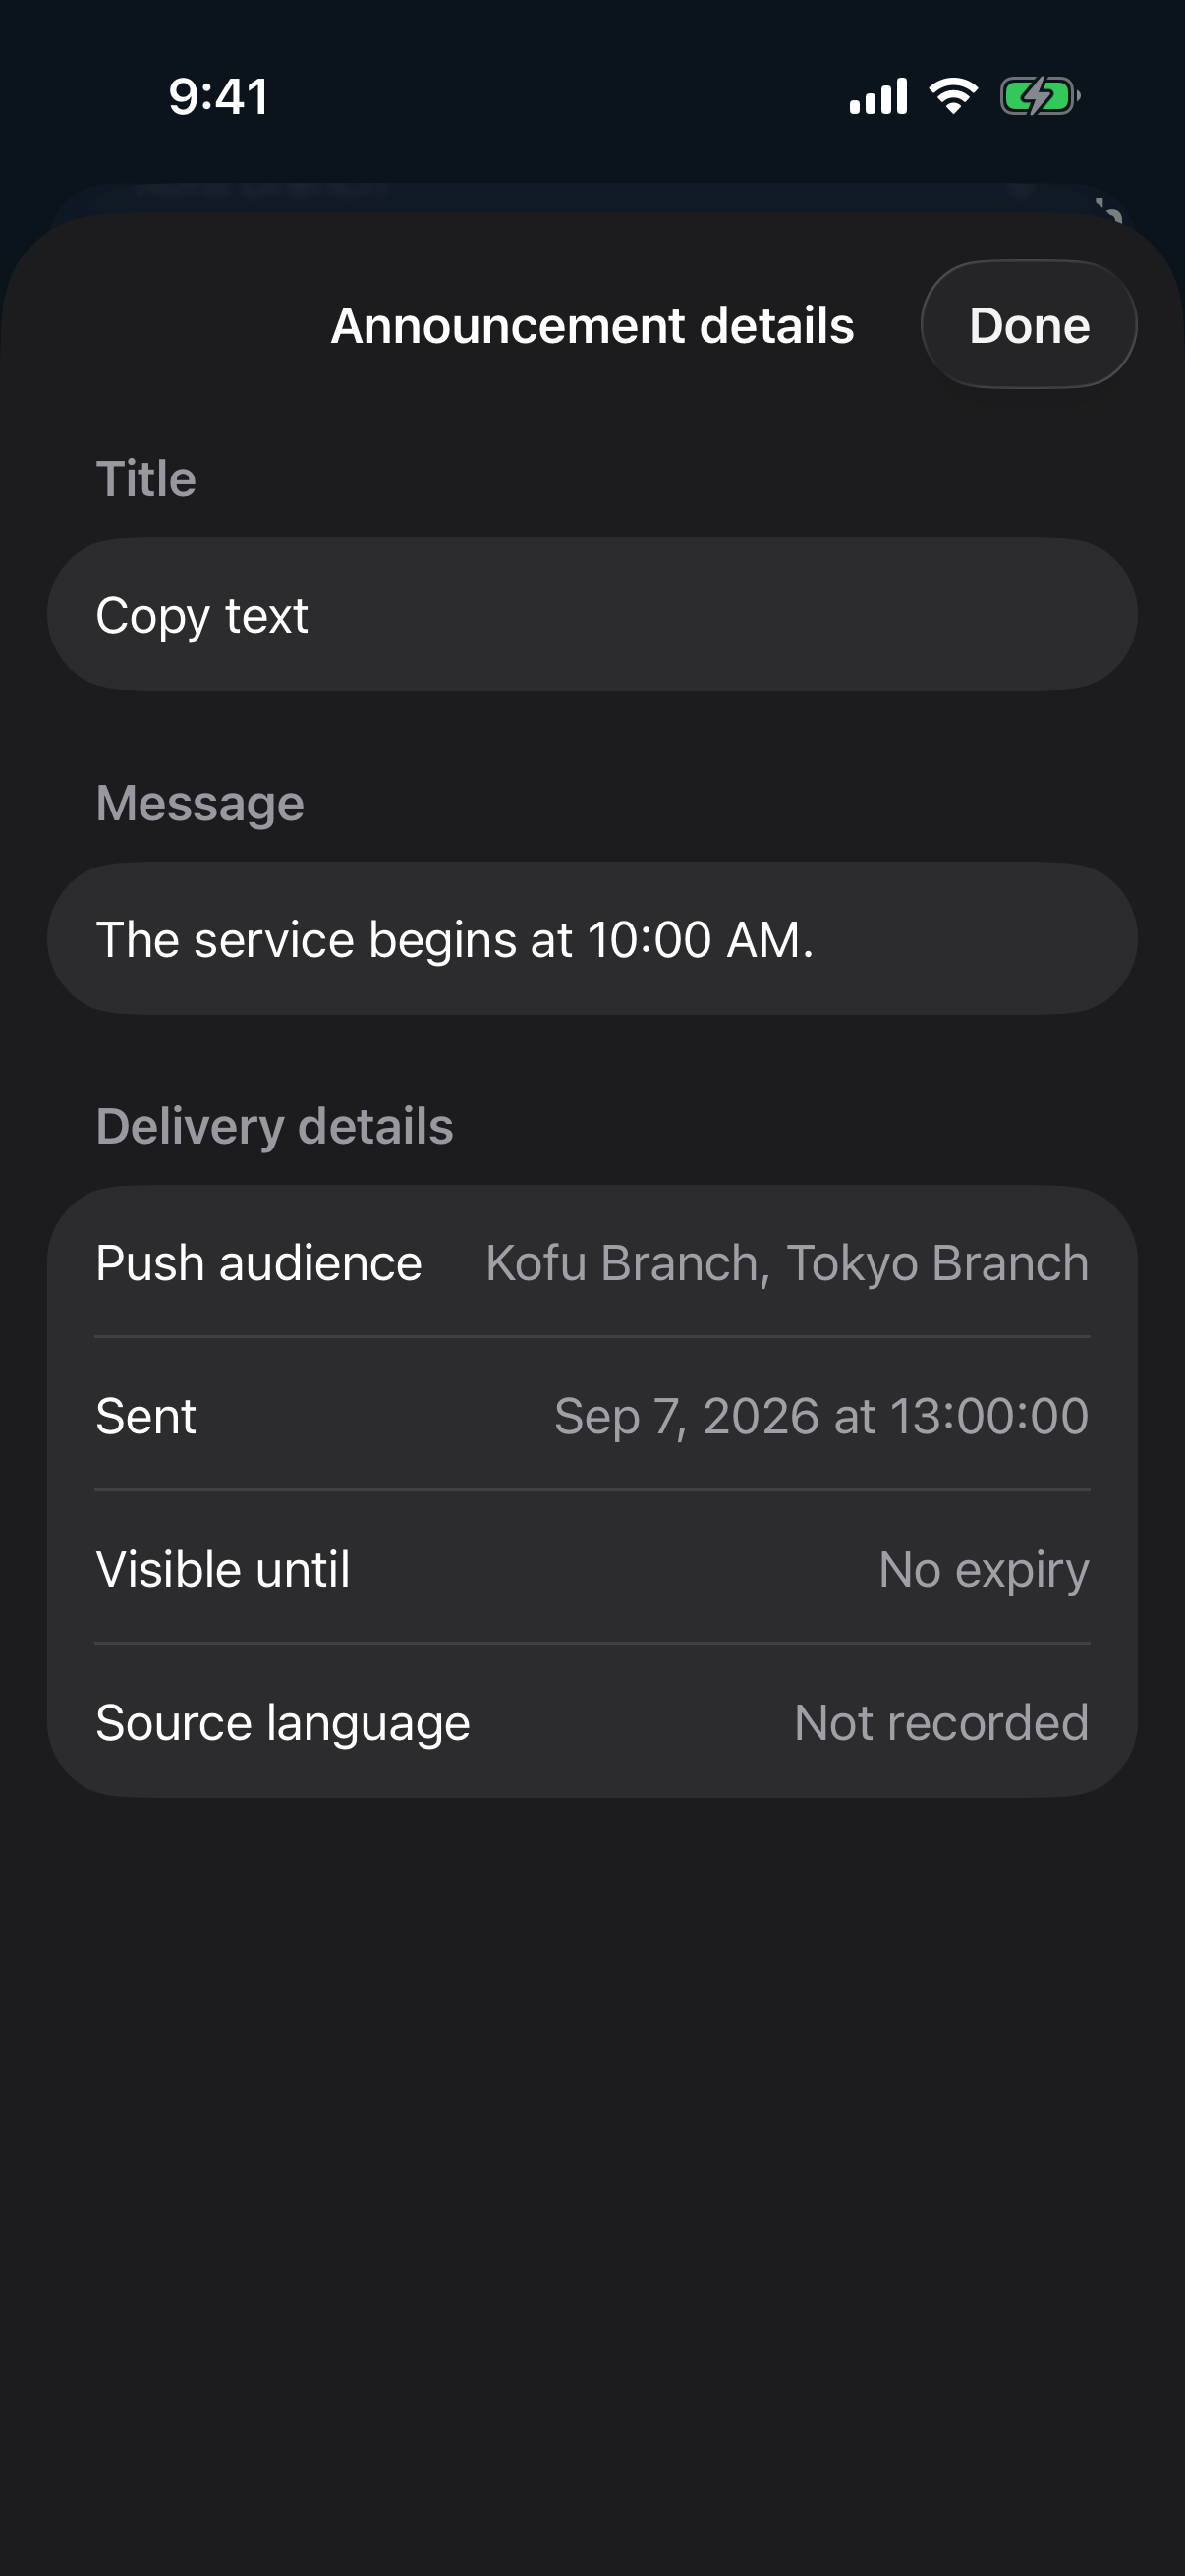
Branch-scoped announcements show the branch names in the list and sent details. Order lists also show the branches configured for each order.
Branch selection controls Push recipients. Inbox content remains common to everyone. To receive these notifications, save and synchronize the relevant affiliation in Settings → Notifications → My branches, and enable Administrator announcements. An order list shows its configured default audience; an announcement shows its recorded audience. They may differ after an individual order-delivery override.
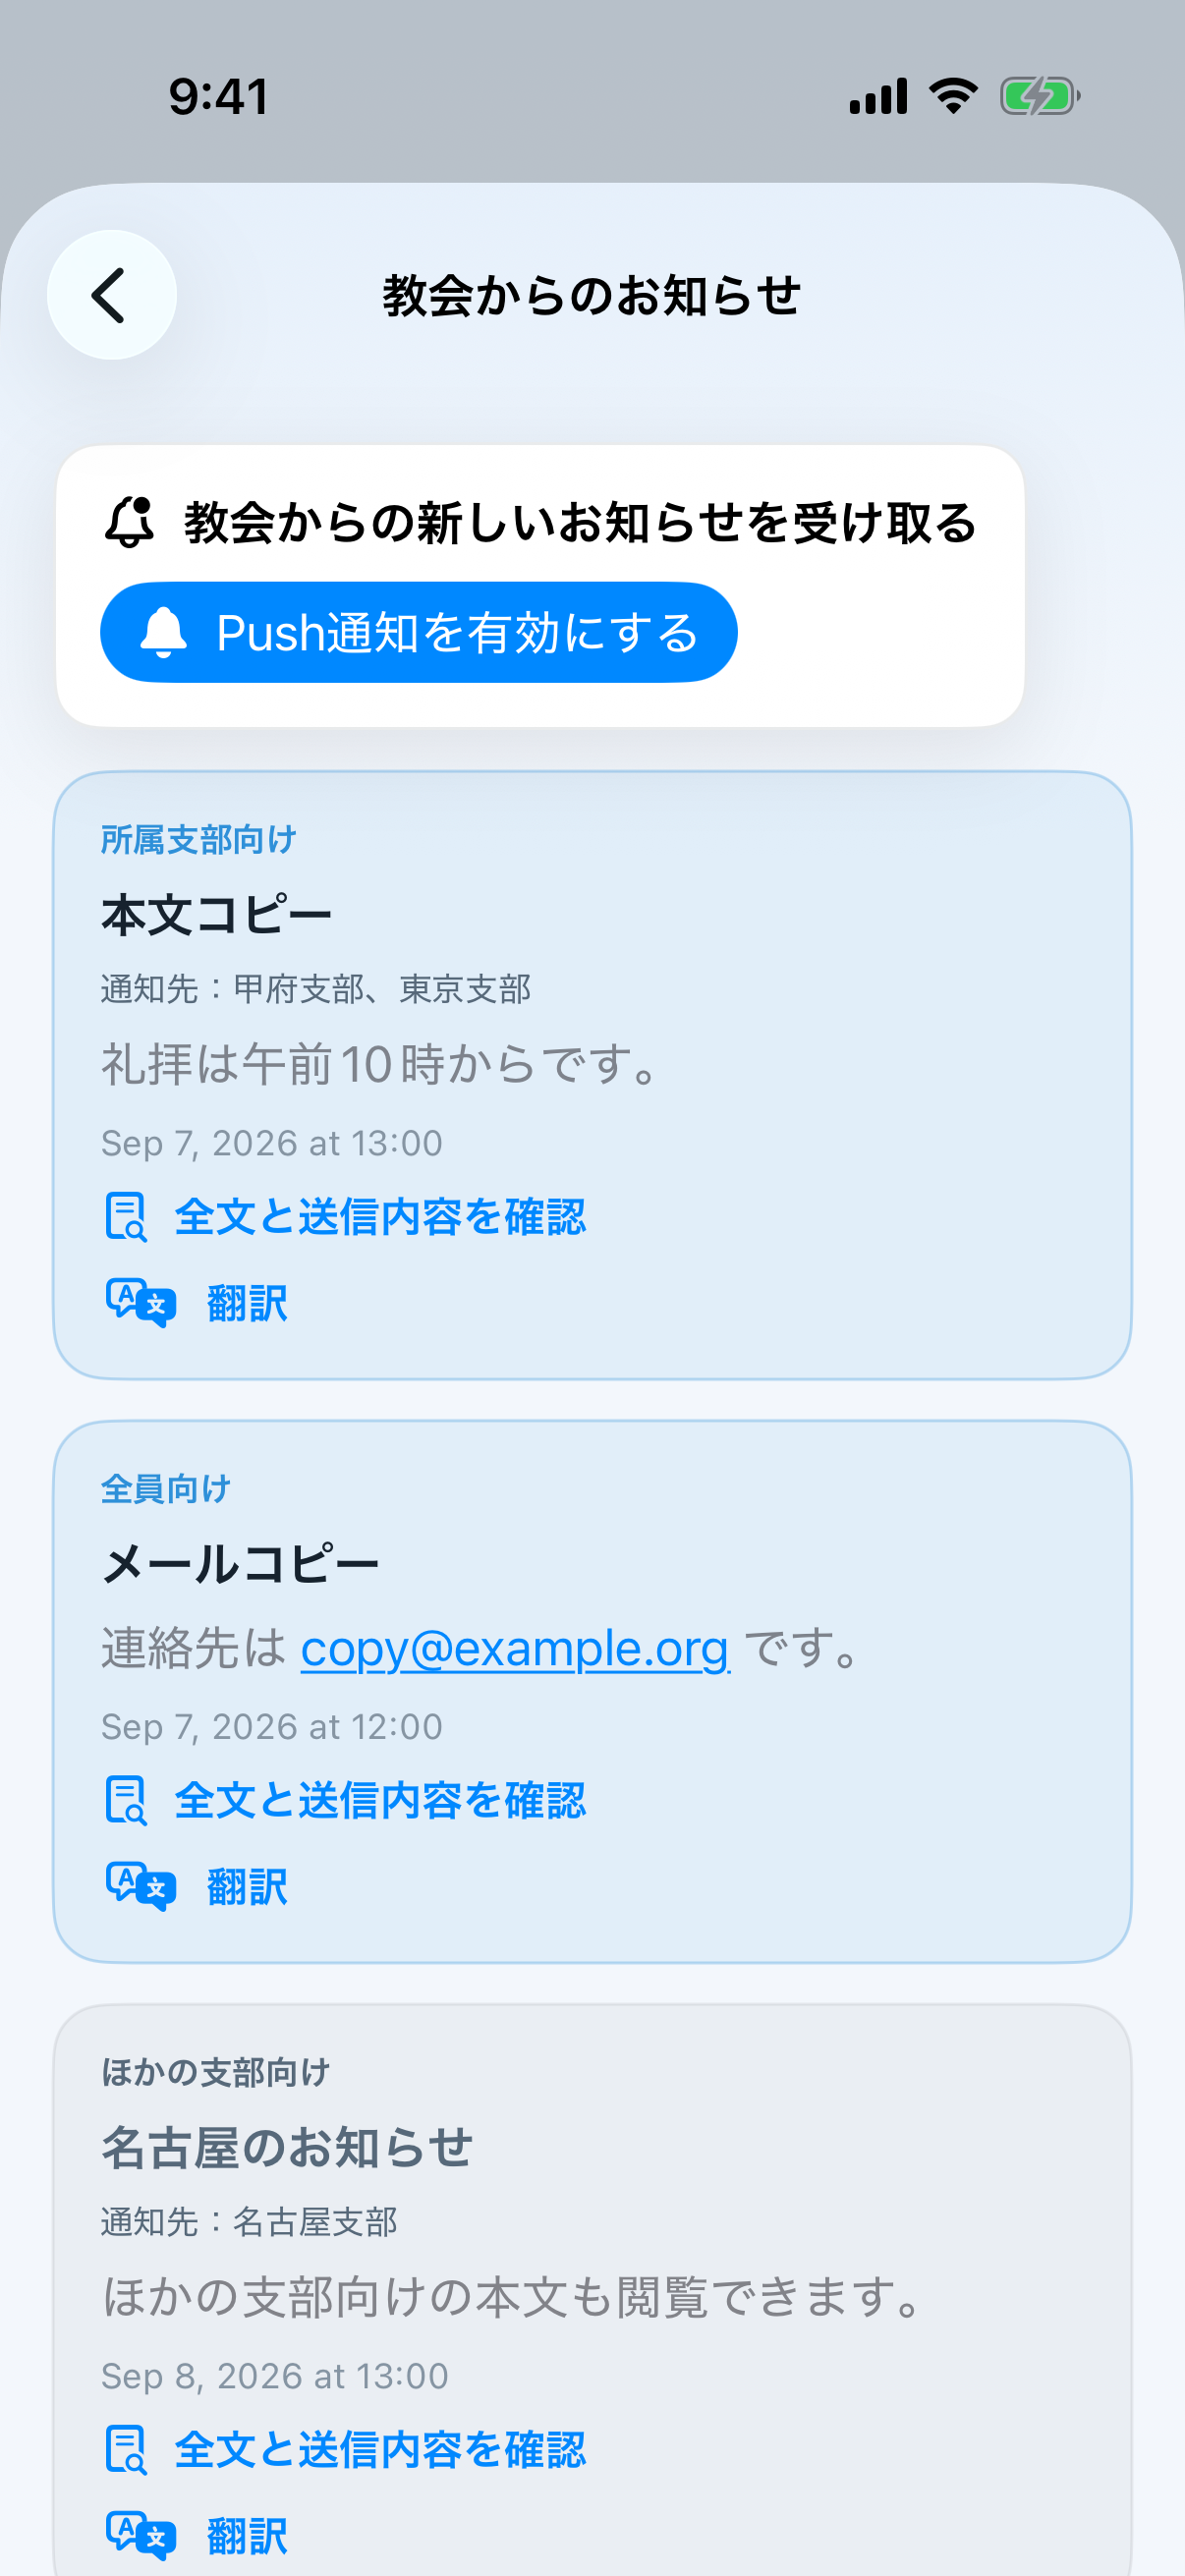
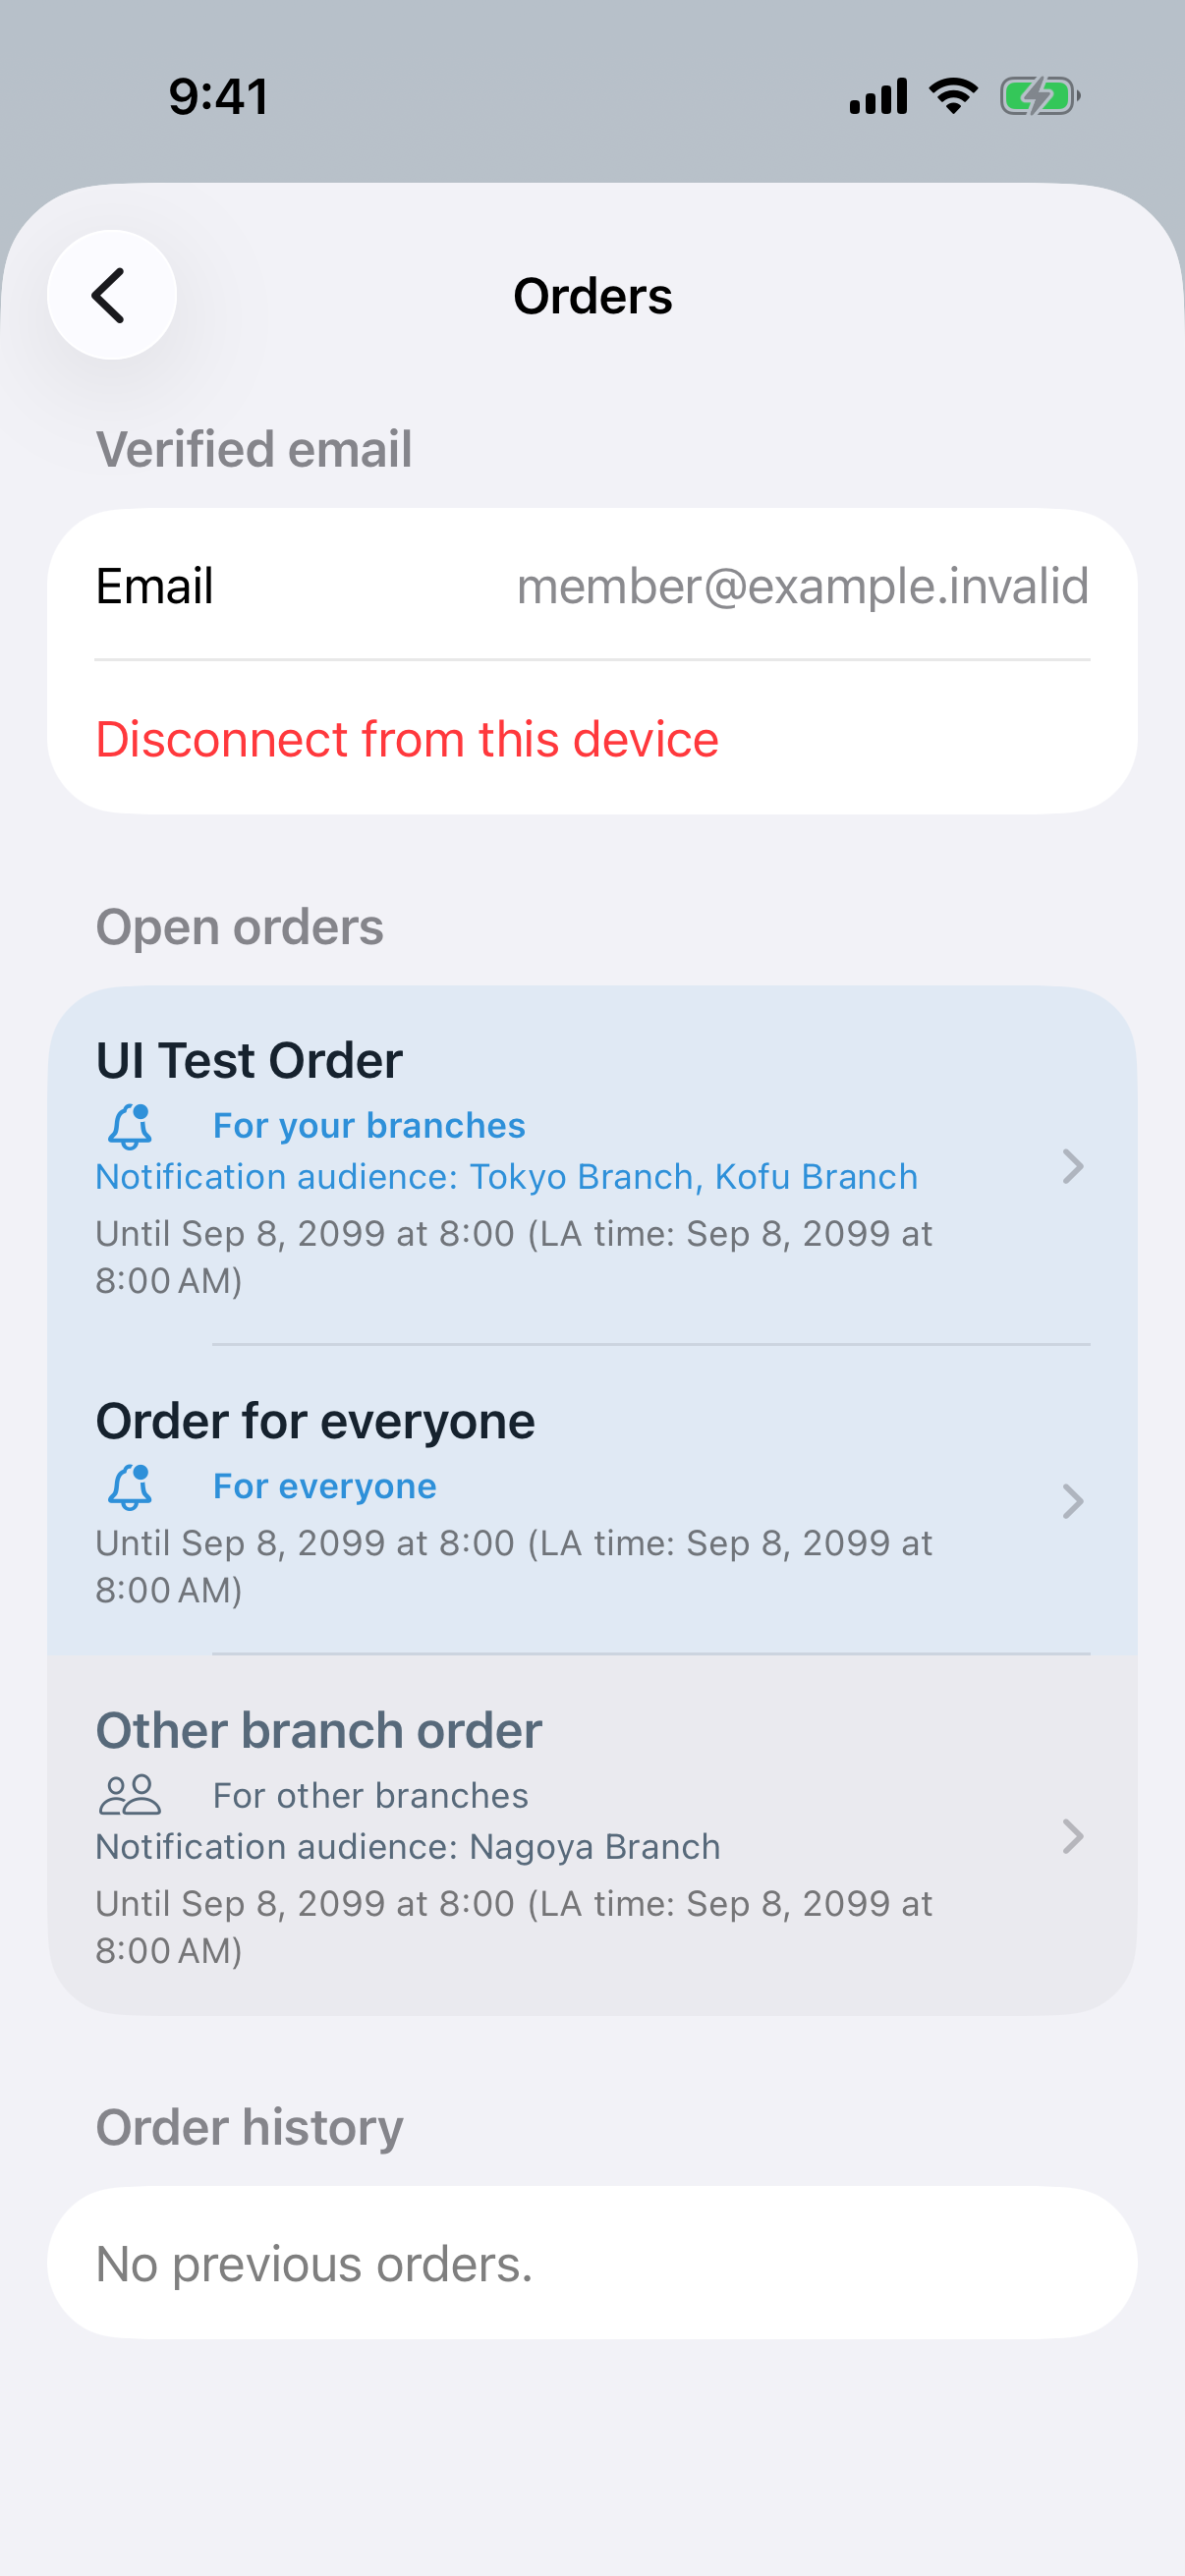
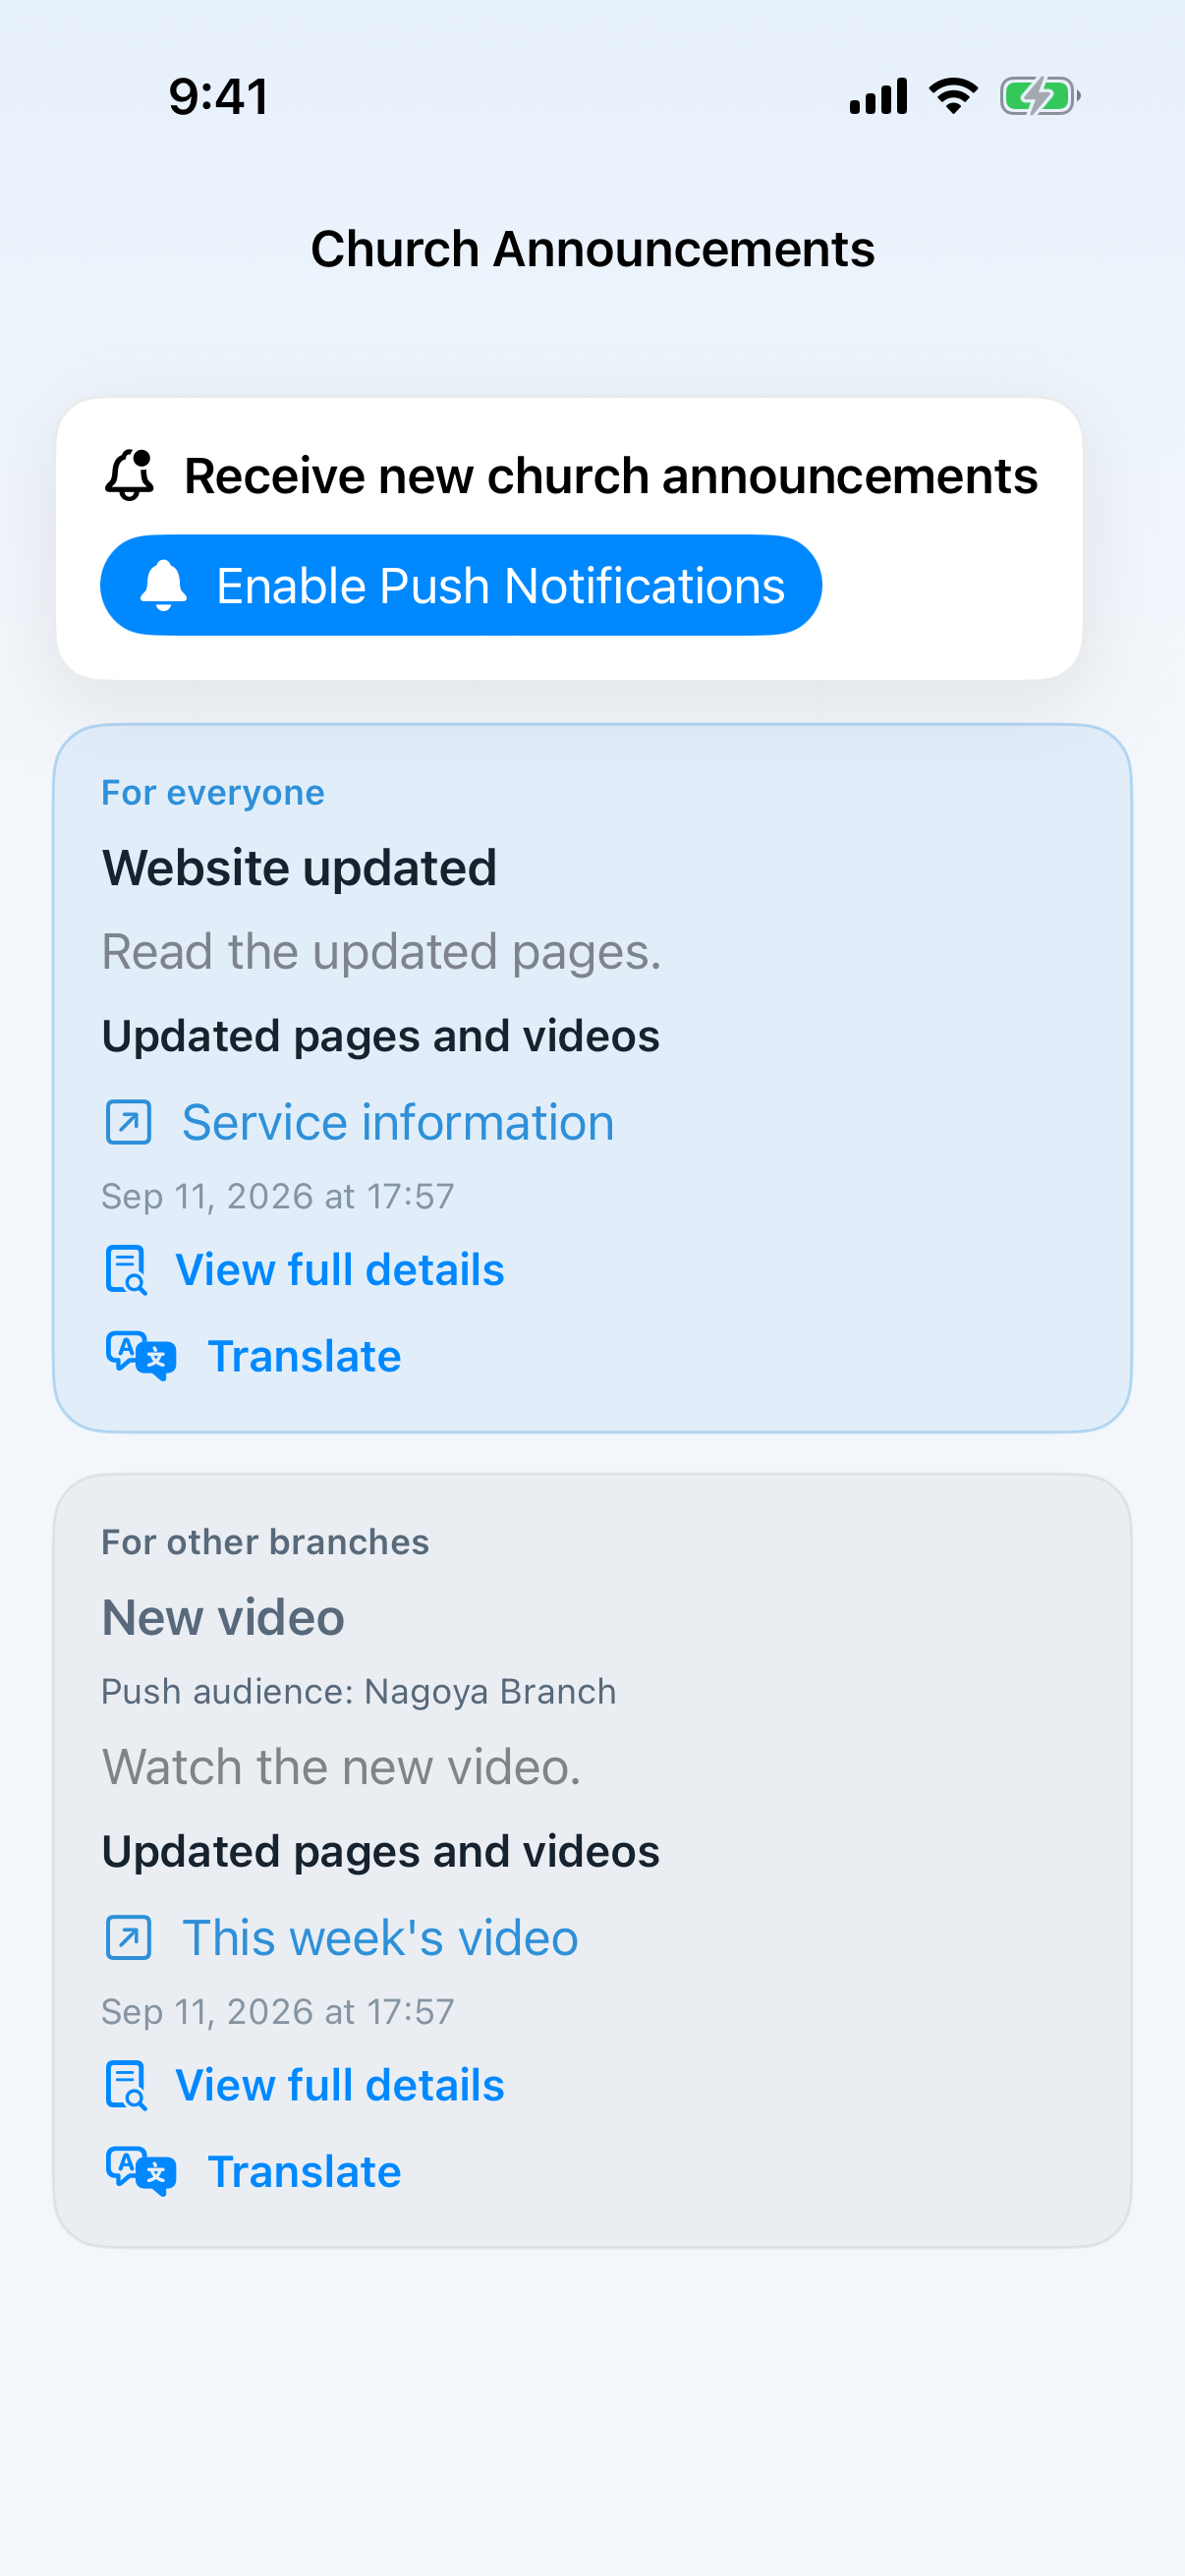
Lists highlight For everyone and entries matching any saved affiliation, placing them first. Entries for other branches appear in gray below and remain readable and openable. Original order is preserved within each group. Without saved affiliations, only all-member entries are highlighted. Display uses affiliations saved on this device; actual Push delivery uses the affiliations synchronized to the server.
These are internal TestFlight build 241 examples with sample content. No real notification was sent while capturing them.
Choose branches
Switch the audience to Branches and select at least one destination. This example selects Kofu and Tokyo. Pasadena (Headquarters) is fixed and remains available regardless of Blogger synchronization.
Review the message and branch names
The final confirmation shows the message and exact audience. Read every branch name before tapping Publish and Send.
Check the recorded audience
Open a sent announcement to inspect its saved branch audience.
Your branches and everyone appear first
Matching and all-member announcements are highlighted above other branches. This Japanese-screen example uses the affiliations saved in Settings.
Do not include private information. Never send names, room assignments, prayer requests, counseling details, giving information, passwords, or anything meant for only one person.
Publishing from a browser: Creating App Announcements, setting expiration, publishing, and the separately confirmed Push send are covered in the Member Web Guide.
2. Photo and video management
Find and select media
Open Settings → Account and sign in with an administrator account.
Open Church Photos & Videos → Manage. Filter by photo/video, event tag, or capture-date range when needed.
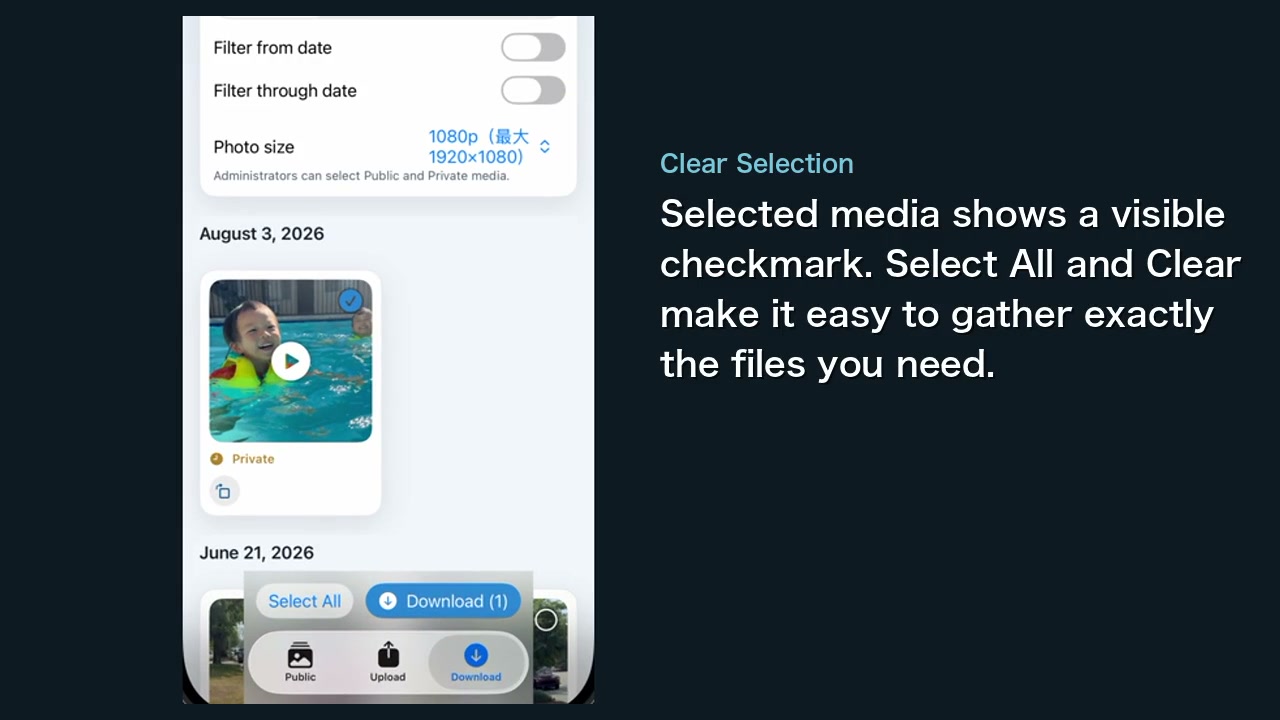
Tap a thumbnail to select it. A checkmark appears. Use Select All only after checking the active filter.
The pictured screen is an actual app screen. Labels may move slightly in newer releases, but the selection flow is the same.
Publish or make Private
Select the items, choose the visibility action, read the count, and confirm. In Version 1.17, User, Operator, and Administrator account credentials can open the full contribution album and upload. Only Administrator credentials enable bulk download and visibility management. A contributor can see their own legacy Private items only while the same contribution session remains valid.
Rotate
Open an item and rotate it in 90-degree steps. Saved rotation is used for display, thumbnails, and converted downloads.
Event tags
Use 2026JBS or 2026SBS only for the correct event. The general Church gallery is not an event tag. Review the count before a bulk tag change.
Delete
Deletion is destructive. Check the thumbnail, capture date, visibility, and event tag first. If unsure, make it Private and ask another administrator to review it.
Current upload and notification behavior: Current supported clients explicitly request immediate publication. Older or unknown clients remain pending/Private. New photos and videos join Home/site changes, the weekly bulletin, and Verse Cards in at most one site-update notification each day at 8:00 AM Los Angeles time. Administrator announcements remain a separate notification choice.
After uploading: An upload batch sends every queued item before presenting the result, retries eligible failures, and reports only items that still failed. Video controls hide after two seconds without interaction. After an administrator deletes the open item, the viewer advances to the next newer item, or to the next older item when no newer item exists.
3. Open and manage an order
Branch notifications are available in the App Store release of iOS 1.20 and later. Check Version History for availability.
Your own branch affiliation and the audience an administrator chooses for an order are separate settings. Start with My branches, or continue to creating an order setup.
Setting
What it controls
Default audience for new orders
The initial choice for brand-new orders on this device. It does not change existing orders or other devices.
Each order's default notification audience
The choice saved with that order. You can change it while creating the order; each delivery initially selects it.
Audience for this delivery
The audience for one Push reservation. Changing it does not update the order's default or your default for future new orders.
Set your own branches (members and administrators)
The branch choices in My branches and order notification audiences synchronize with the branch information in the Verse Card Gallery (branch labels ending in「支部」). Pasadena (Headquarters) stays first; all other branches appear by descending number of Blogger posts carrying that branch label, with equal counts ordered by branch name. A duplicate branch label on one post counts once. Pasadena is a fixed exception that is not listed in the Blogger gallery and synchronization never removes it. It is available in both My branches and order notification audiences. Updating those gallery labels can update the list without redistributing the compatible app. Synchronization runs when you open the gallery or its upload screen. It starts with the initial list and then keeps the last successfully accepted list. If your branch is missing, open the gallery and return here. Label changes may take a few minutes to appear. A failed request or a change affecting 80% or more of the list leaves the previous list in place.
“My branches” records the branches you belong to. It is separate from notification interests or an administrative role. Select all of your affiliations if you belong to more than one branch.
Select at least one branch and save
Open the three-line menu → Settings, then scroll down to Notifications.
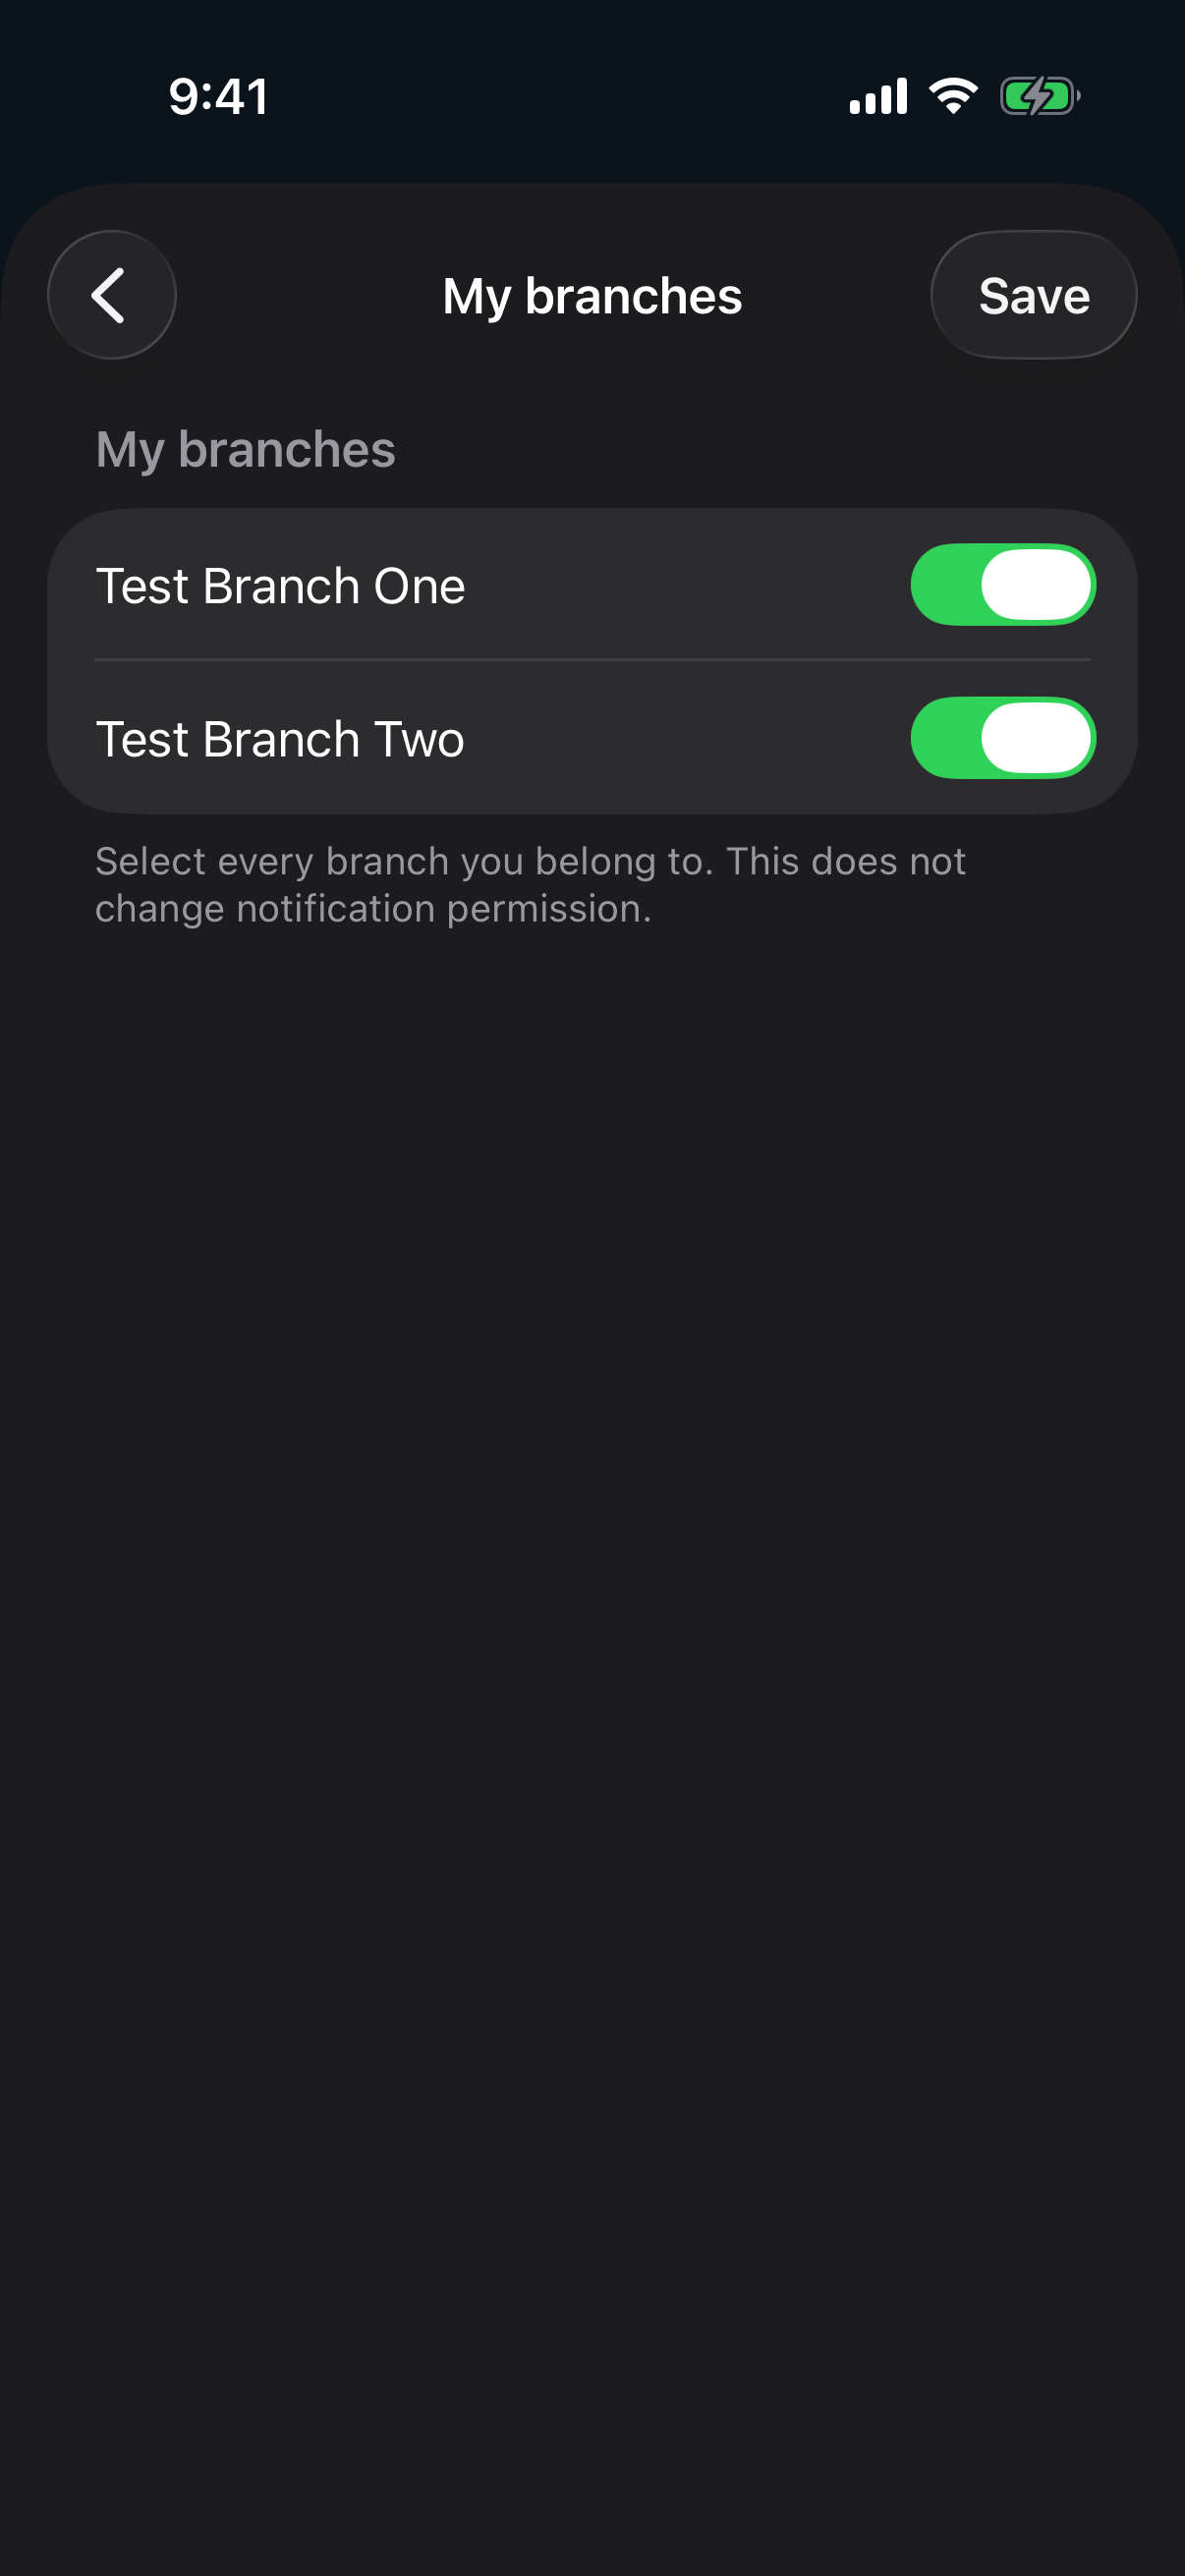
Open My branches and turn on each branch you belong to. At least one is required; multiple selections are supported.
Review the full list and tap Save at the upper right. To save, select at least one available branch and deselect any unavailable branches.
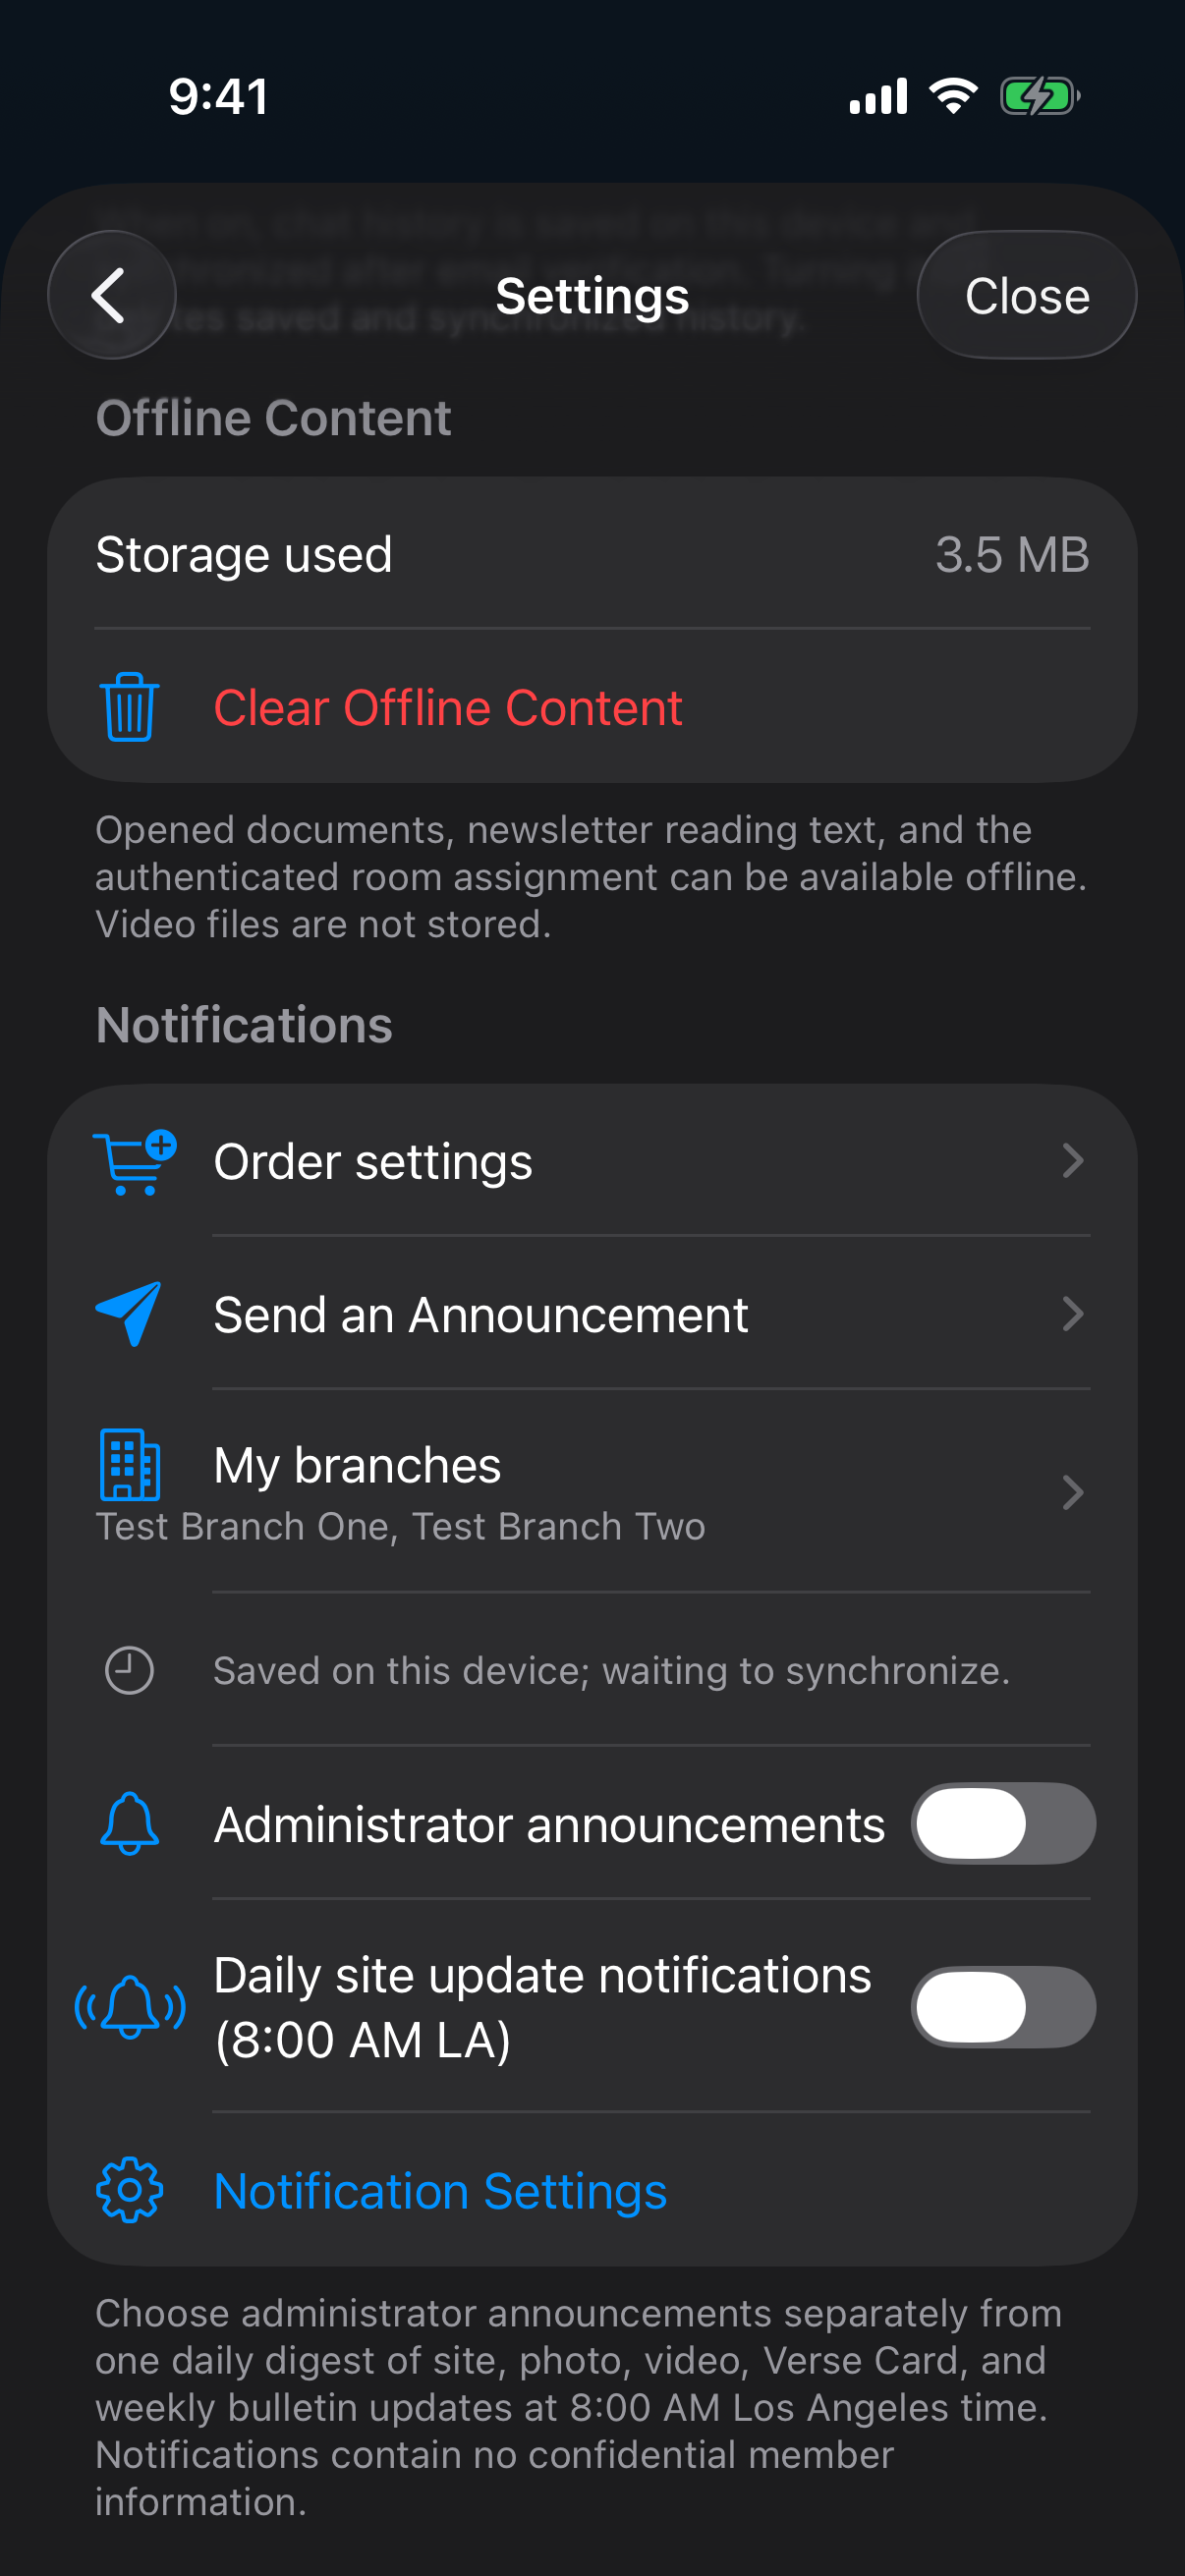
Return to Notifications and check both the selected names and synchronization status.
Internal TestFlight iOS 1.20 (build 240), shown in English with Dark appearance and large text. Tap an image to enlarge it.
Check whether your selection has synchronized
Branch choice synchronized: the server has saved your selection.
Saved on this device; waiting to synchronize.: the choice remains on this iPhone but has not yet changed notification delivery. Wait for device registration or connectivity.
If synchronization fails, check the connection and tap Retry branch sync. The last server-confirmed selection remains effective until synchronization succeeds.
If the branch list cannot load, tap Retry. A temporarily missing entry does not cause a saved affiliation to be replaced. Retired branches remain saved and are marked unavailable. To change your affiliation, deselect them, choose an available branch, and save.
English example from internal TestFlight iOS 1.20 (build 240). Saving on the phone and confirming synchronization are separate states.
To receive notifications: enable iPhone notification permission and Administrator announcements in the app. Use Notification Settings to check system permission and Retry Push Registration when registration is needed. Selecting branches does not change notification permission. Before affiliation setup, all-member notices follow your existing notification settings, but branch notices are not delivered. The daily site digest is unaffected.
A branch Push is delivered when at least one of your synchronized affiliations at delivery time matches the order's selected audience. See also My branches in the Settings manual.
Administrator: Open Order settings and create a setup
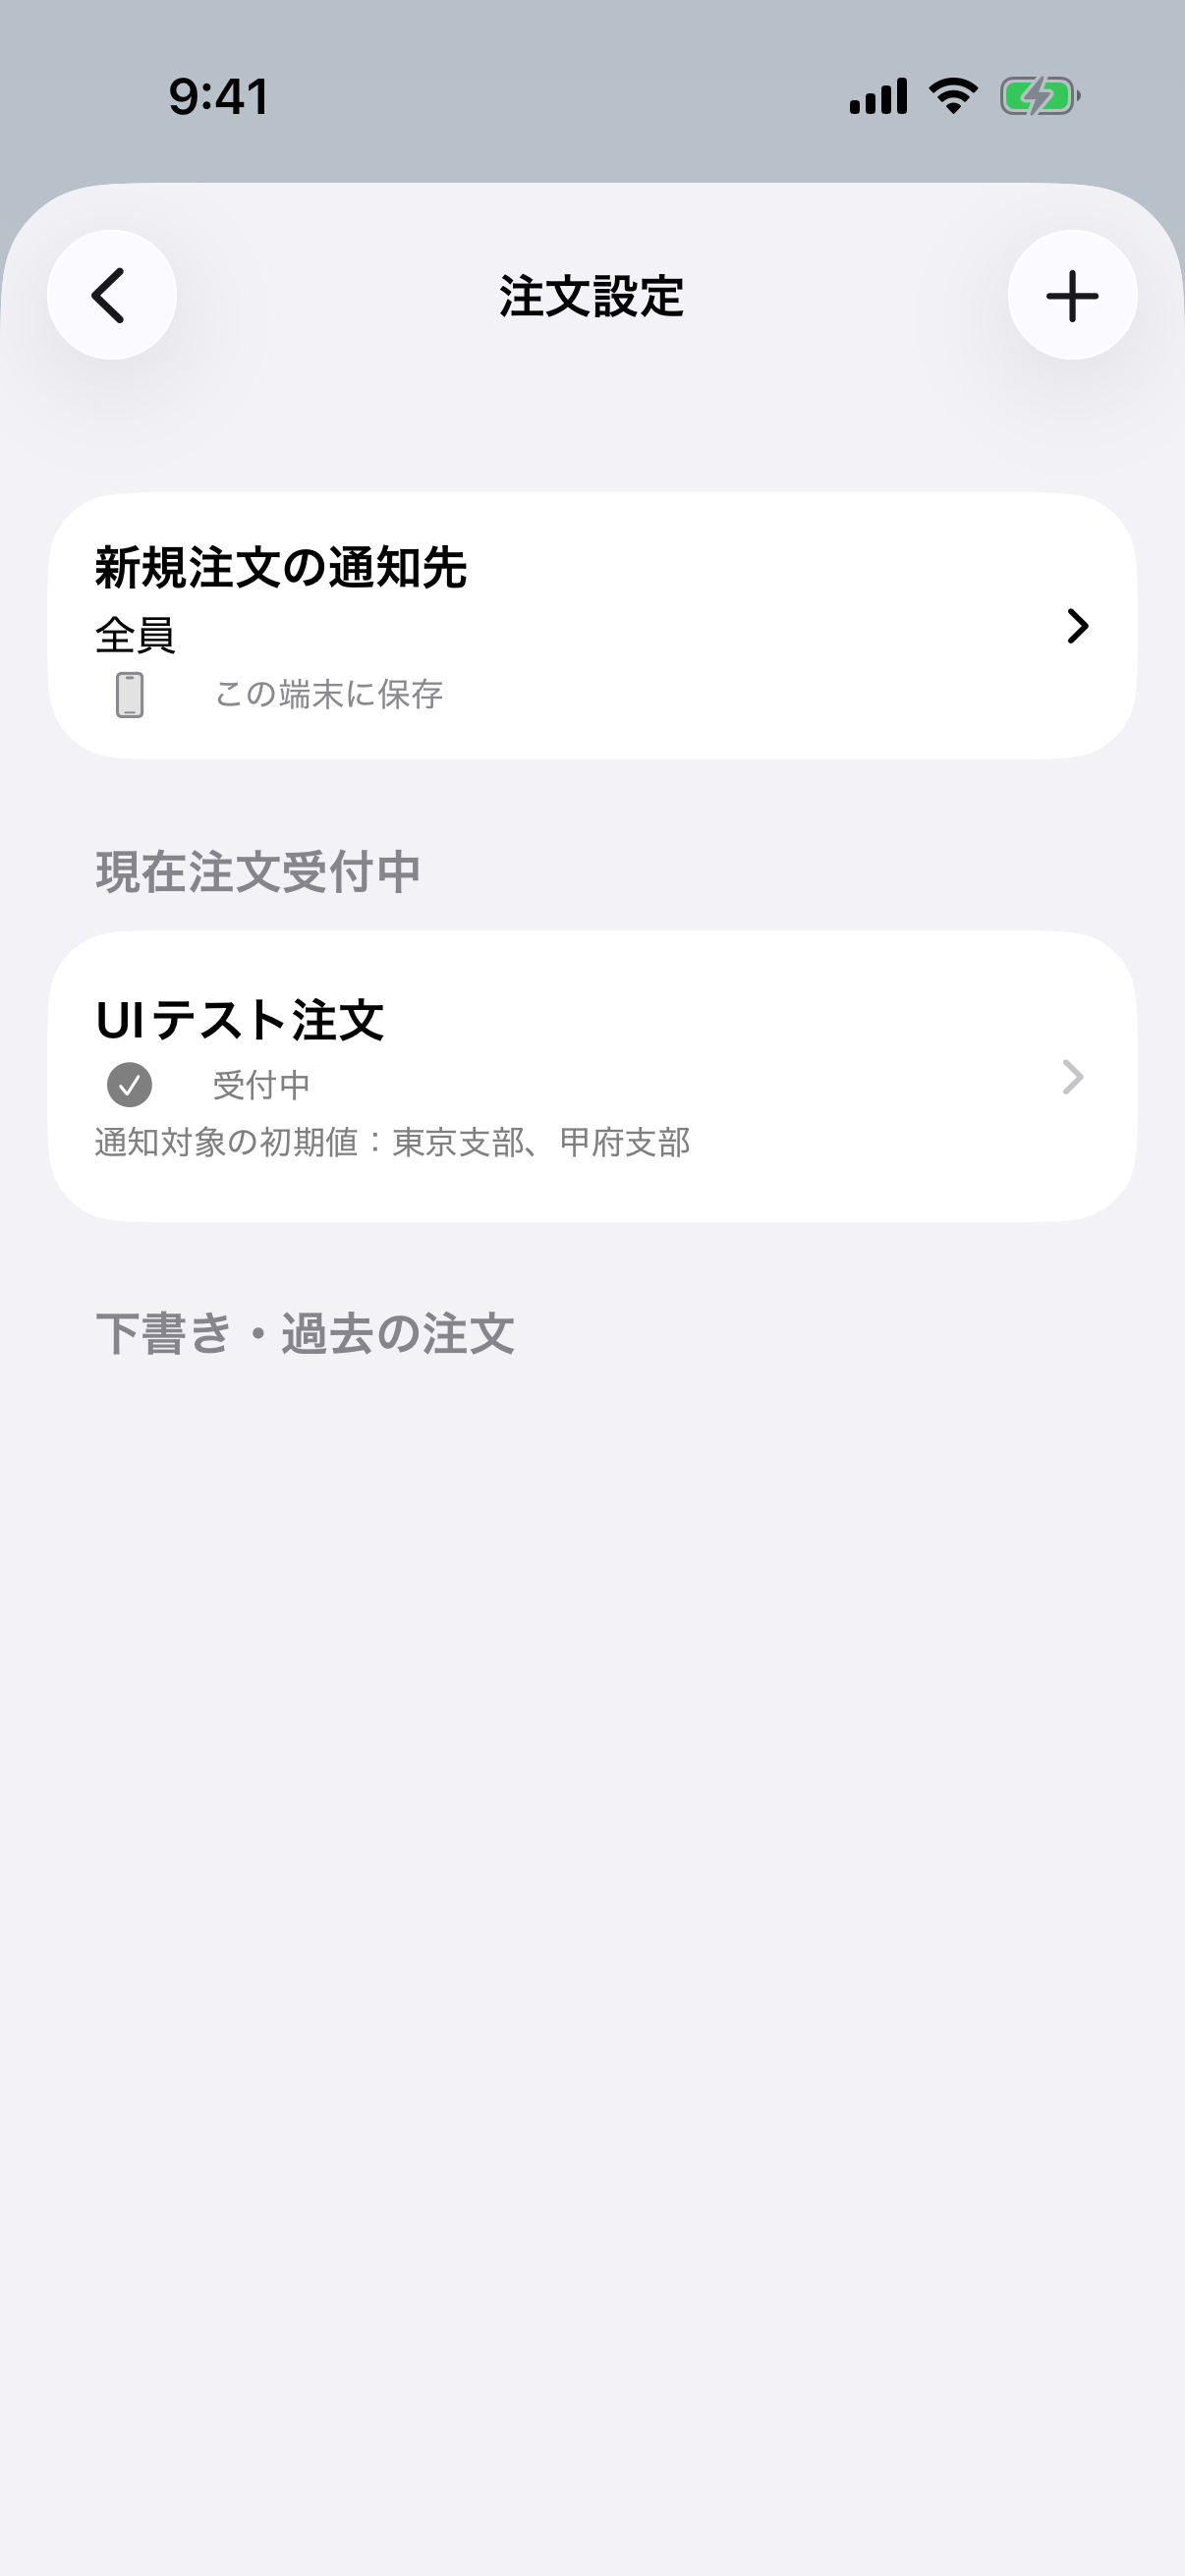
Start from the Order settings list
Sign in as Administrator under Settings → Account.
Scroll down to Notifications and open Order settings.
Tap + (New) at the upper right to create a setup. For an existing setup, tap its name-and-status row.
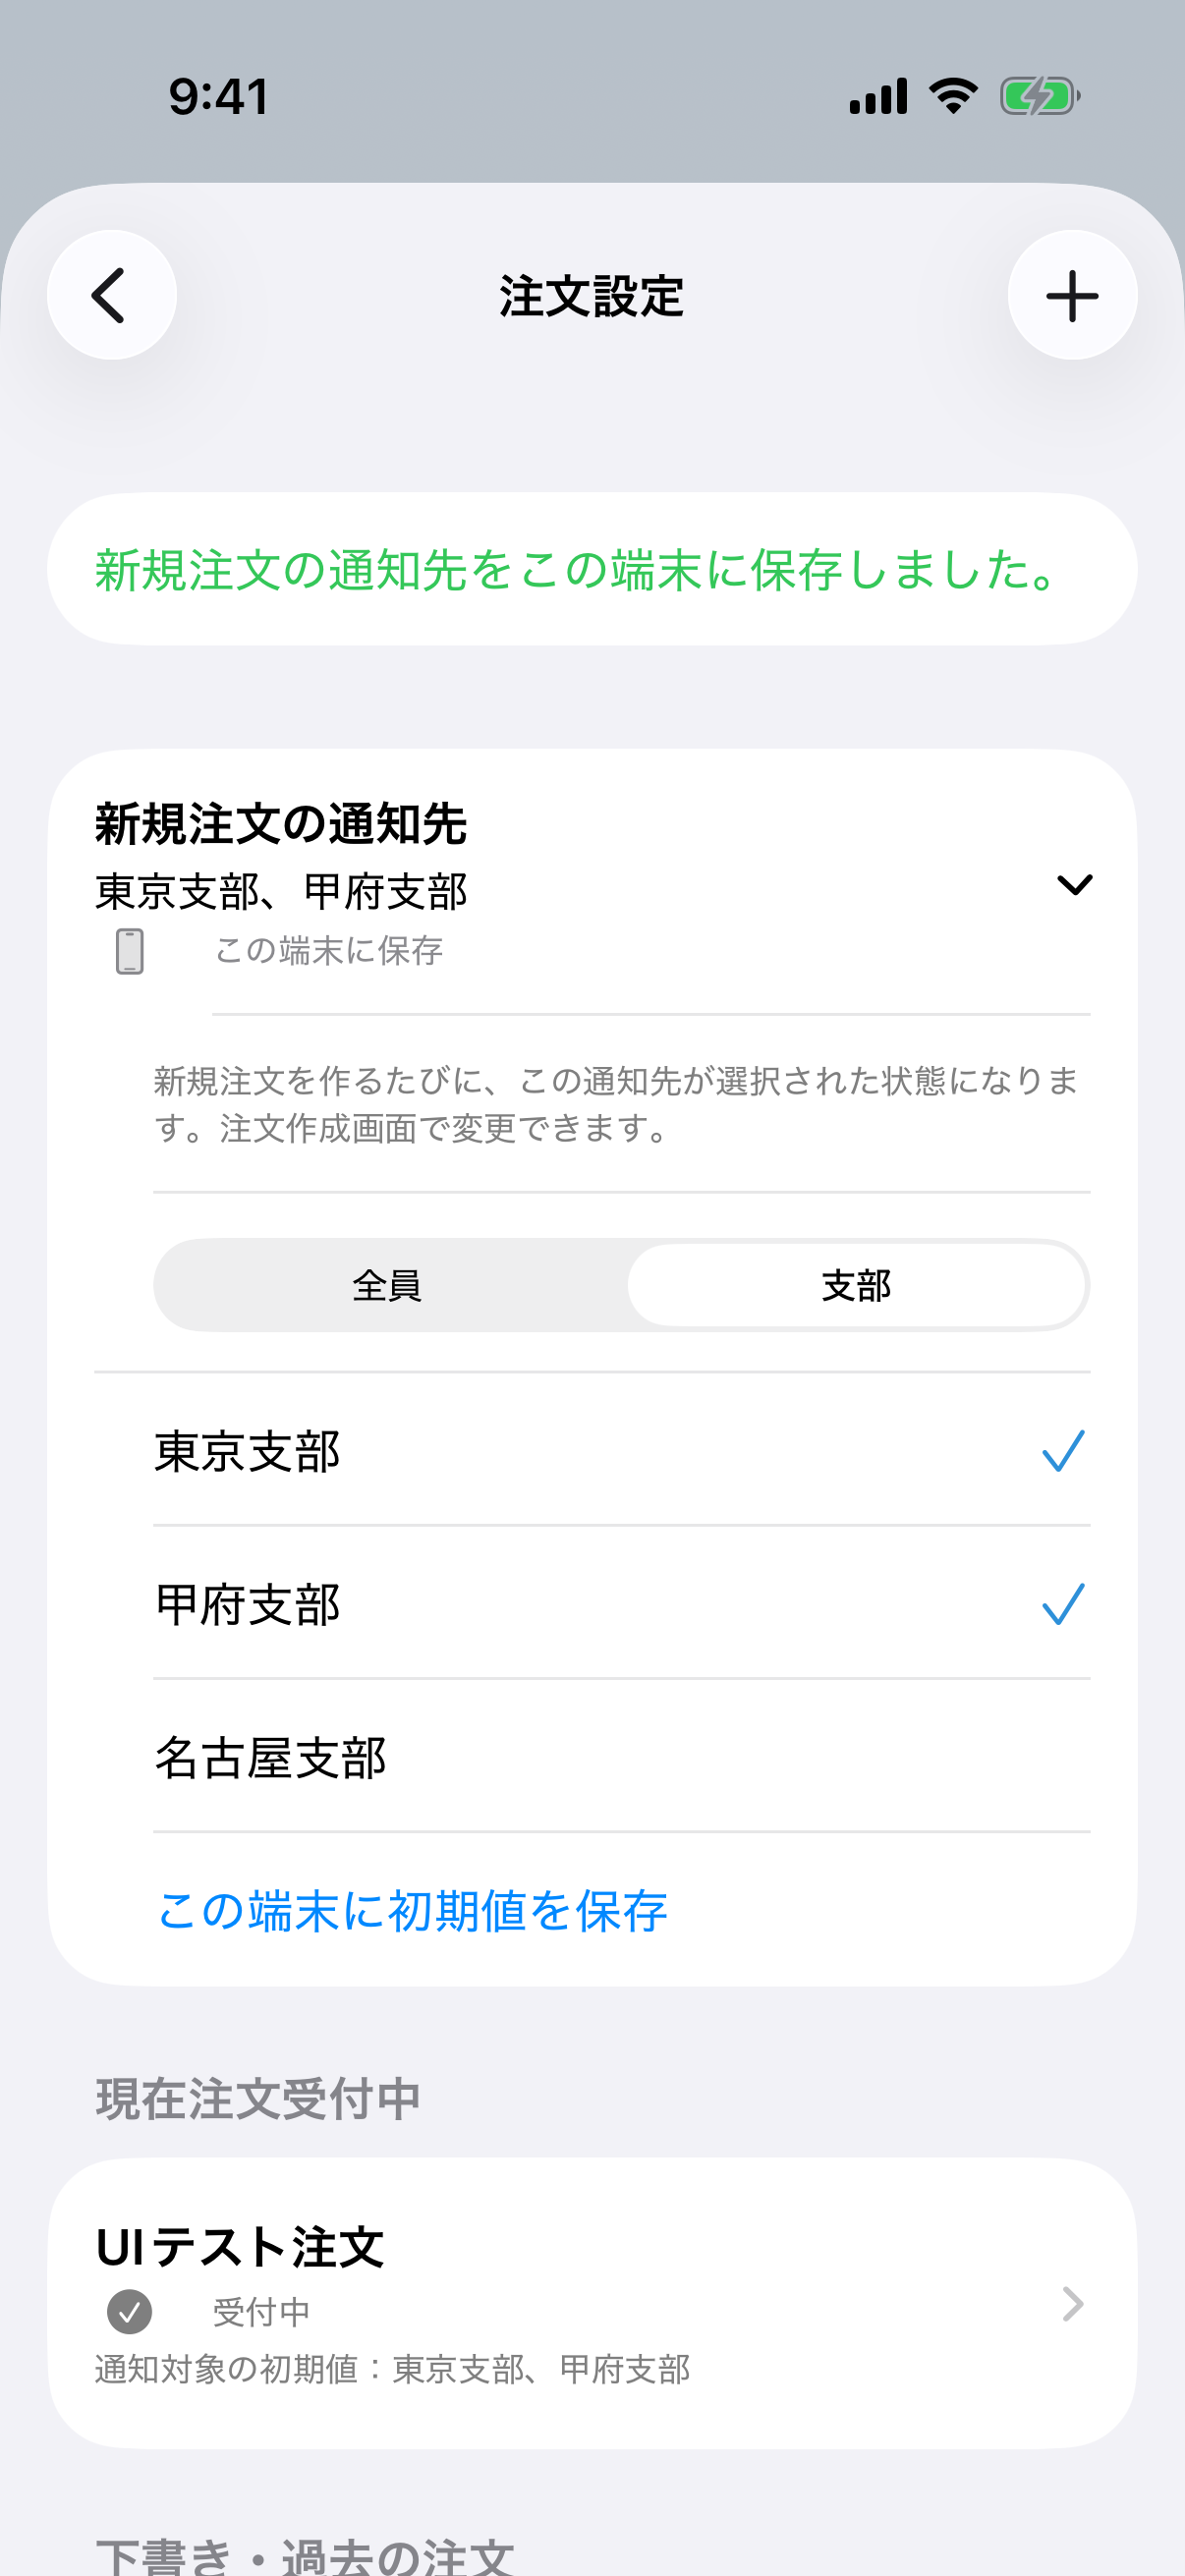
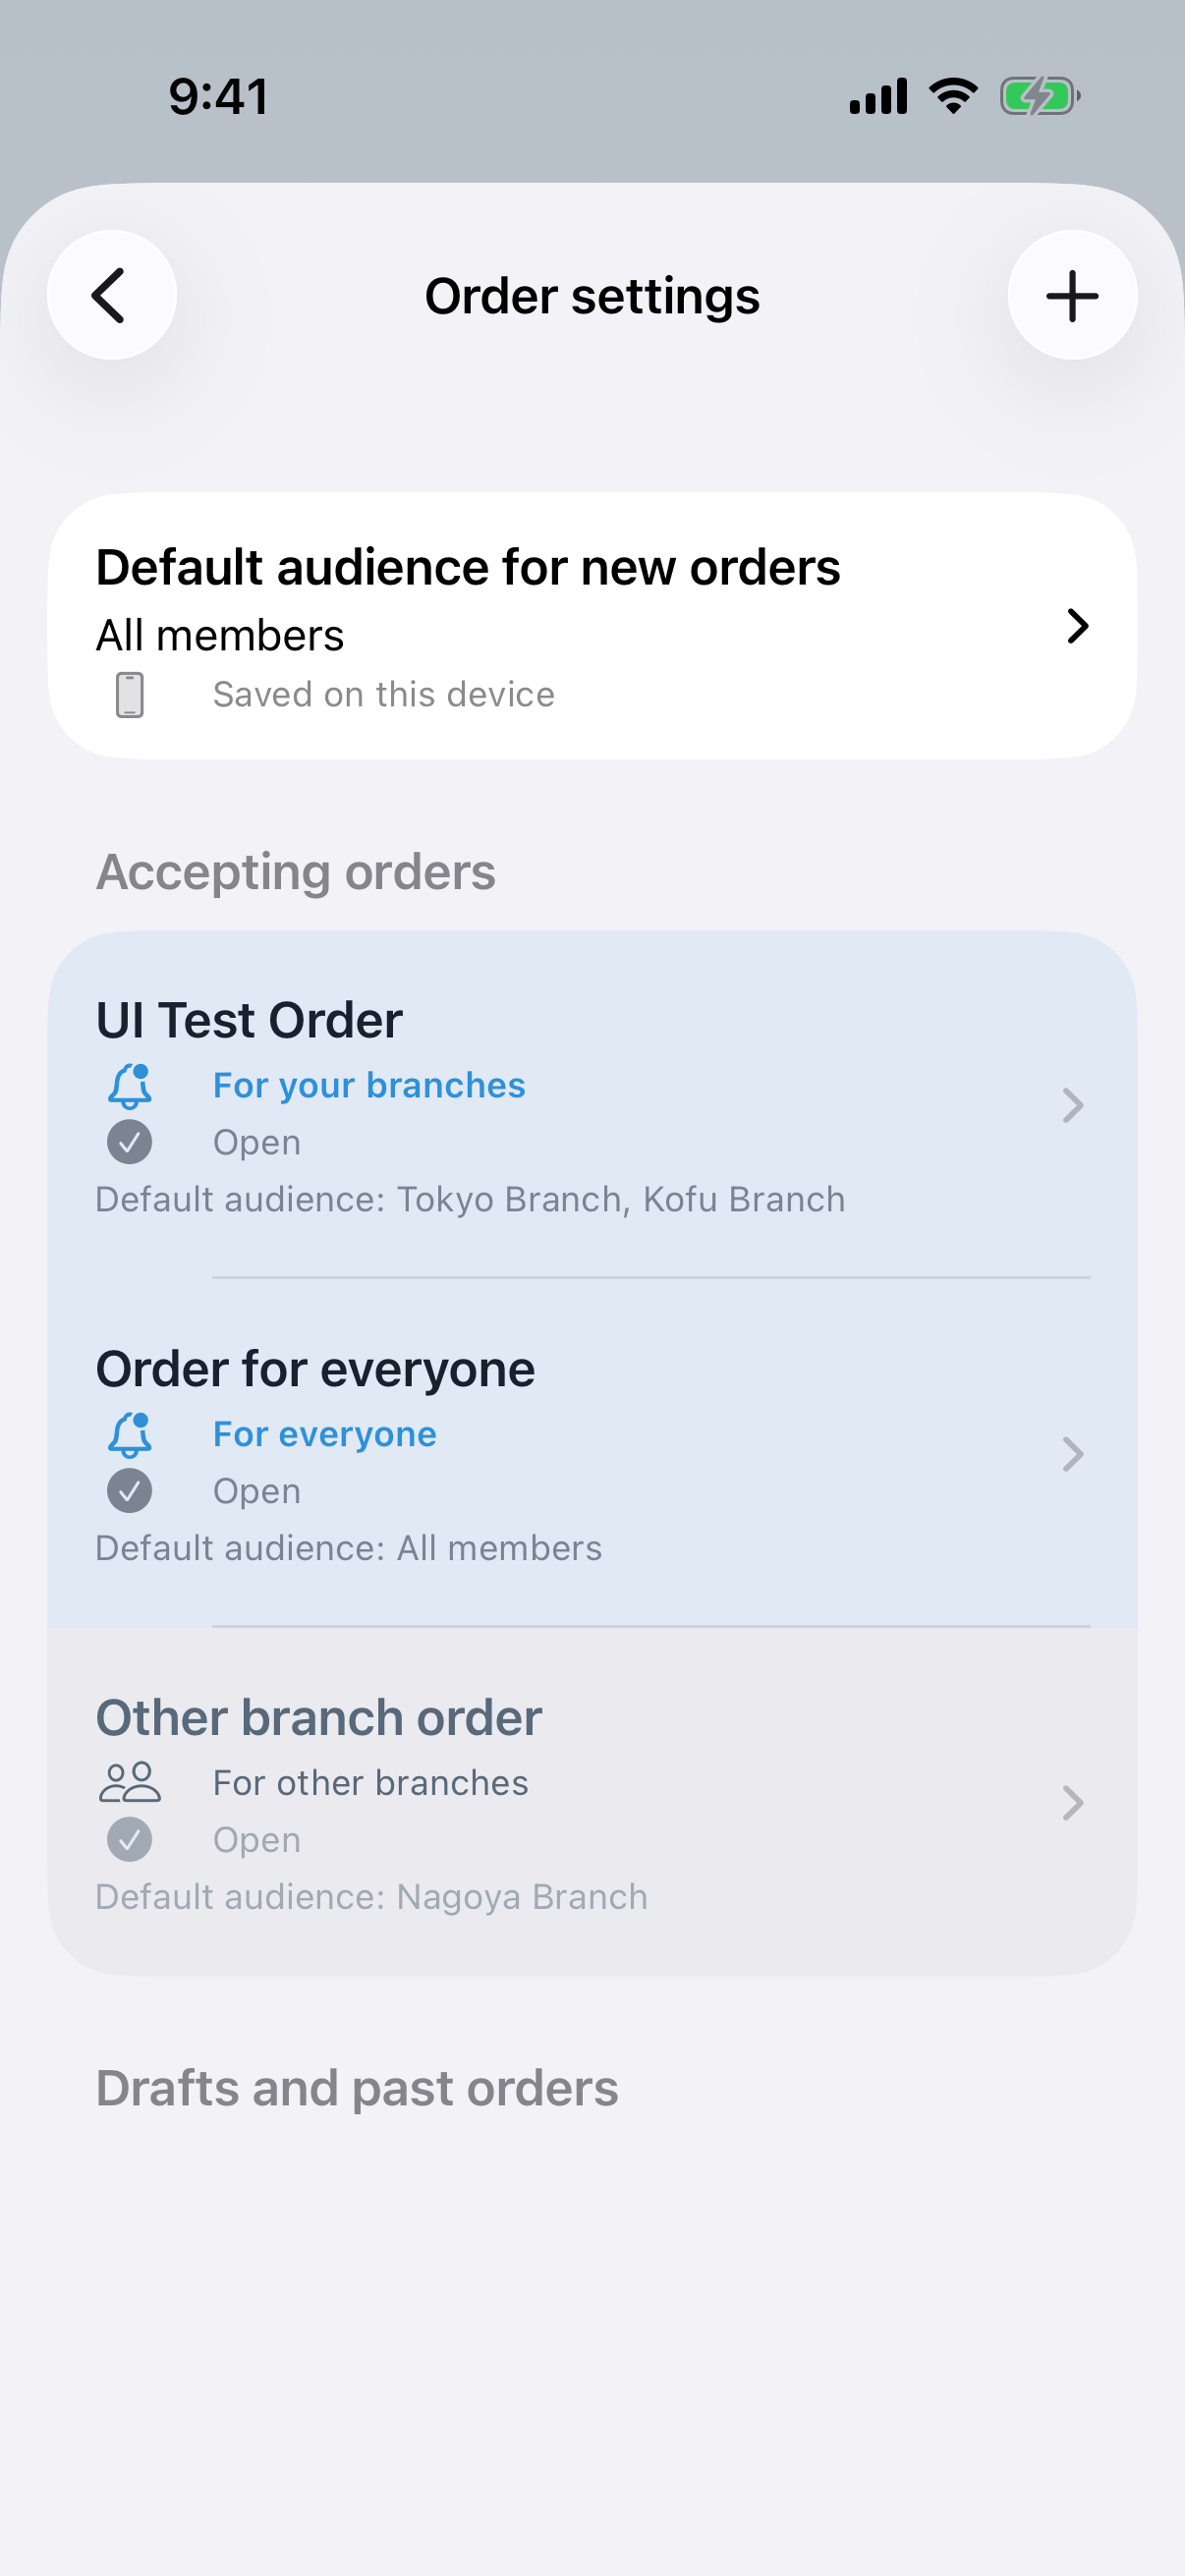
Japanese sample order list, captured for the September 12, 2026 candidate. This administration list is separate from the member Orders screen.
Choose this device's initial audience for new orders
If you usually notify only your own branch, save that branch as the default so it is selected each time you create an order. For an order that needs a different audience, change the selection during creation.
Set Default audience for new orders
On the main Order settings screen, open Default audience for new orders.
Under Default audience, choose All members or Branches. Select at least one branch in branch mode.
Tap Save default on this device. Future orders created with + (New) on this device begin with this choice.
You can change the audience while filling in an individual new order. Copies keep the source order's audience. Editing an order or changing one delivery never overwrites this device default.
Japanese example from internal TestFlight iOS 1.20 (build 240). This setting is saved on this device; it does not change another administrator's or another device's default.
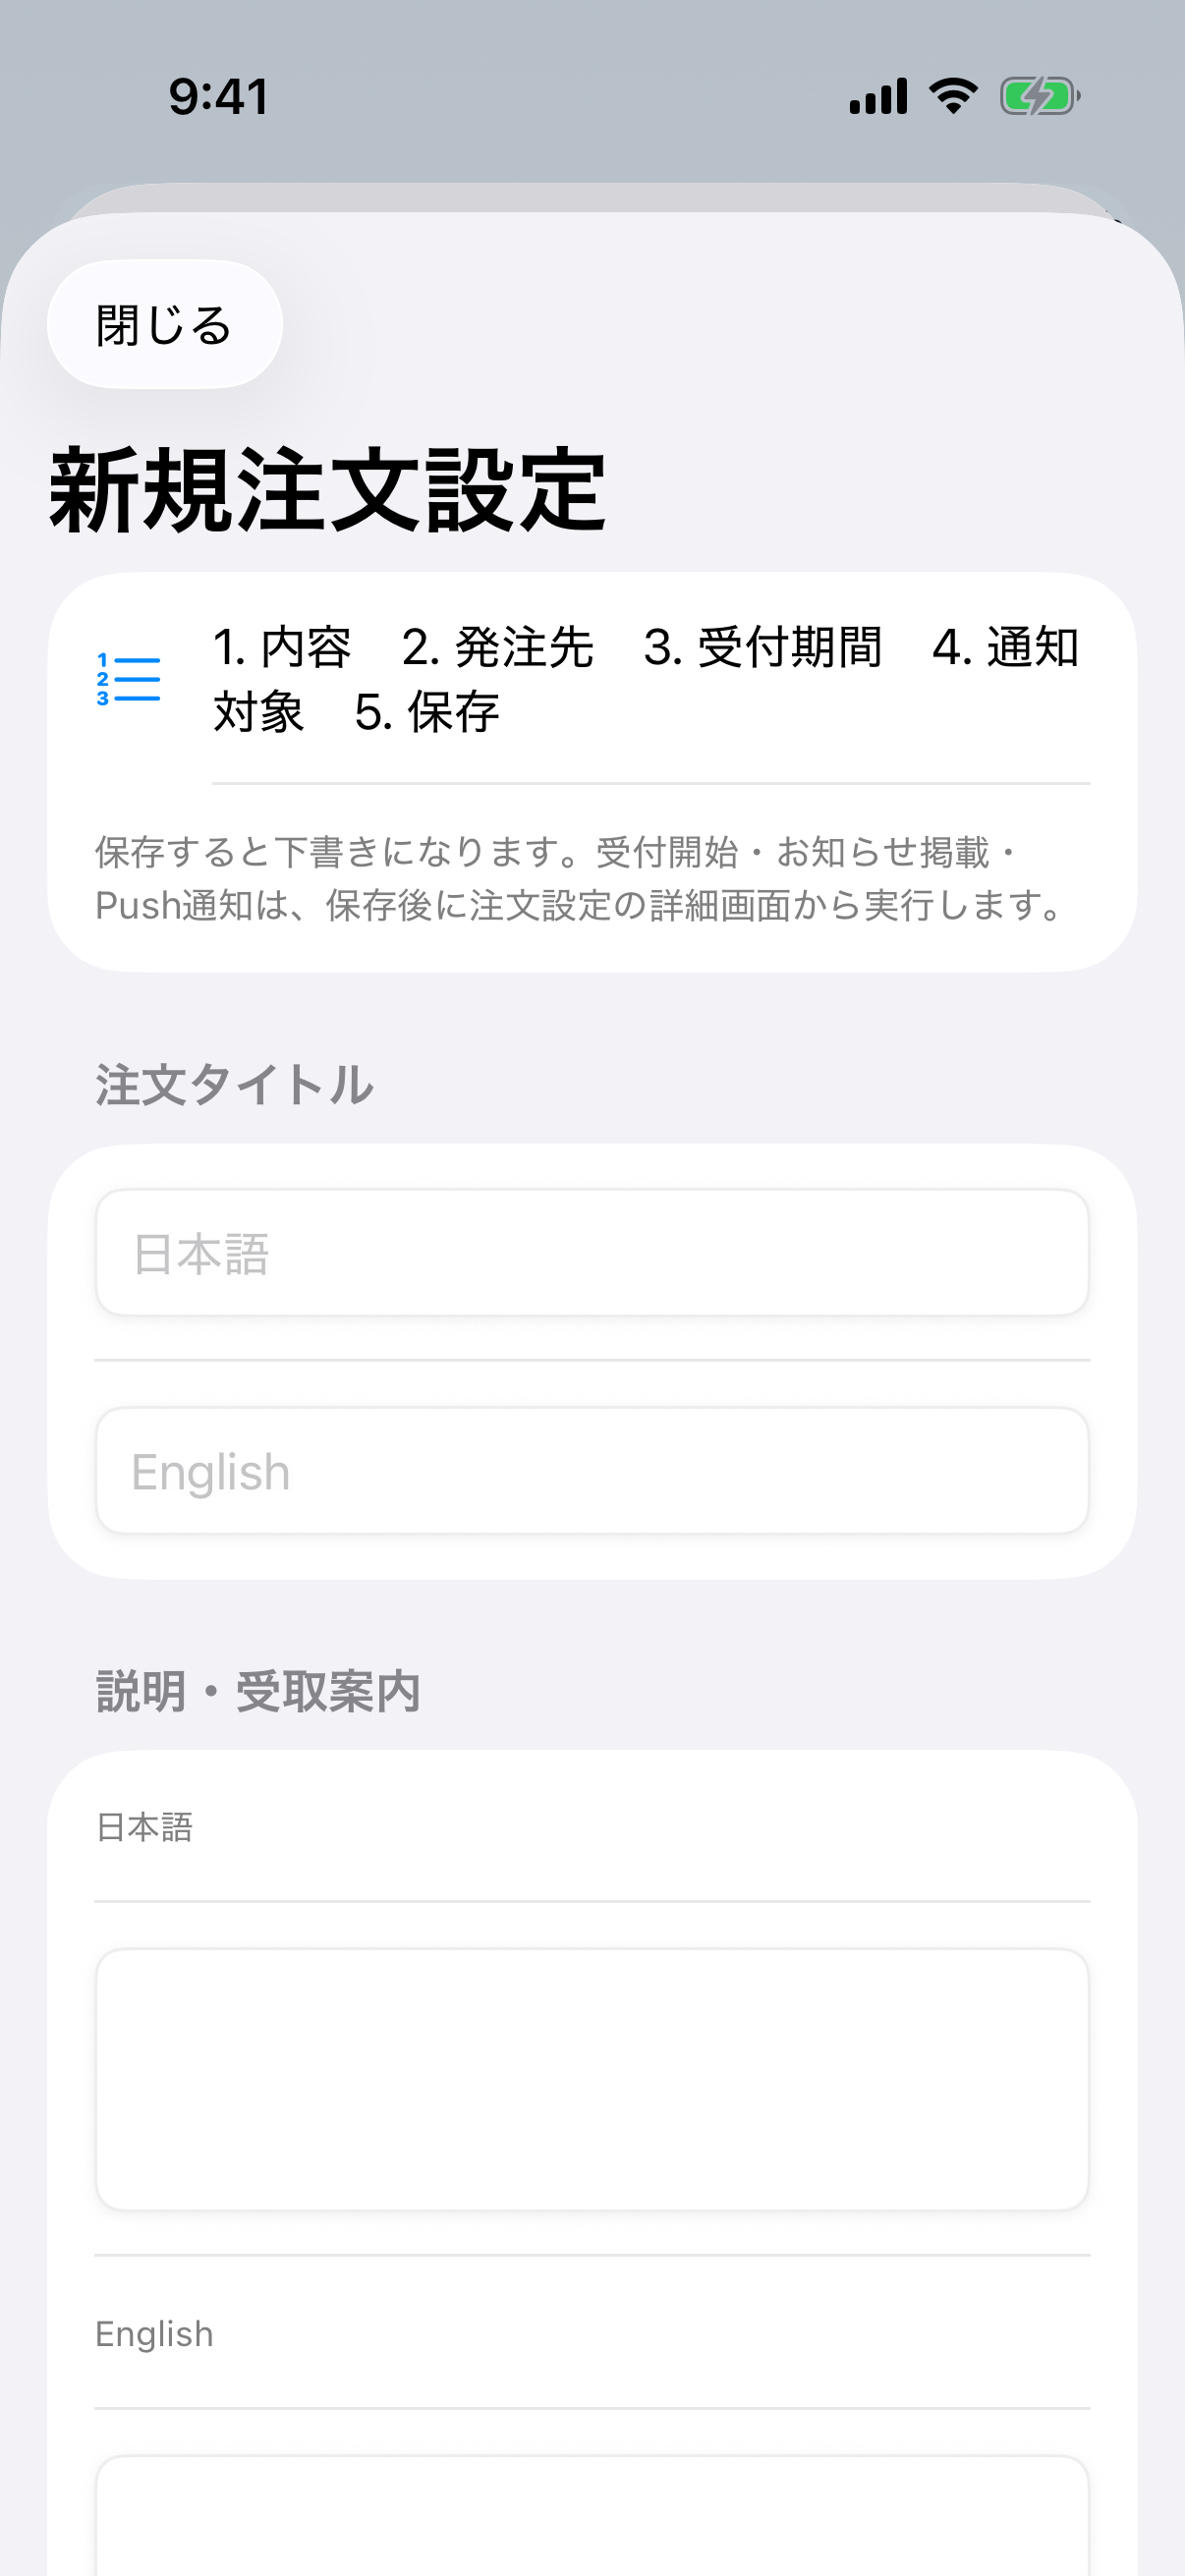
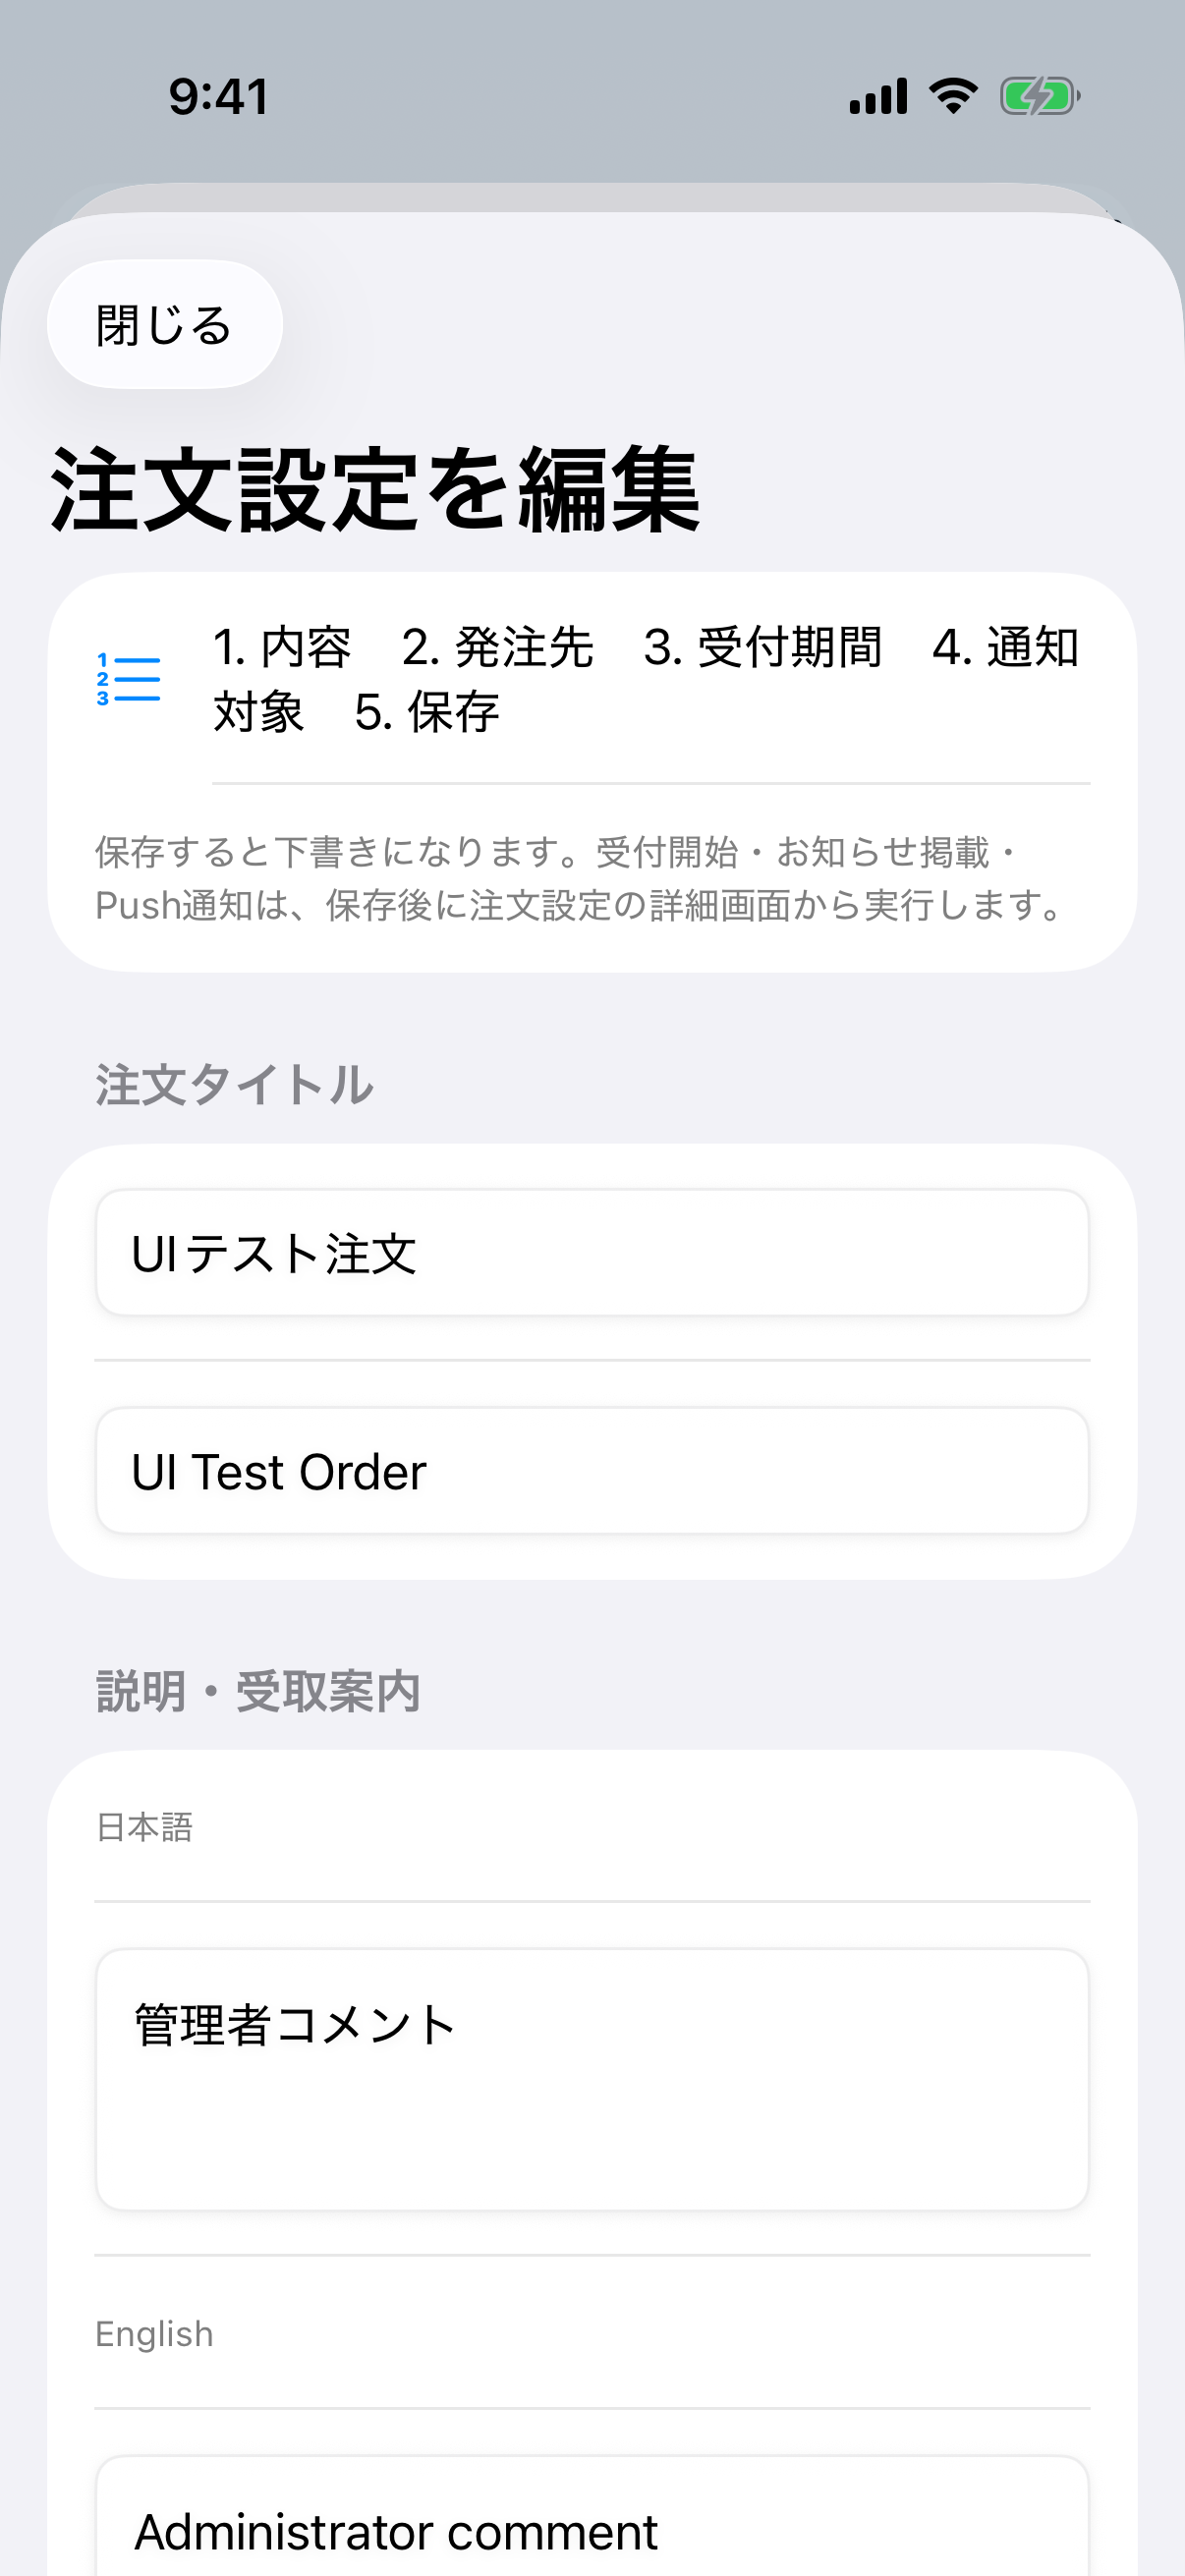
1. Enter the content
Enter the customer-facing Order title. At least Japanese or English is required.
Use Description and instructions for product details and pickup instructions.
Enter product names under Items. Tap Add item for another product. Each item also needs at least Japanese or English.
Japanese example. Continue scrolling to recipients, dates, and audience before saving.
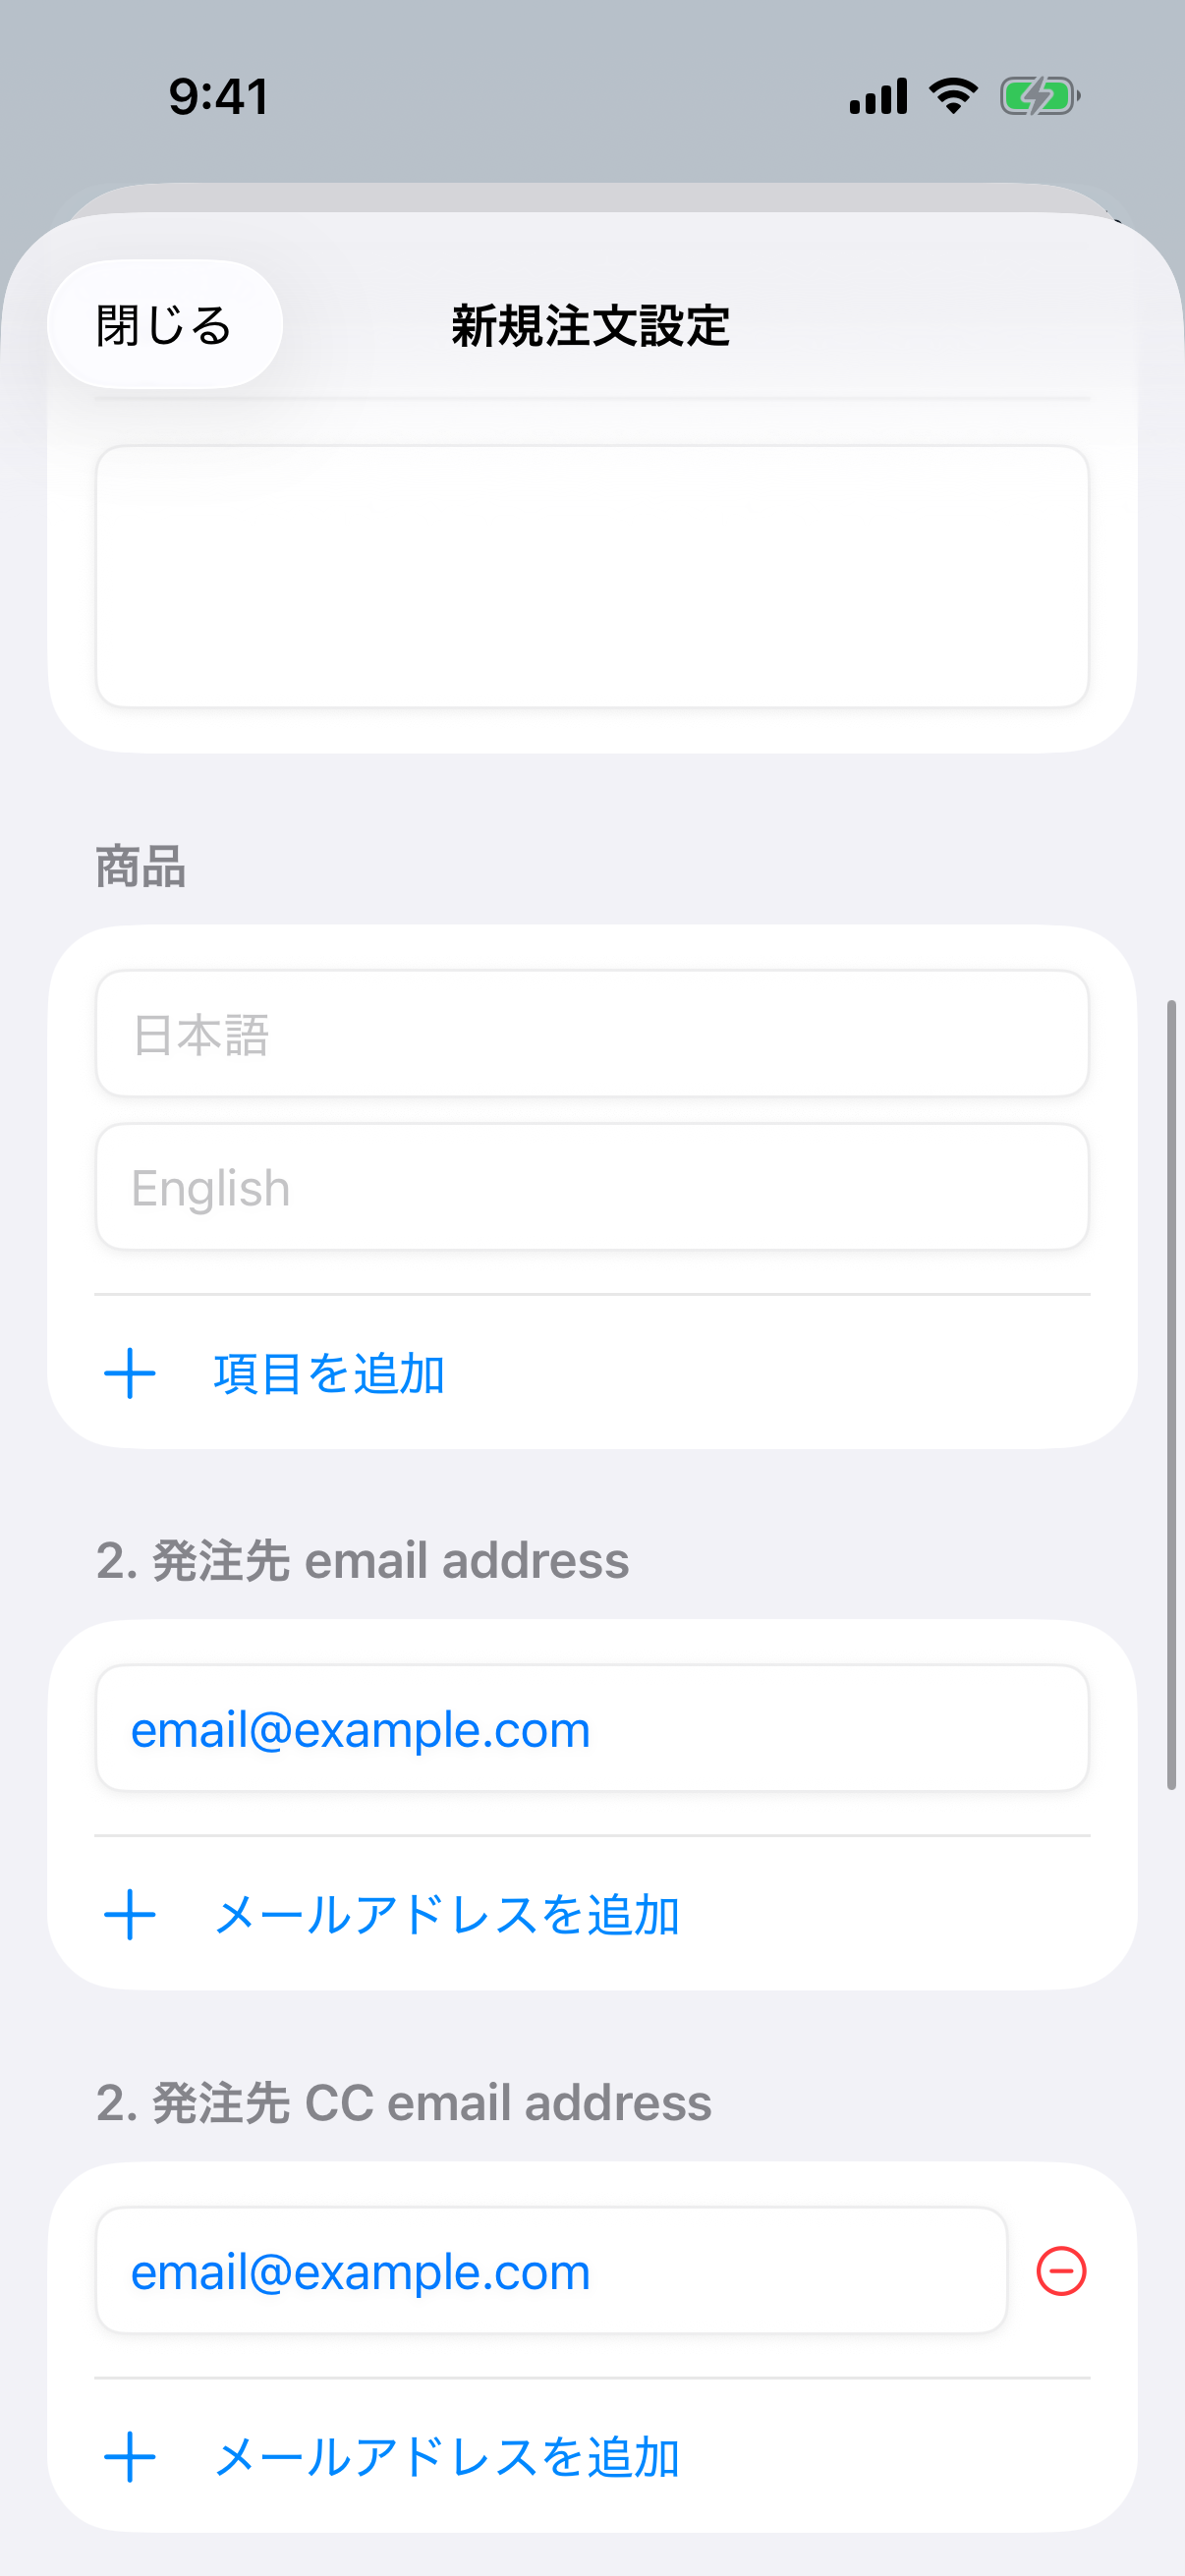
2. Enter recipients and order dates
Enter at least one Supplier email address to receive submitted orders. Use Add email address for additional recipients.
Add Supplier CC email address entries only when needed. These email recipients are separate from the Push audience.
Enable Set opening time and Set closing time as needed, and enter dates in Los Angeles time. Opening must precede closing when both are set. Members also see their device-local time.
Japanese example. The acceptance window is separate from the Push delivery time configured later.
3. Choose the audience and save at the bottom
Choose this order's default notification audience
All members: notify eligible users who enabled Administrator announcements, regardless of their affiliations.
Branches: select at least one target branch. Multiple selections are supported. Review every checked name.
You cannot save a branch audience with no selection, an unavailable list, or an unavailable selected branch. Retry and review the audience.
A new order begins with the saved Default audience for new orders on this device. Change 4. Default notification audience to suit this order. Your own affiliations do not automatically become its audience.
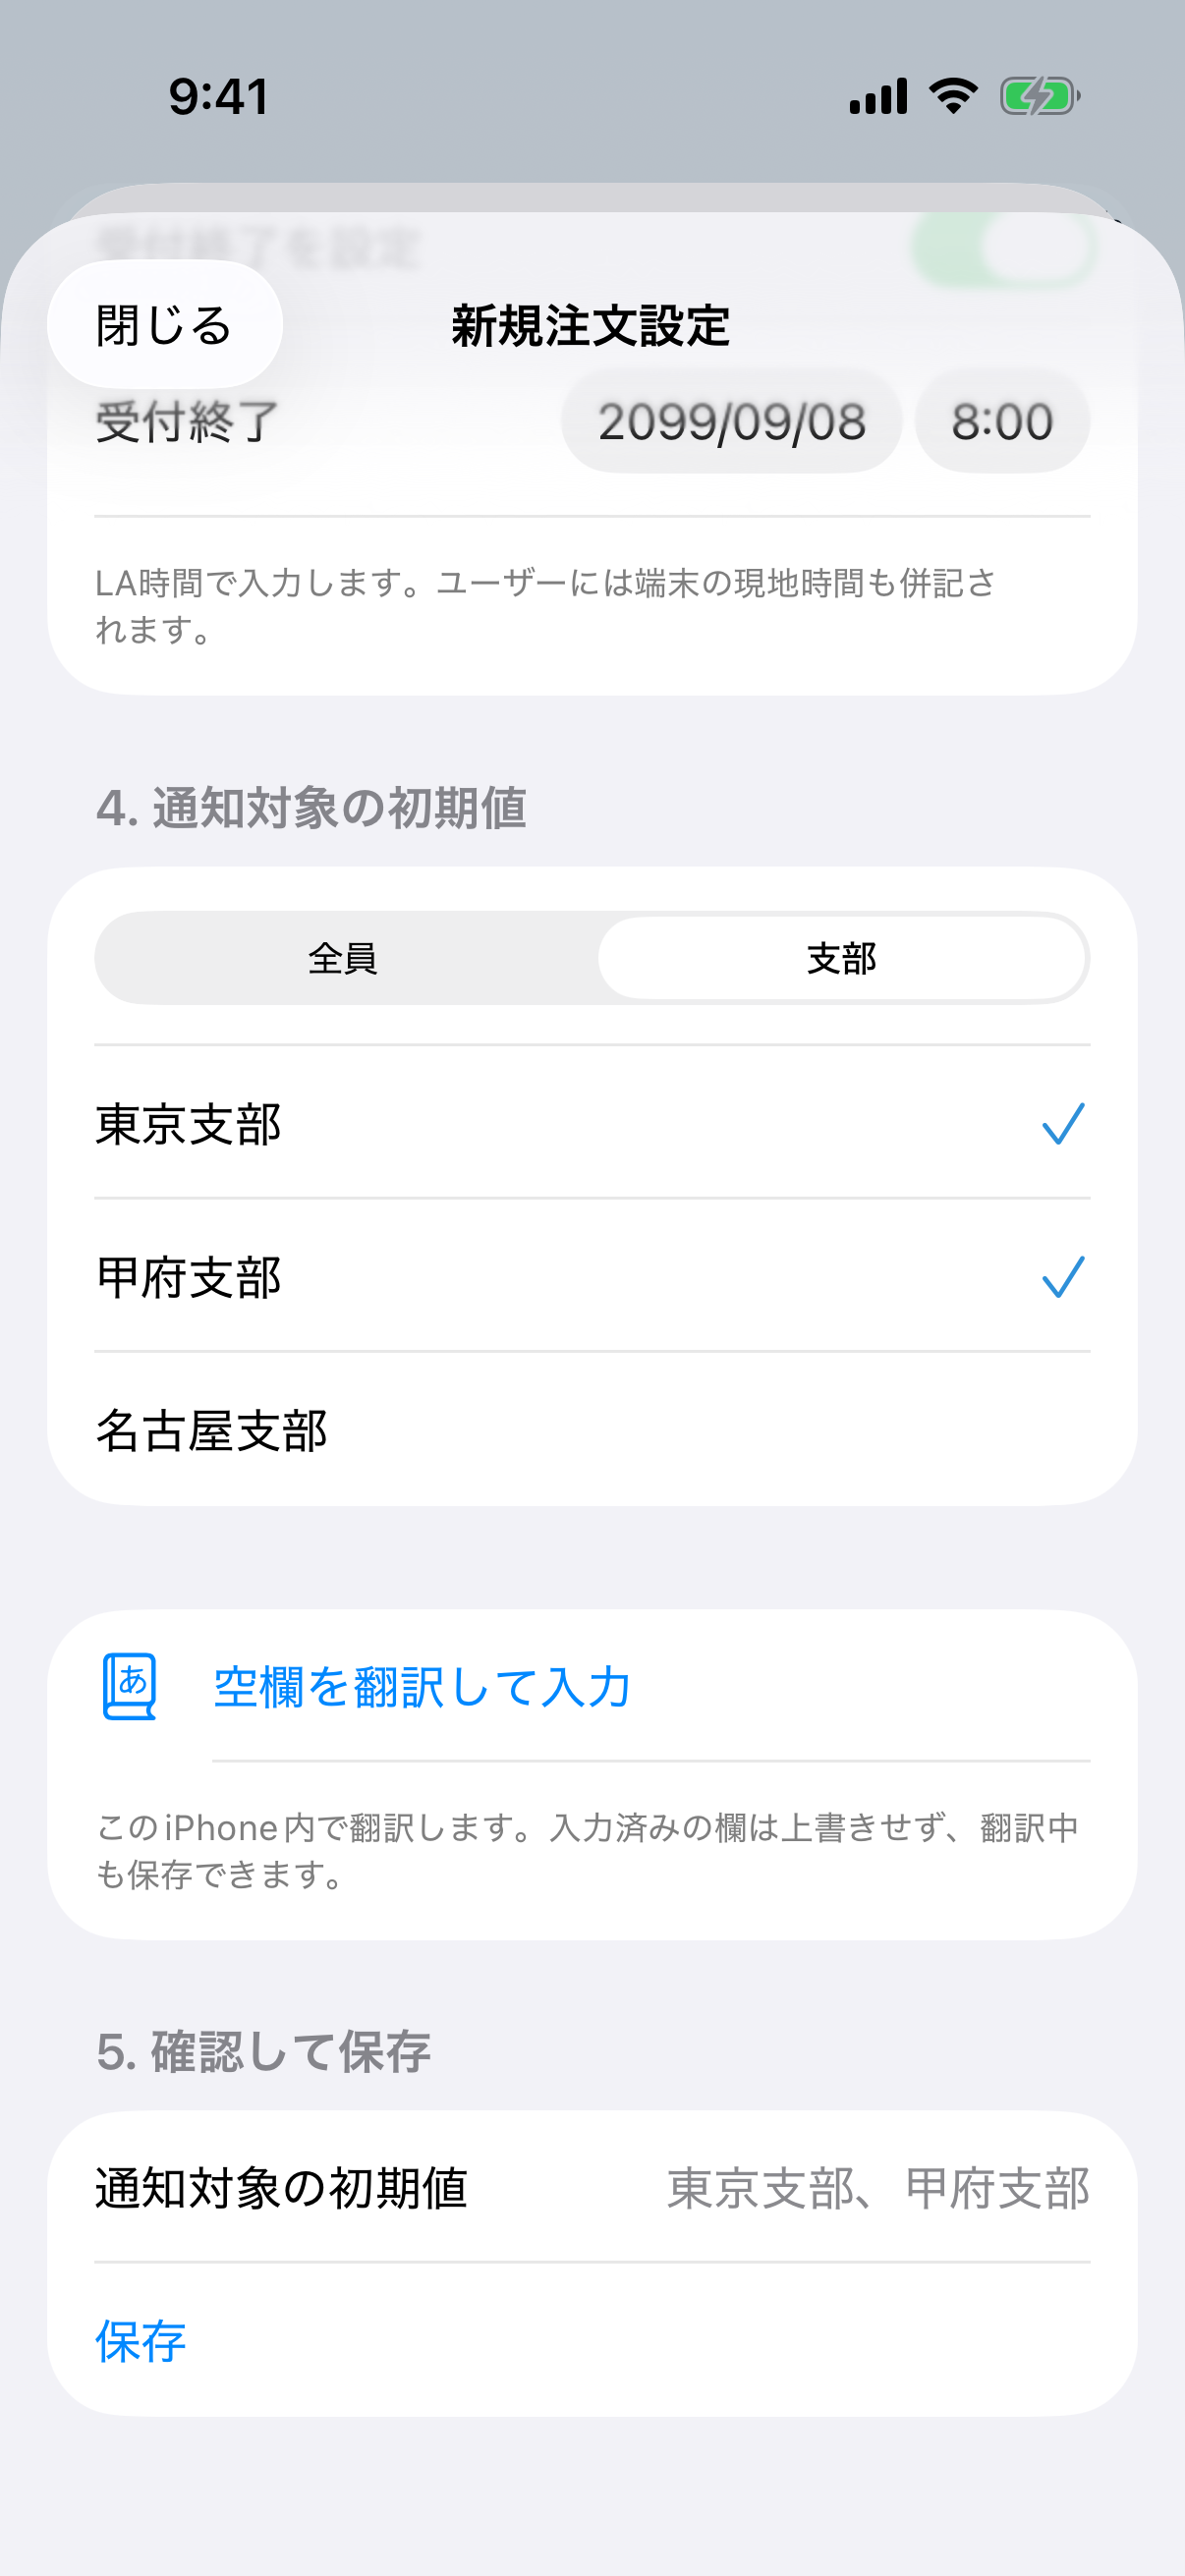
Japanese branch-targeting example from internal TestFlight iOS 1.20 (build 240). Branch names come from the server list.
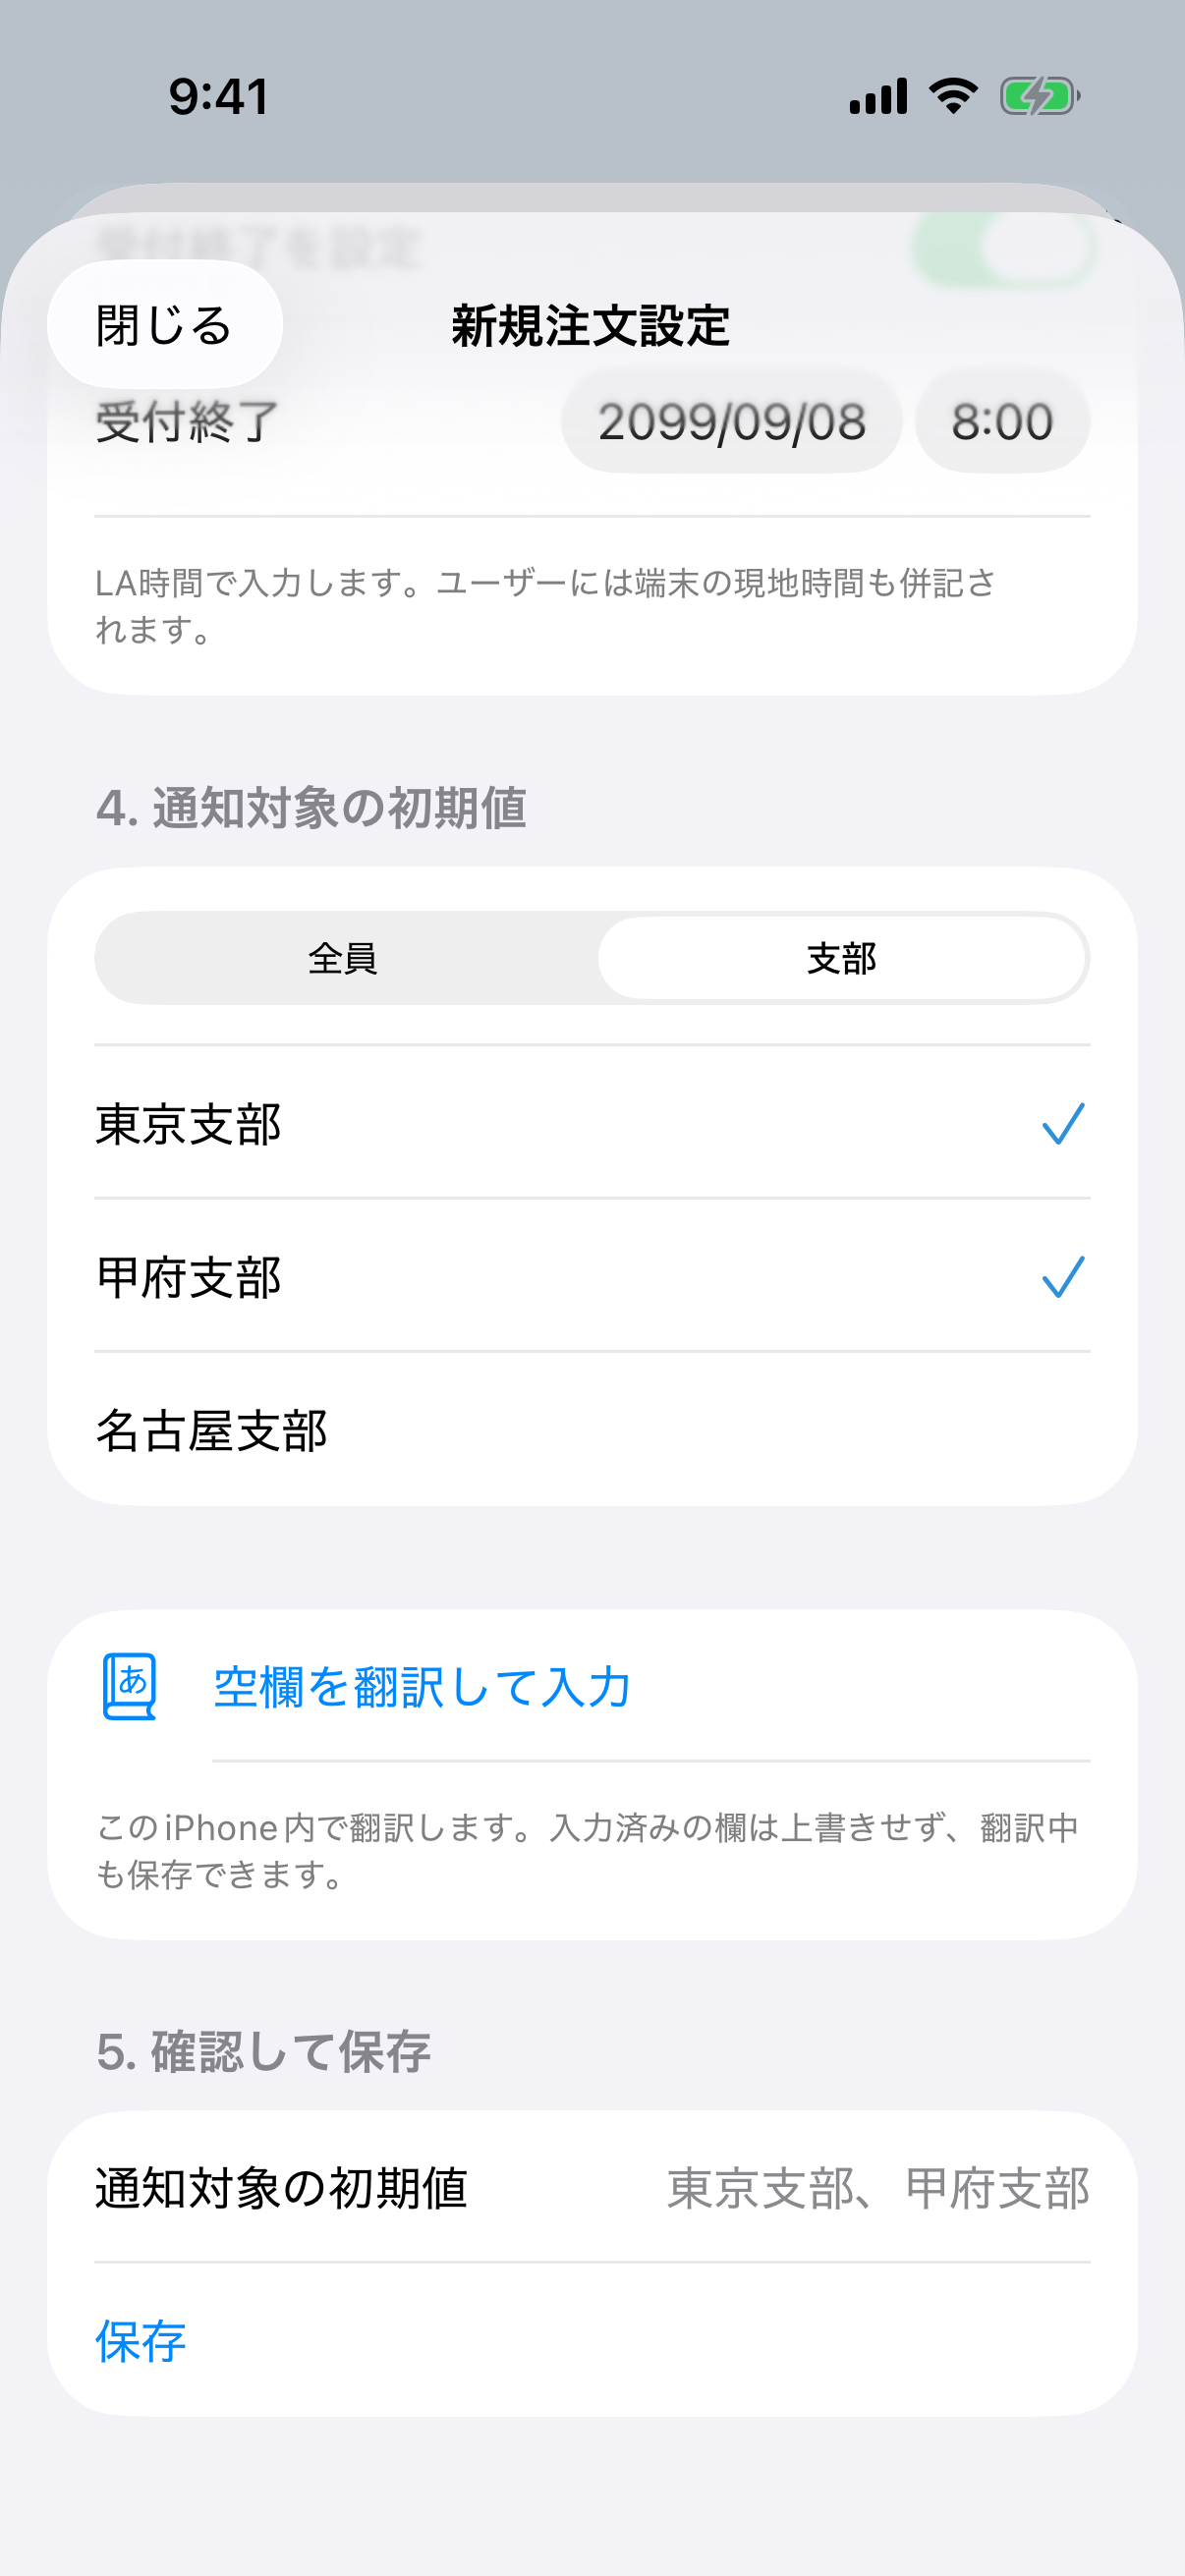
4. Review translations and audience, then save
Use Fill empty translations if needed. It fills blank title, description, and item fields without replacing existing translations.
Scroll to 5. Review and save. Read Default notification audience: All members or every selected branch name. Also check supplier emails, dates, and both languages.
Tap Save, then open the saved setup from the list. New and copied setups are saved as drafts. Saving does not open ordering, publish an announcement, or send Push.
Japanese example. The audience summary appears immediately above Save; scroll to the bottom to review it.
This audience applies to the order announcement Push. It does not change order access, supplier emails, member confirmation emails, or the daily site digest.
Edit an existing setup, copy it, and inspect history
Decide whether to change this setup or create another
Open the setup from the list and tap Edit order setting. Change content, recipients, dates, or audience, then scroll down and Save. Editing retains its current acceptance state.
Use Copy as new to preserve the original. Content and audience carry into the draft; received orders and Push reservations do not. Recheck the new title, dates, recipients, and audience before saving.
Open Revision history to inspect each saved version and its recorded audience.
If another administrator has updated the setup, review your preserved edits and the refreshed fields before saving again.
Japanese example. Edit and Copy as new are under Order setting in the detail screen.
Open ordering and publish an announcement
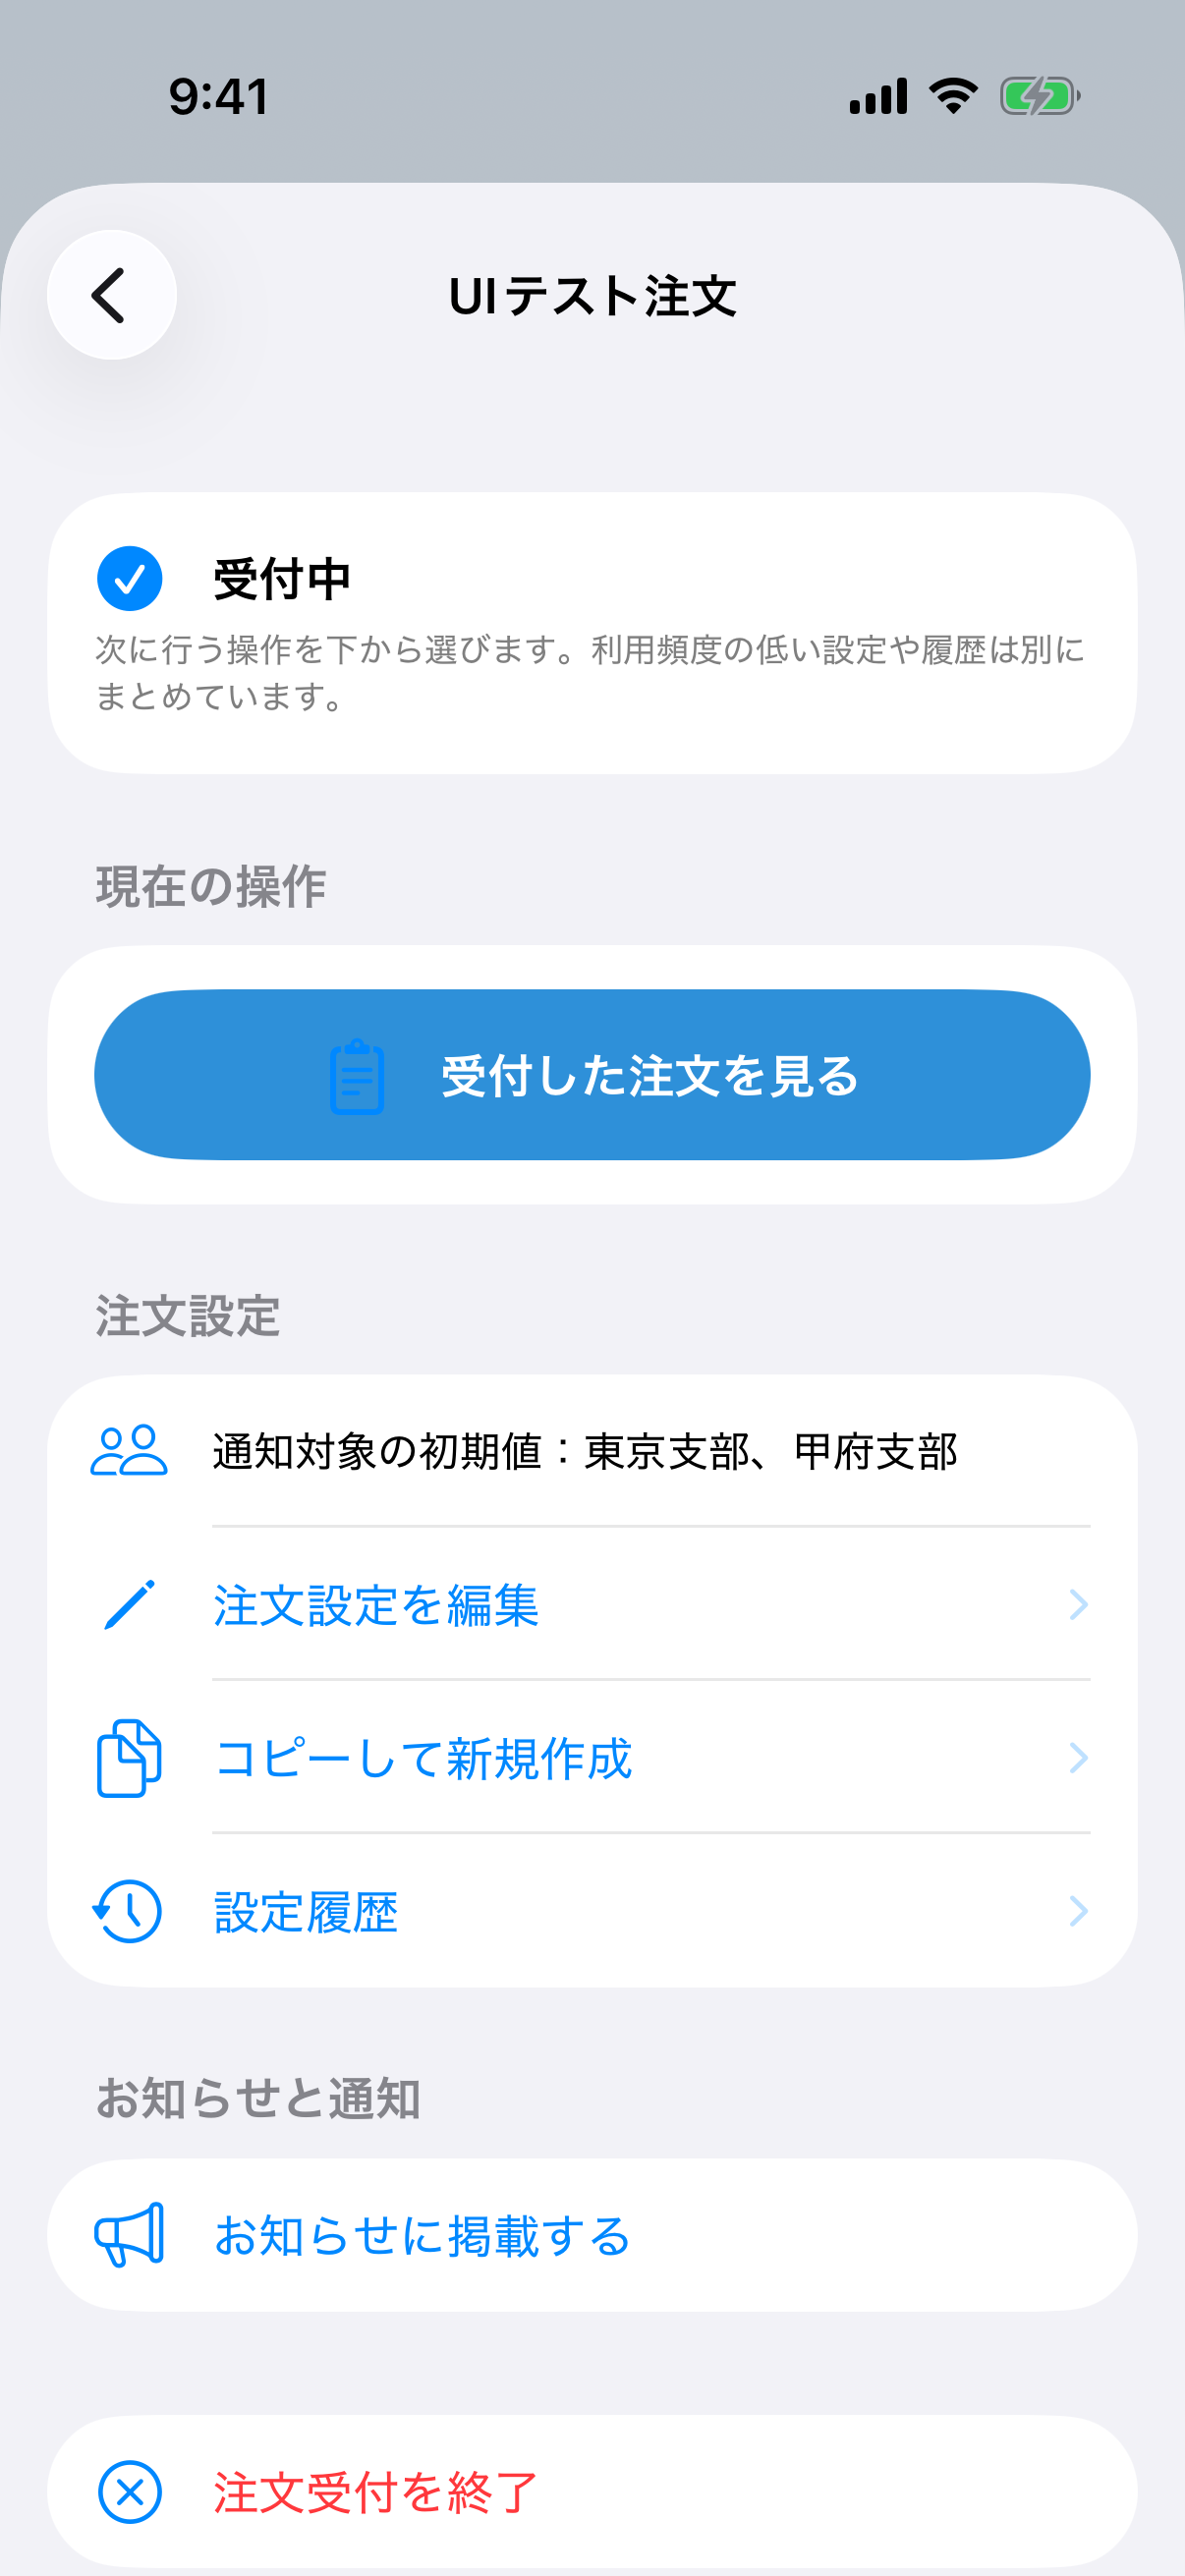
Open ordering and publish separately
On the draft detail screen, tap Start accepting orders. A future opening time leaves it awaiting that start time.
Under Announcement and Push, tap Publish in announcements. Publication alone does not send Push.
Check the member Announcements → Orders screen. Publishing an announcement while the setup remains a draft does not make the order form visible.
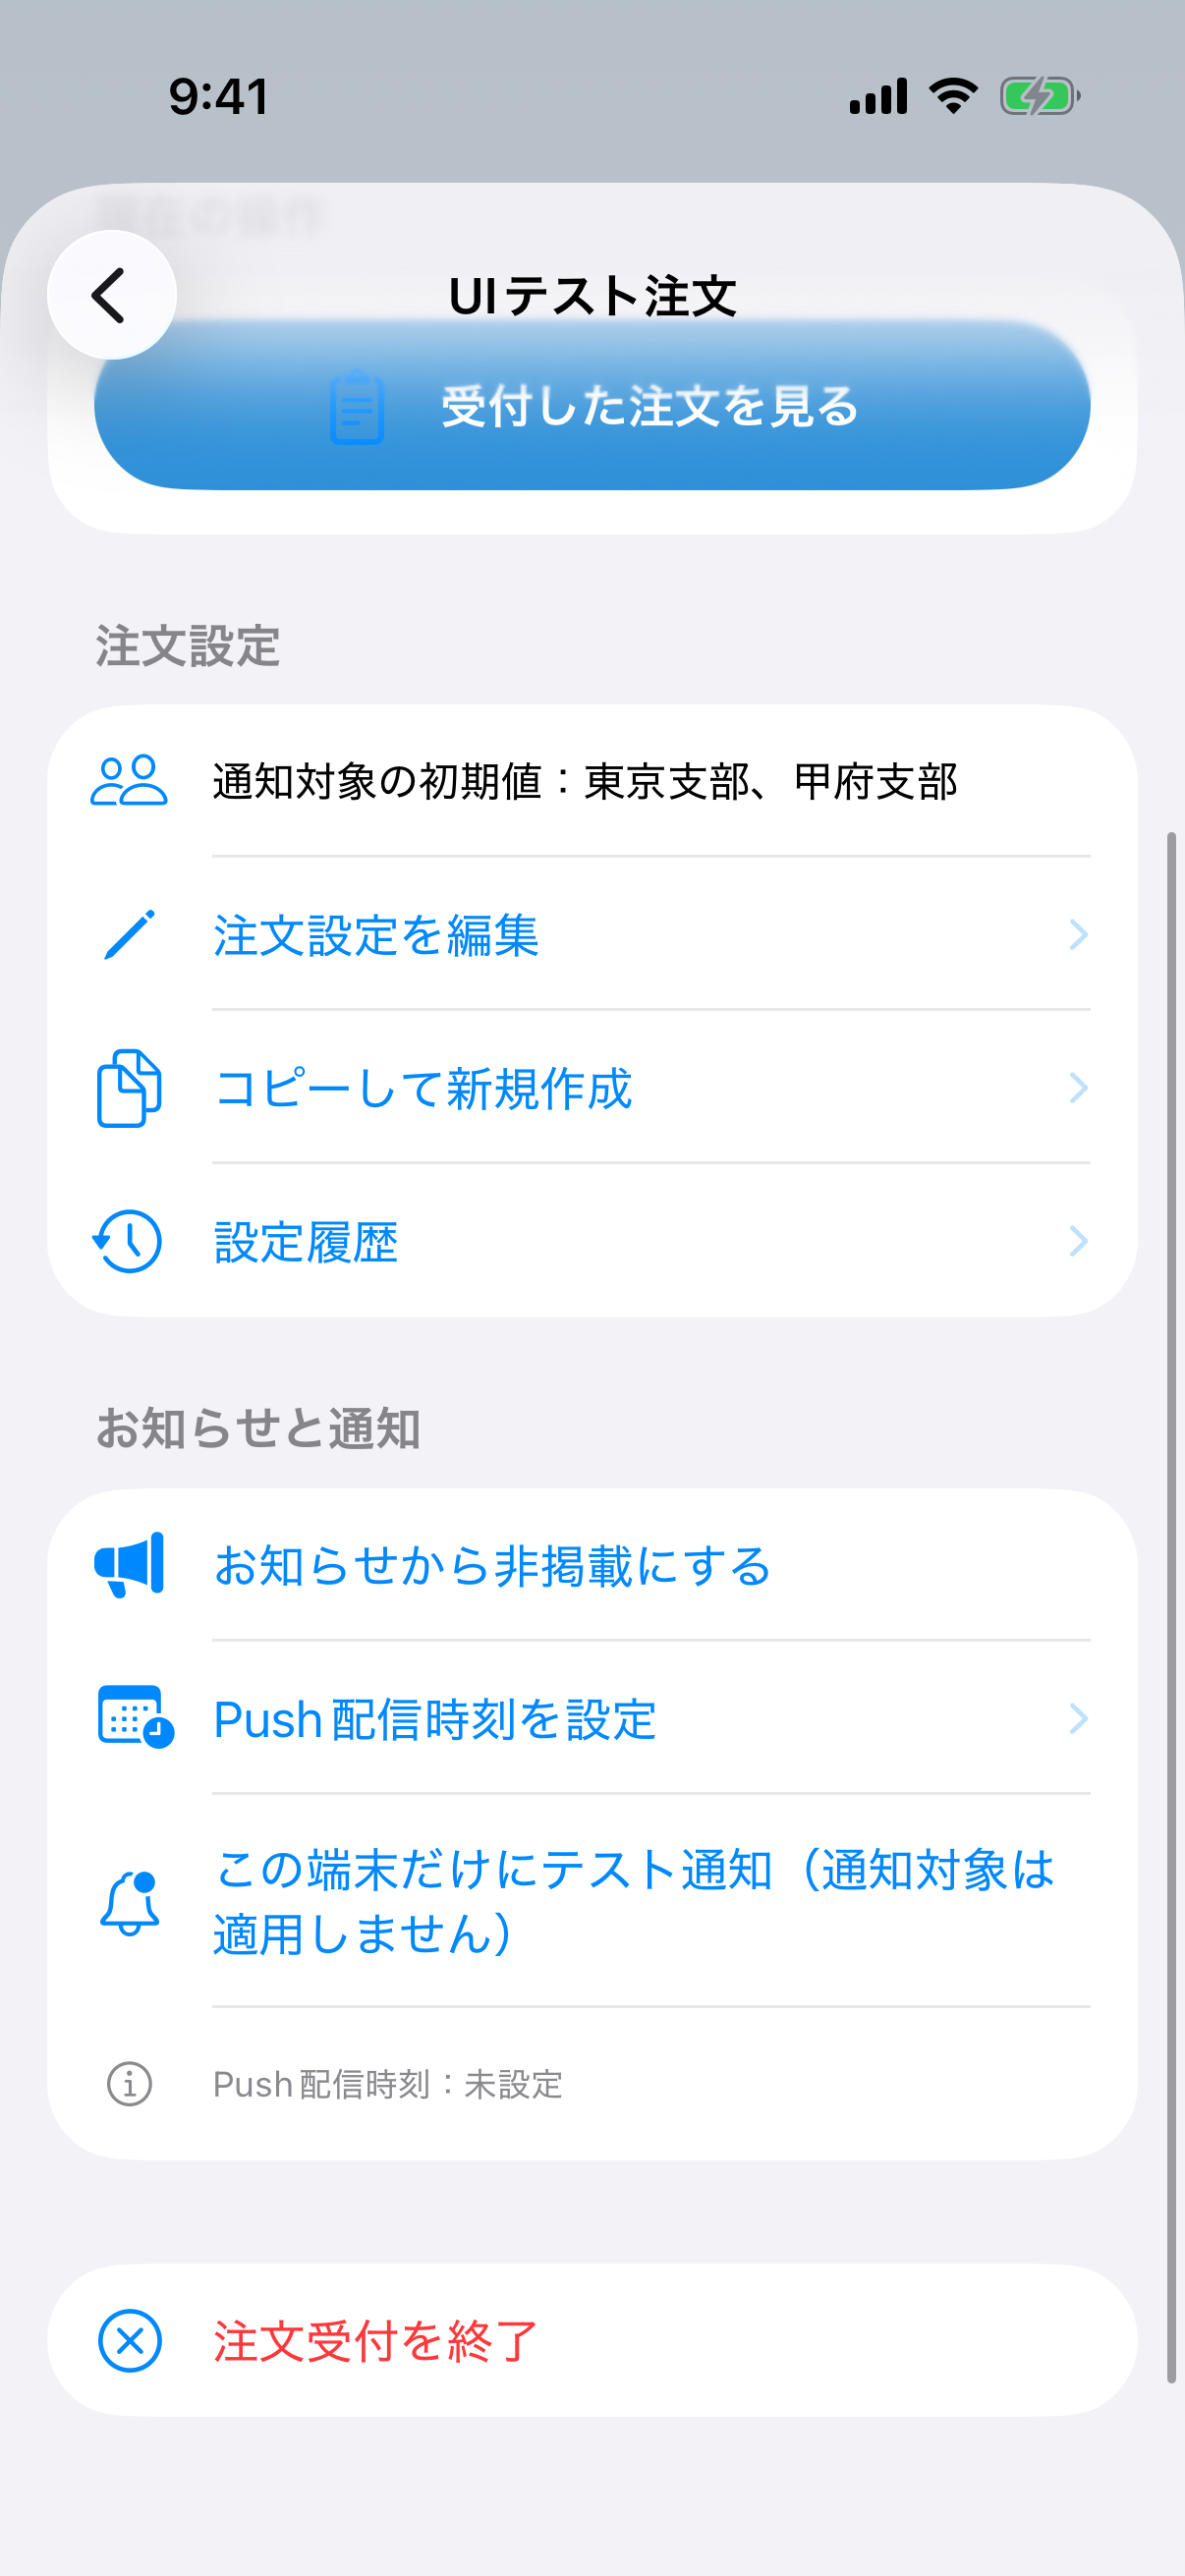
Japanese example. Review Current task, Order setting, and Announcement and Push in that order.
Check the order state after publication
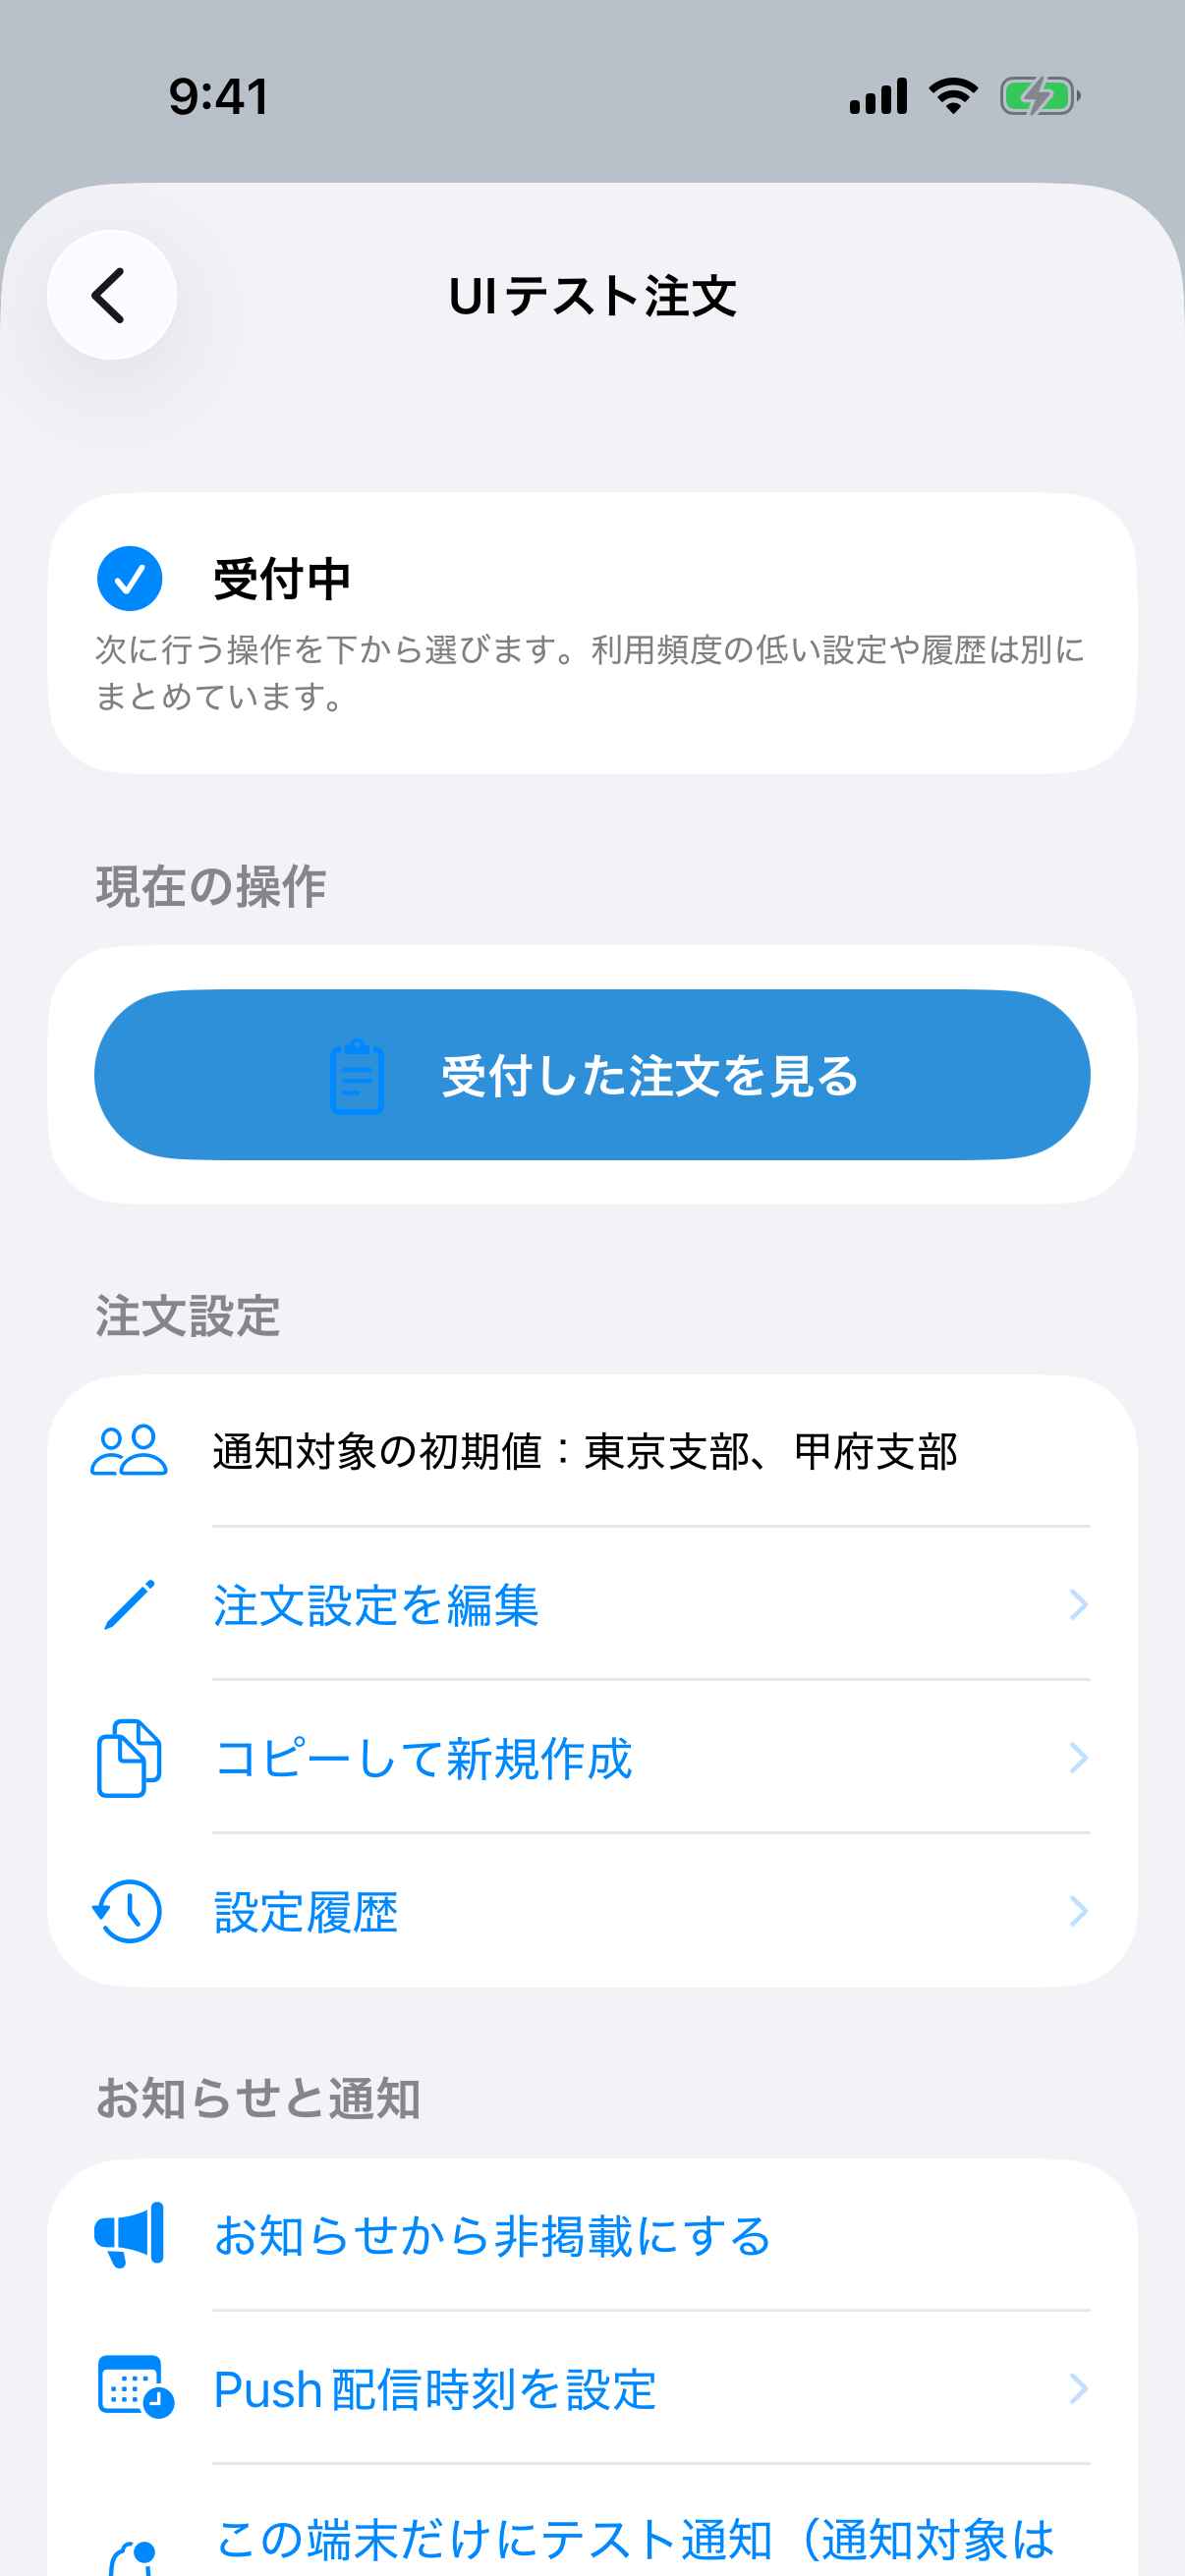
Check the state on the detail screen, then continue down to Announcement and Push for scheduling and the current-device test.
Japanese example of the upper part of the same detail screen. The testing and delivery controls continue below.
Send a test to this device only
Allow notifications on the current iPhone and check This device is registered under Settings → Notifications.
Tap Send test to this device only (audience ignored) once. It does not send to the selected branches or other users.
On the physical device, check receipt and the destination reached from the announcement and its order link. Even after a successful provider response, Focus or banner settings may suppress a visible alert.
Japanese example. Testing always targets the current administrator device, independent of branch selection.
Choose an audience for each Push reservation
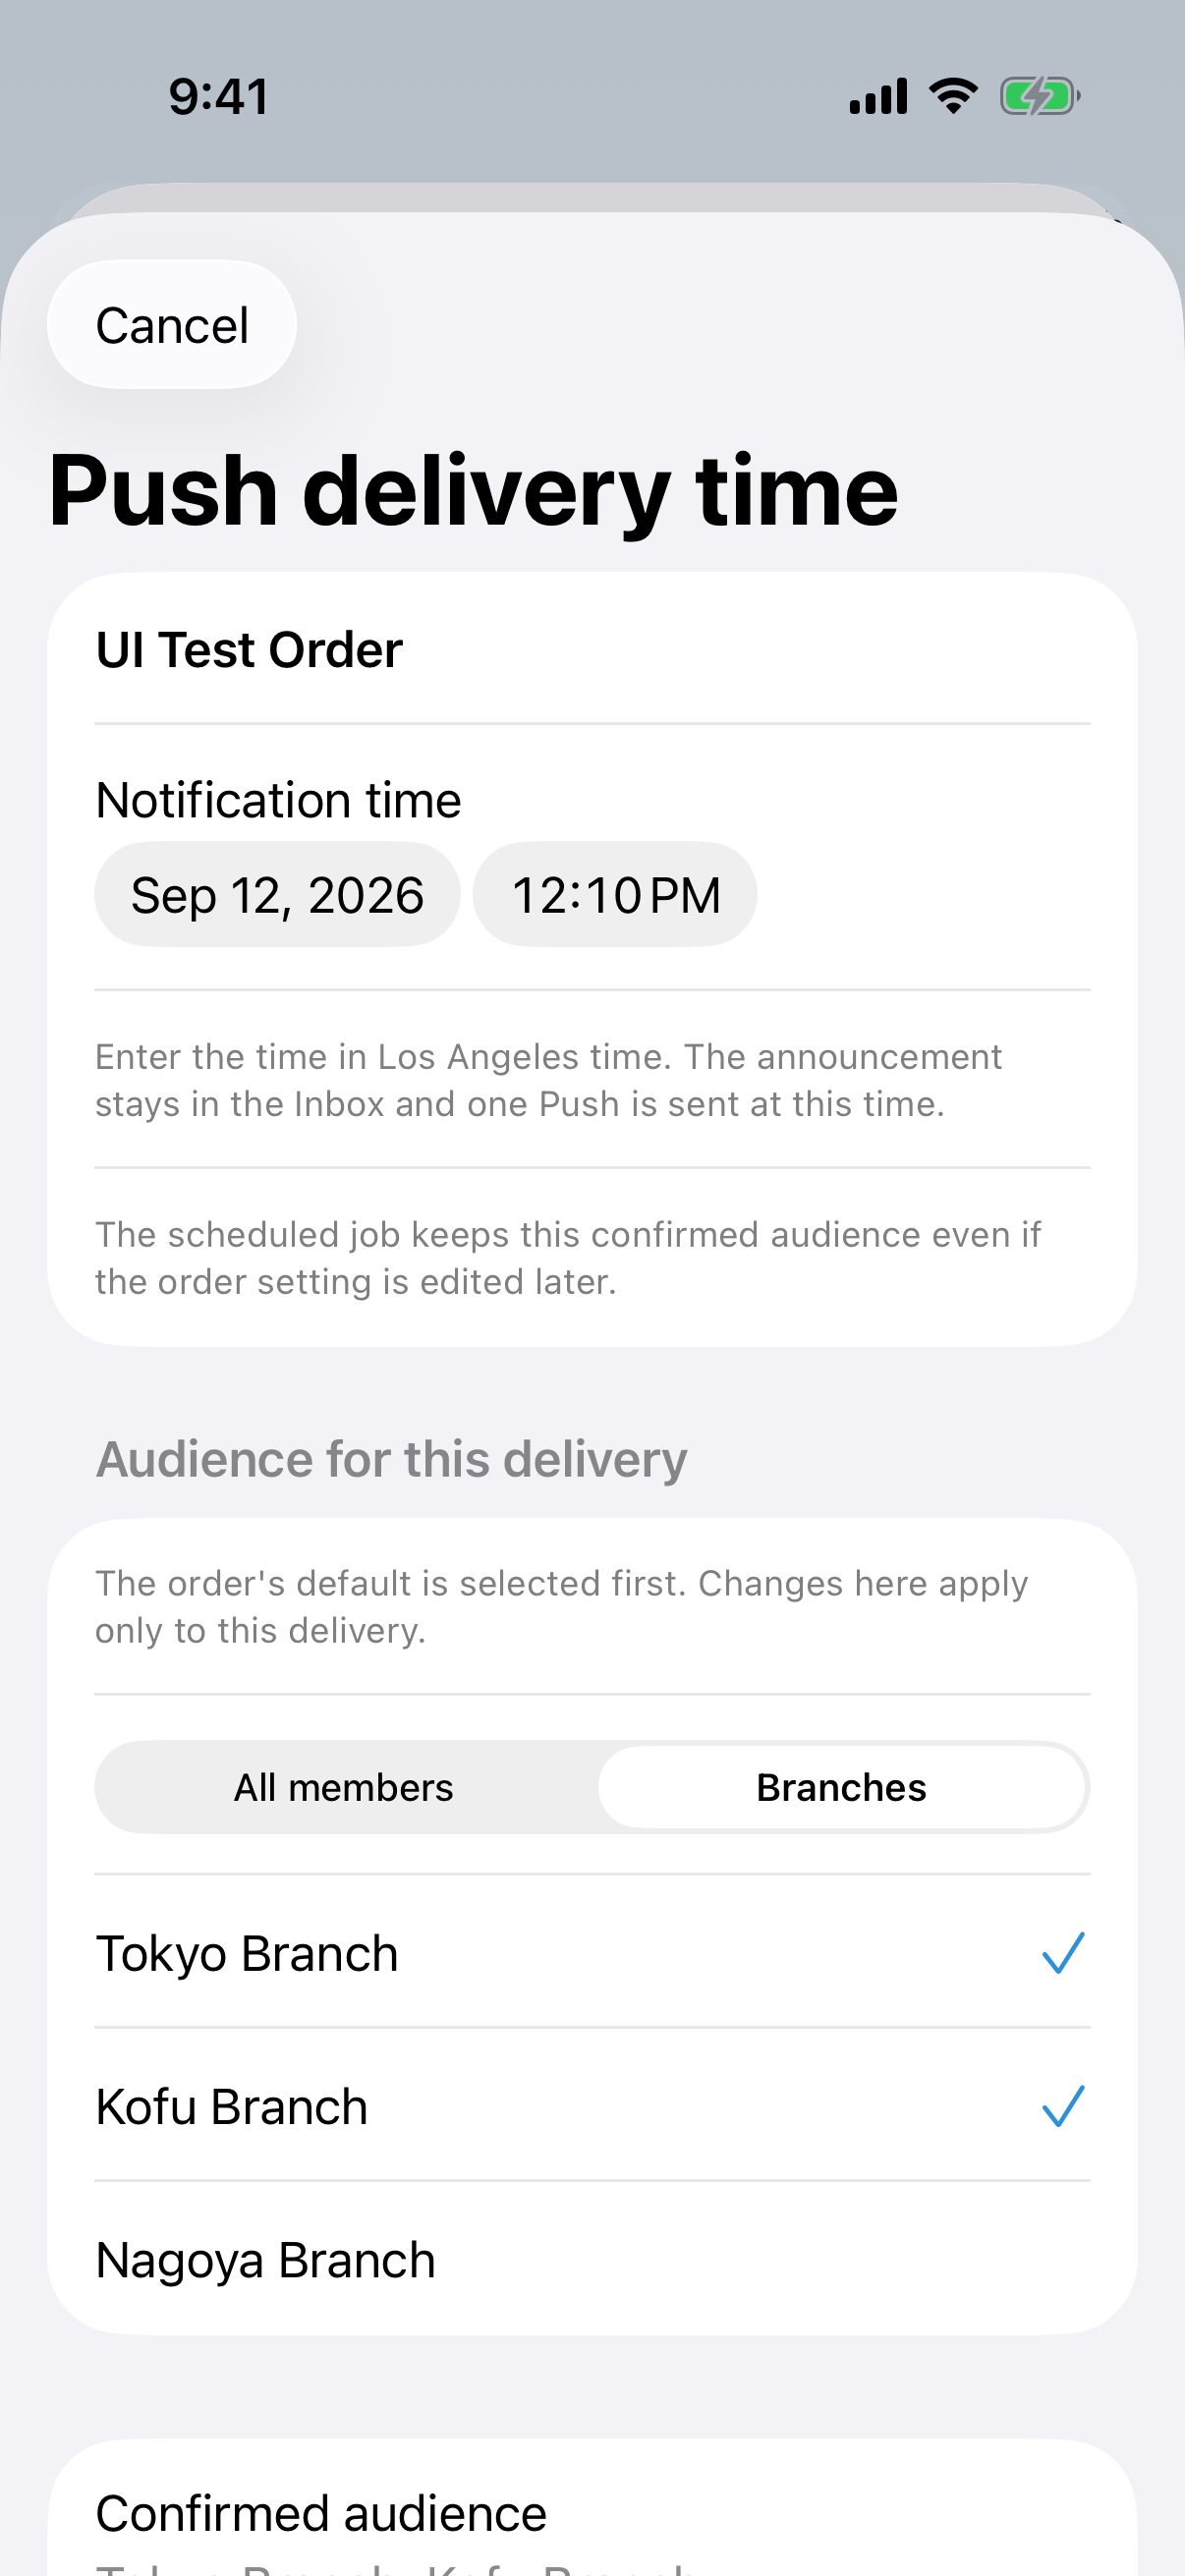
1. Open the delivery-time screen
Open Set Push delivery time for the published order.
Set Notification time in Los Angeles time, then scroll down.
This announcement Push time is separate from the order opening and closing dates.
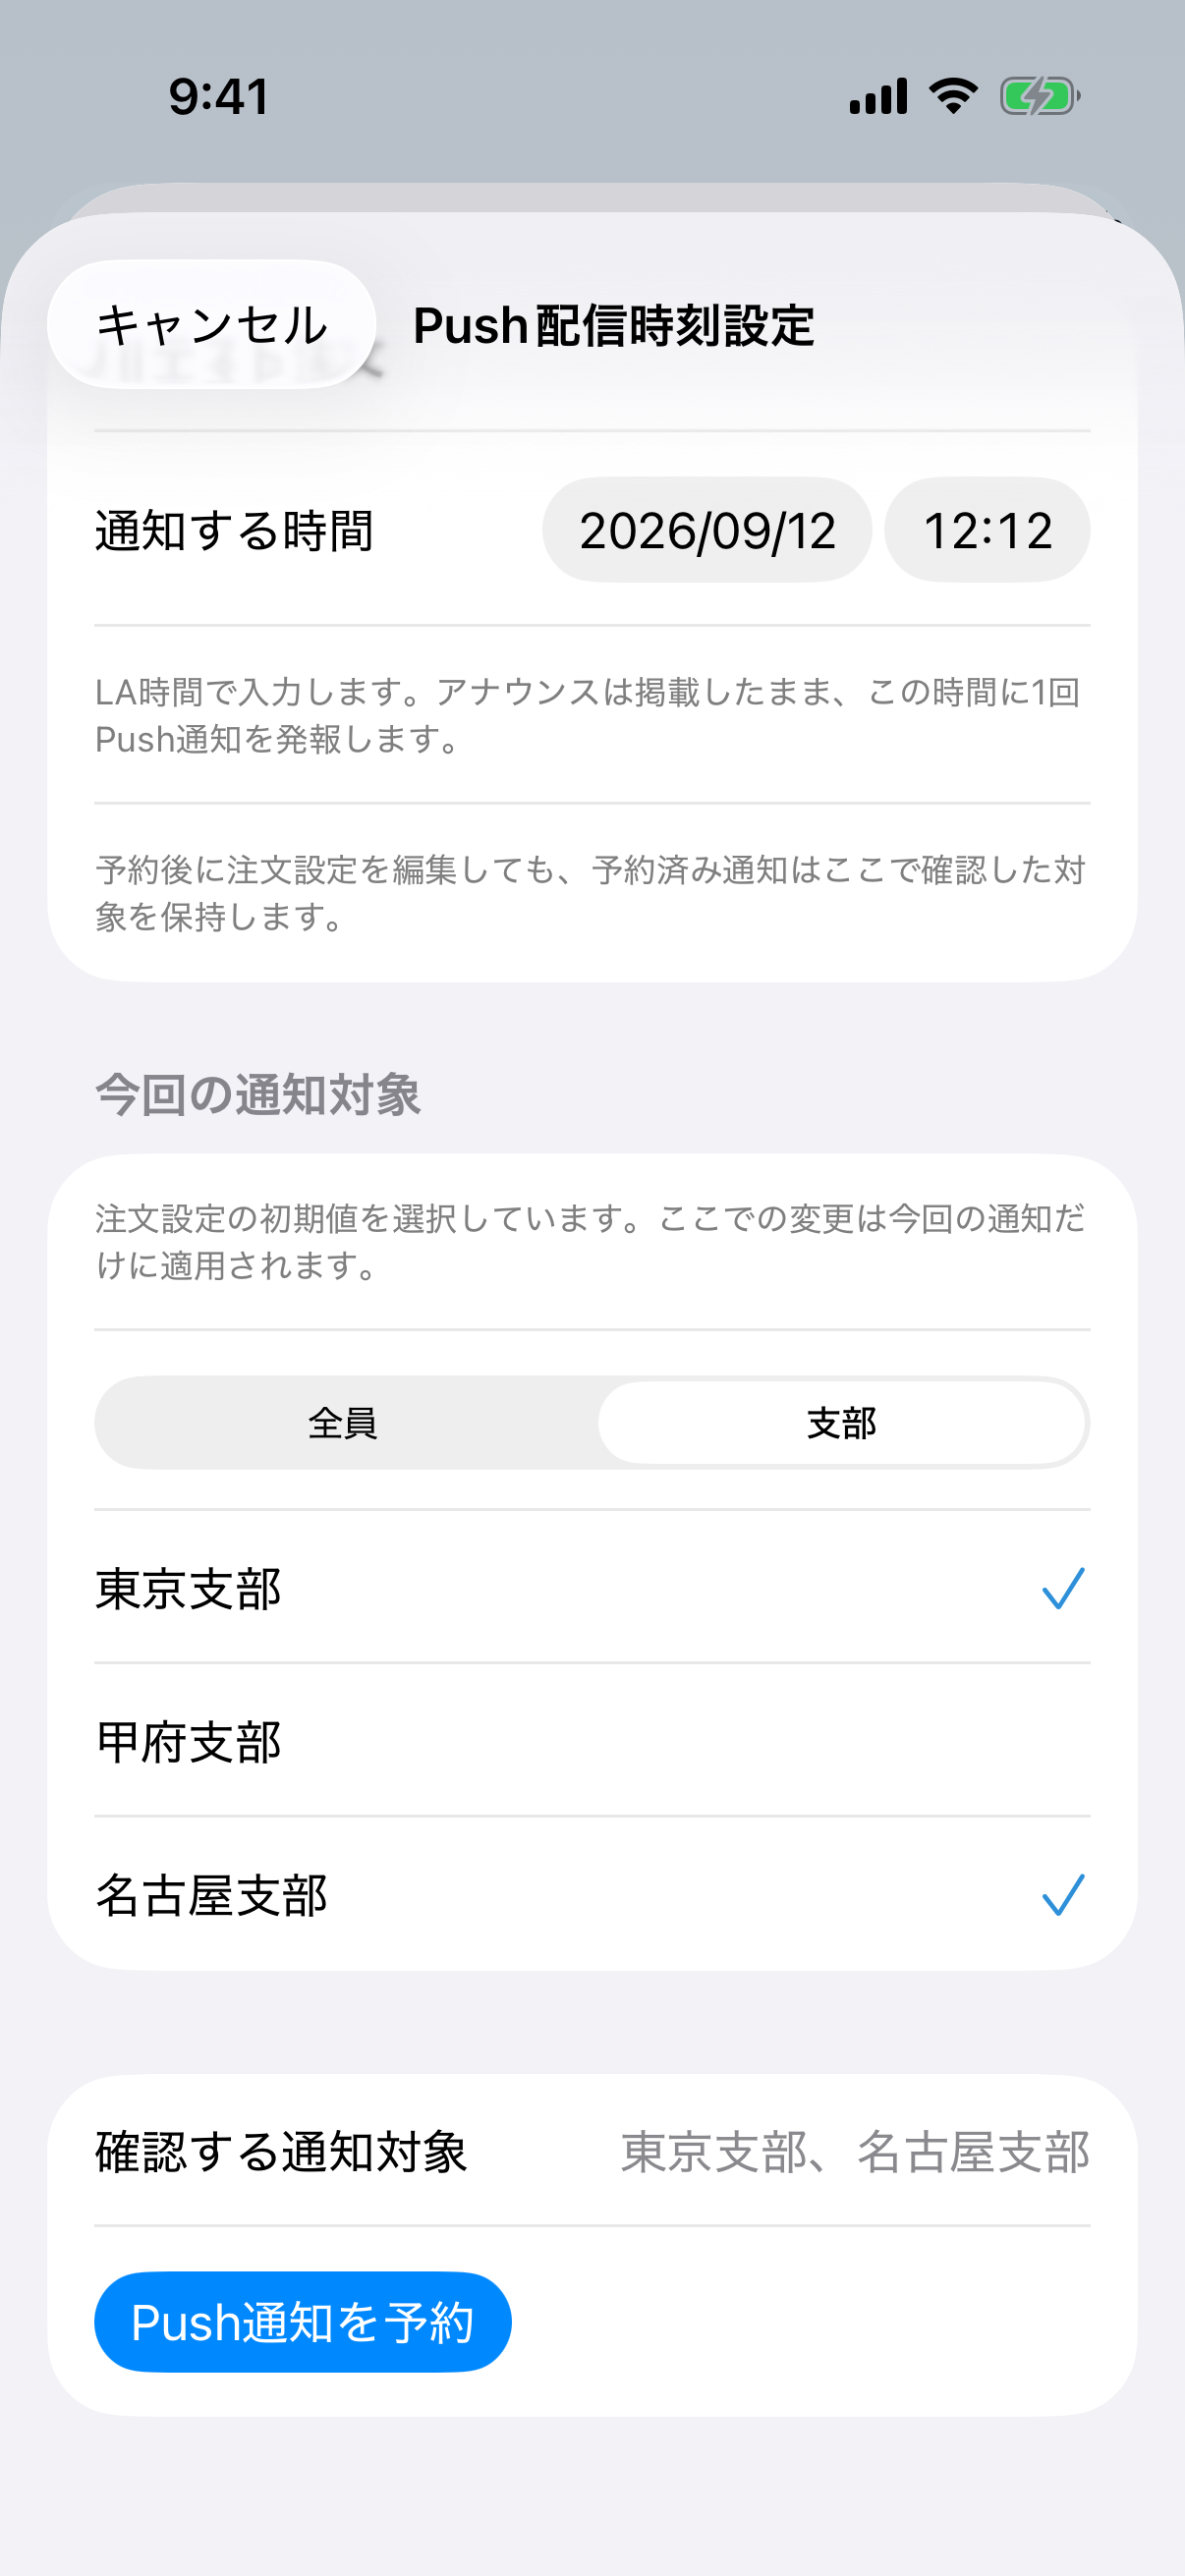
2. Choose Audience for this delivery
Audience for this delivery initially selects the default saved with this order.
For a different audience this time, choose All members or Branches. Branch mode requires at least one selection and supports several.
This change affects only this delivery. The saved order default and the main screen's Default audience for new orders remain unchanged.
At the bottom, check every name under Confirmed audience, then tap Schedule Push notification once.
Back in the detail screen, check the reserved time and Scheduled audience. Later changes to either default do not change this reservation.
Japanese example from internal TestFlight iOS 1.20 (build 240). Choose a different audience for this notification without editing the order setup.
Change a reservation: reopen Set Push delivery time, choose the audience and time for this delivery, then schedule again. The screen starts from the order default, so recheck any override used for the previous reservation.
Cancel an unsent reservation: tap Remove from announcements on the detail screen. This withdraws the announcement and cancels its unsent reservation. Publish again and review the audience and time before scheduling another notification.
Check delivery: review the displayed state and accepted/failed counts. If delivery is still being resolved, check the updated state before taking another action.
See order audiences in the list
Orders for your branches or everyone appear first; other branches appear gray below.
See branches in order settings
The same priority applies within each status section. If an individual delivery overrides the order audience, its announcement shows that recorded delivery audience.
Review received orders
Use View received orders to inspect items, quantities, and comments, then Create CSV → Share CSV when needed. Tap Close order acceptance at the bottom of the detail screen to stop acceptance, or Reopen orders to resume. Member ordering, editing, and cancellation are explained in the Announcements & Orders manual.
Event pages and menus: App Pages and App Navigation authoring moved to the Member Web Guide. Pages added from Member Web are time-sensitive event content and belong under Events.
4. Before you finish
Both languages are complete and say the same thing.
Dates, times, phone numbers, and links were checked by another person.
No private information is in a public page, Inbox item, push message, or media caption.
The result was opened as a normal user, not only as an administrator.
For deletion or a large bulk change, a second administrator reviewed the selection.
Open what was published or updated
Available in internal TestFlight iOS 1.20 (build 242). These changes are not yet included in the public App Store version. Updated links appear in new announcements created after server support is enabled.
The site-update Push contains a short summary of update categories and counts. When the Store has new products, the summary includes a count such as “6 new Store items.”
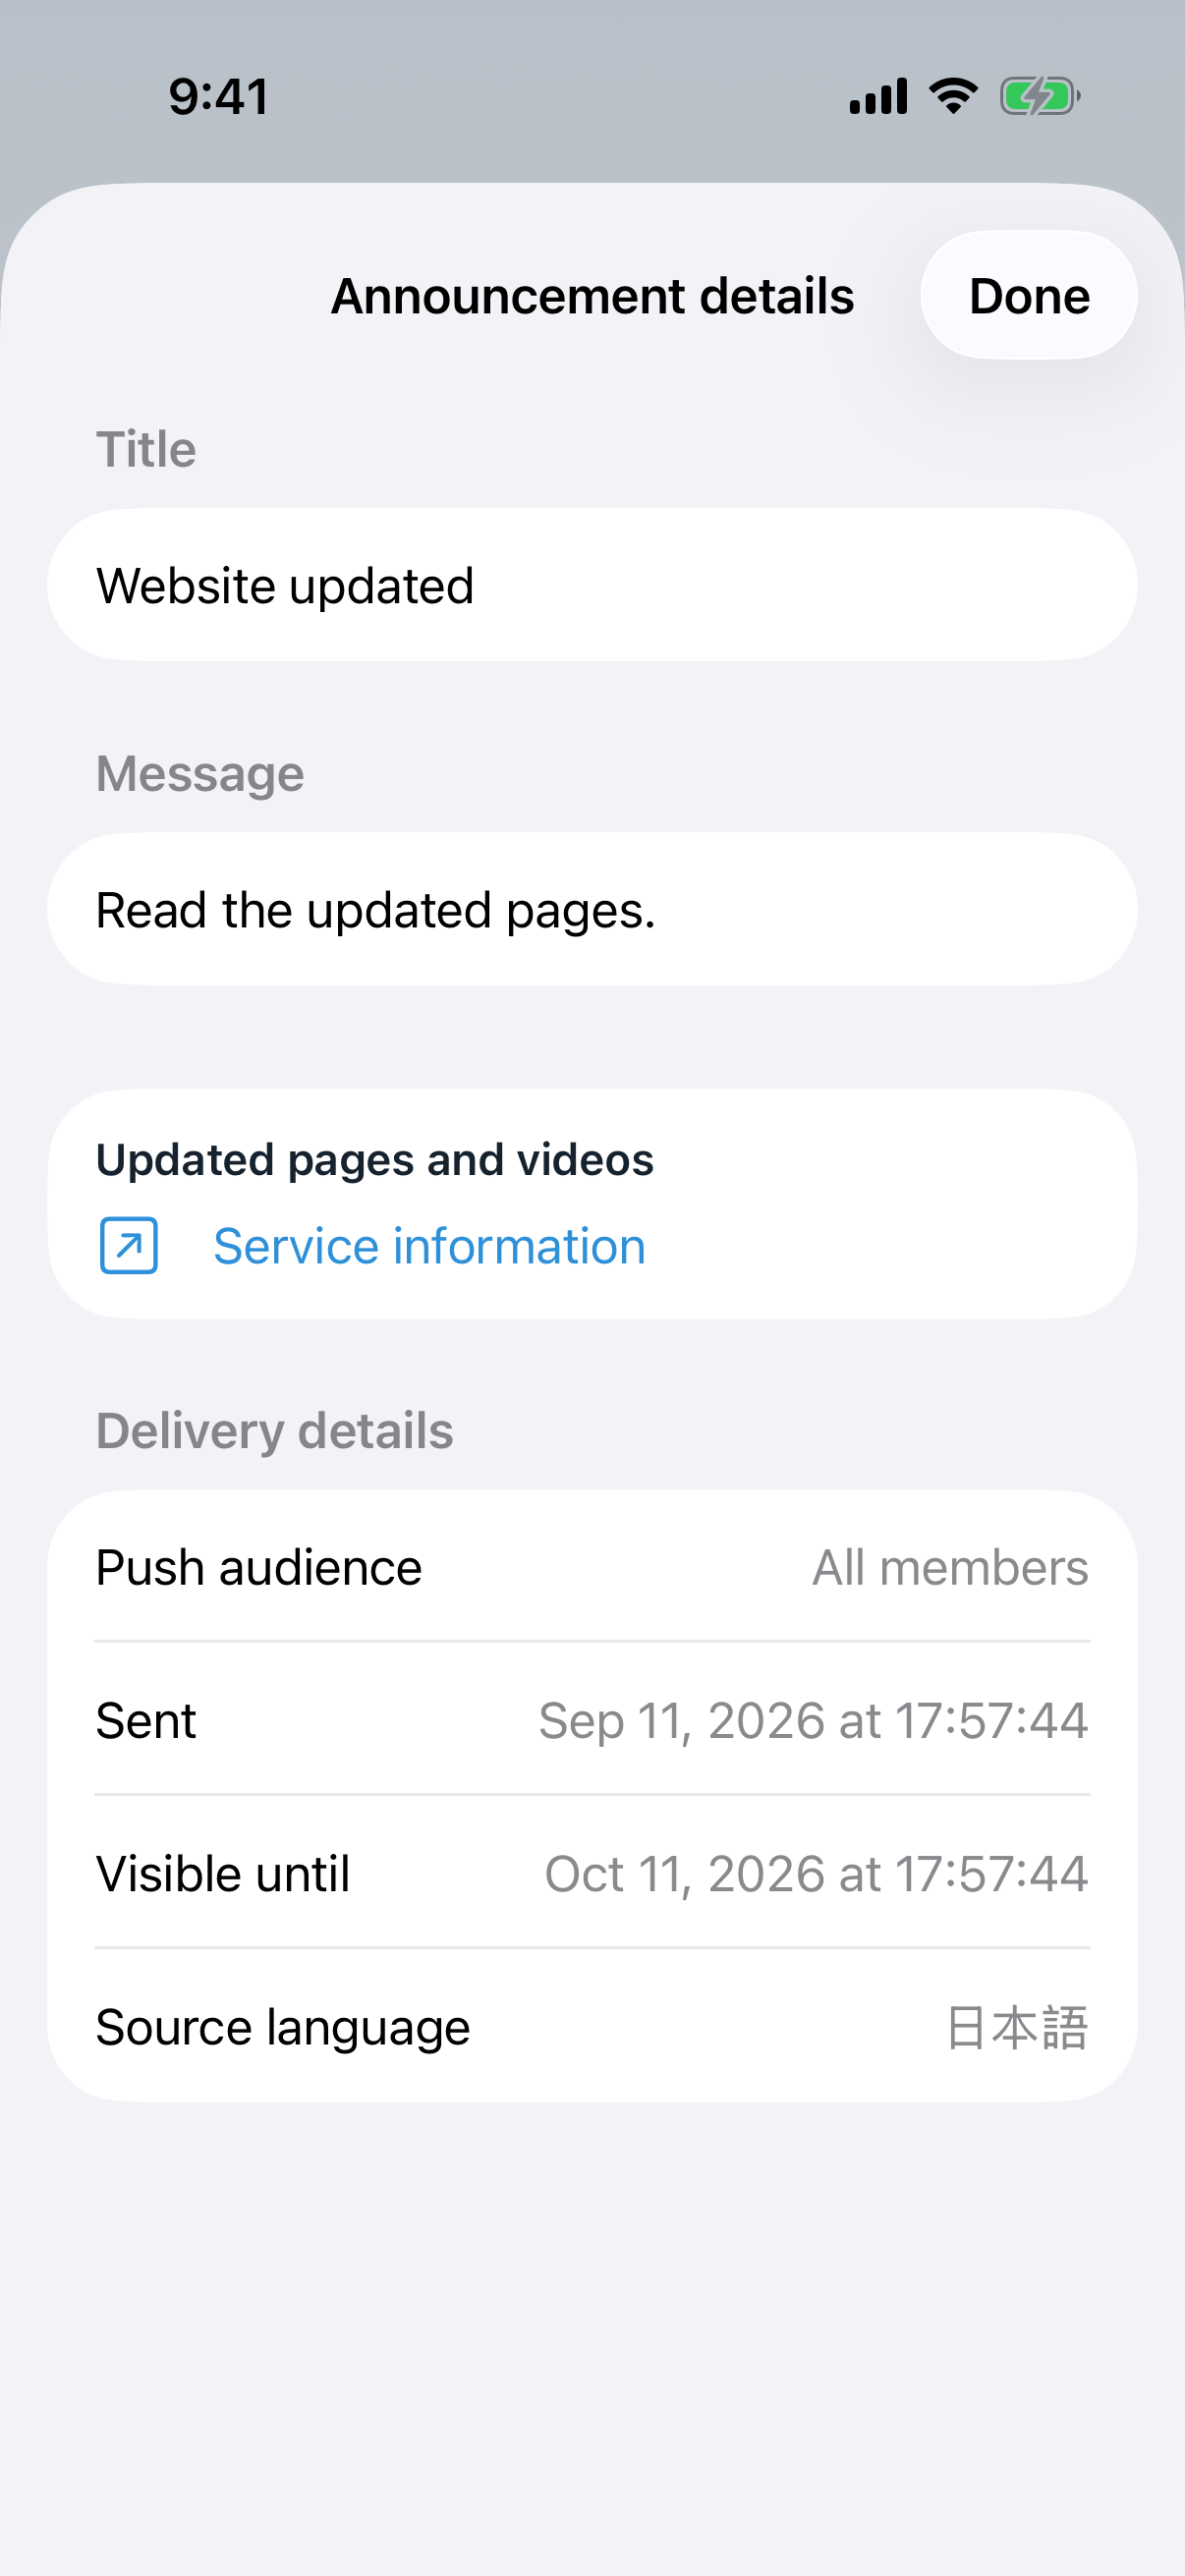
Tap the notification to open that announcement's details. Under Updated pages and videos, the saved titles identify updated pages, videos, Verse Cards, and Store products.
Tap a title once to open the exact page, video, or Store product. Individual titles and destination URLs are not included in the Push text.
See which pages and videos were published from the Inbox.
Actual iOS 1.20/242 screens with sample content for this guide.
Tap a title in details to open the published page.
Actual iOS 1.20/242 screens with sample content for this guide.
New uploads from Davar Kingdom of God and Jun Asai on YouTube join the daily site-update digest at 8:00 AM Los Angeles time. New products found through the public Japanese and English Store APIs join the same digest as a separate Store count, and the detail saves each exact product title and product-page link. The first successful YouTube or Store fetch establishes a quiet baseline without notifying old items. A failed fetch preserves that baseline and does not turn older items into new updates on recovery. Instagram, Facebook, and X entries in Links are not currently included in update notifications.
Announcement retention: an announcement with no explicit expiry disappears from the list 30 days after publication. An explicit expiry takes precedence. Expiring an order-related announcement does not delete the order itself. Expired announcements are not shown. A deleted announcement disappears after a successful sync; offline cached announcements may remain visible until their expiry.
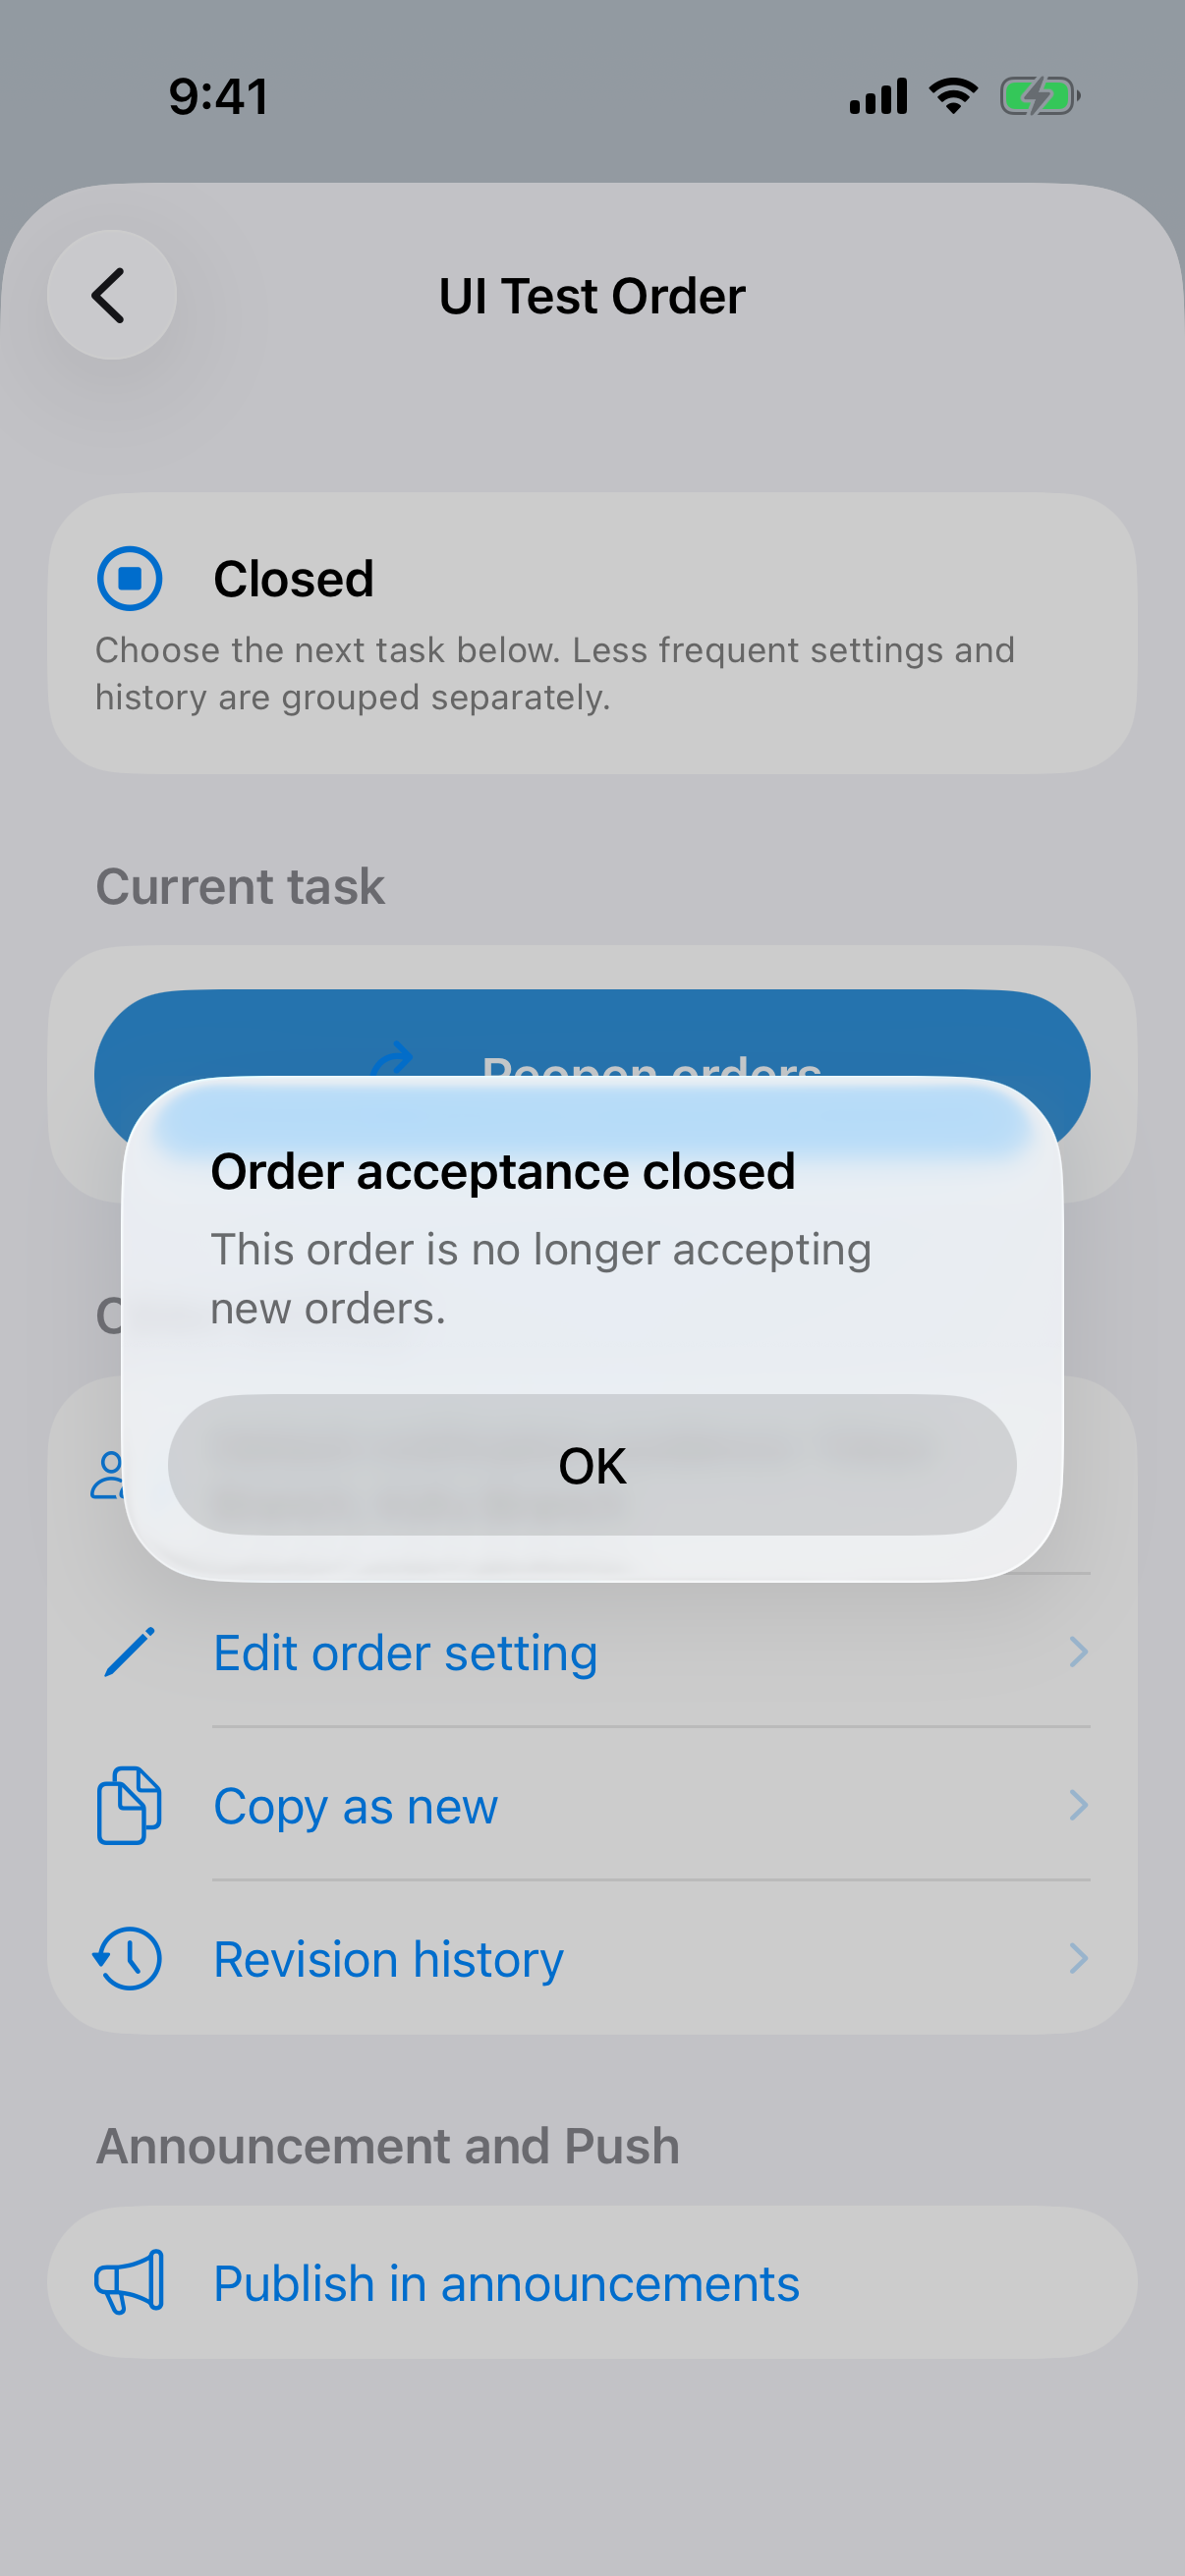
Confirm that order acceptance has closed
“Order acceptance closed” confirms completion. A failed request shows an error rather than success.
Actual iOS 1.20/242 screens with sample content for this guide.